About once a month, I take my son to a potluck with a bunch of other parents and toddlers. It's a lot of fun, and I like to switch things up with what I bring each time. This breakfast casserole is really easy to put together, and it was a huge hit with our Supper Club a while back, so I decided to make it again. It's great for parties because it's really low maintenance and makes a lot. The texture that this casserole gets from the stuffing mix is just wonderful, and it's really flavorful. You could totally play around with what types of ingredients you add into this. It was a big hit at the potluck, and I even managed to bring home a few pieces for Dino to enjoy after work.
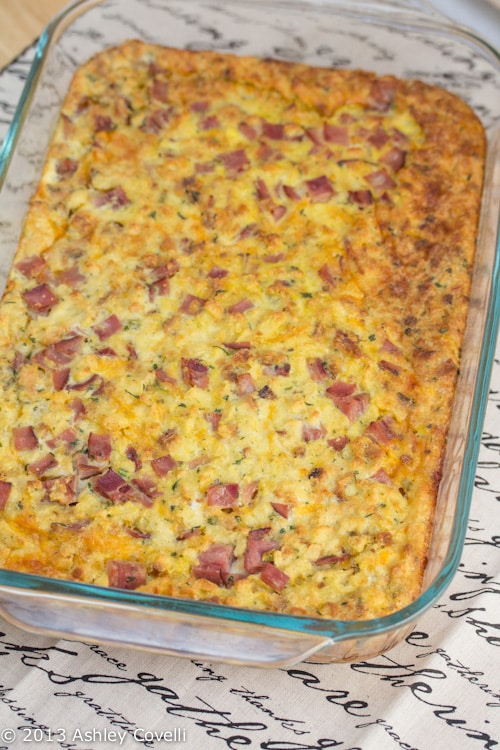
Easy Breakfast Casserole
food.com - Merlot
Prep Time: 20 mins
Cook Time: 45 mins
Total time: 1 hr 5 mins
Servings: 6
This is a tasty and easy breakfast casserole. Serve with a bowl of fresh fruit. Wonderful!
2 cups dry chicken stove top stuffing mix (from the canister)
2 cups milk
1 ½ cups cubed ham (or use Bob Evans Sausage, cooked, drained well, and crumbled)
6 eggs, beaten
1 cup cheddar cheese, shredded
½ teaspoon salt
1. Preheat oven to 350 degrees Fahrenheit.
2. Lightly grease a 9 x 12 baking dish.
3. Mix all the ingredients together.
4. Pour into prepared baking dish.
5. Bake for about 45 to 50 minutes or until set.
Big Flavors Rating: 5 Stars