Big Flavors from a Tiny Kitchen

menu icon
go to homepage
  • Recipes
  • About
  • Events
  • Contact
  • Subscribe
    • Facebook
    • Instagram
    • Pinterest
  • subscribe
    search icon
    Homepage link
    • Recipes
    • About
    • Events
    • Contact
    • Subscribe
    • Facebook
    • Instagram
    • Pinterest
  • ×
    Home » Recipes

    Steakhouse Style Steak

    February 12, 2015 by Ashley 1 Comment

    Steakhouse Style Steaks

    My husband is always up for a challenge when it comes to quality steak and a cast iron skillet.

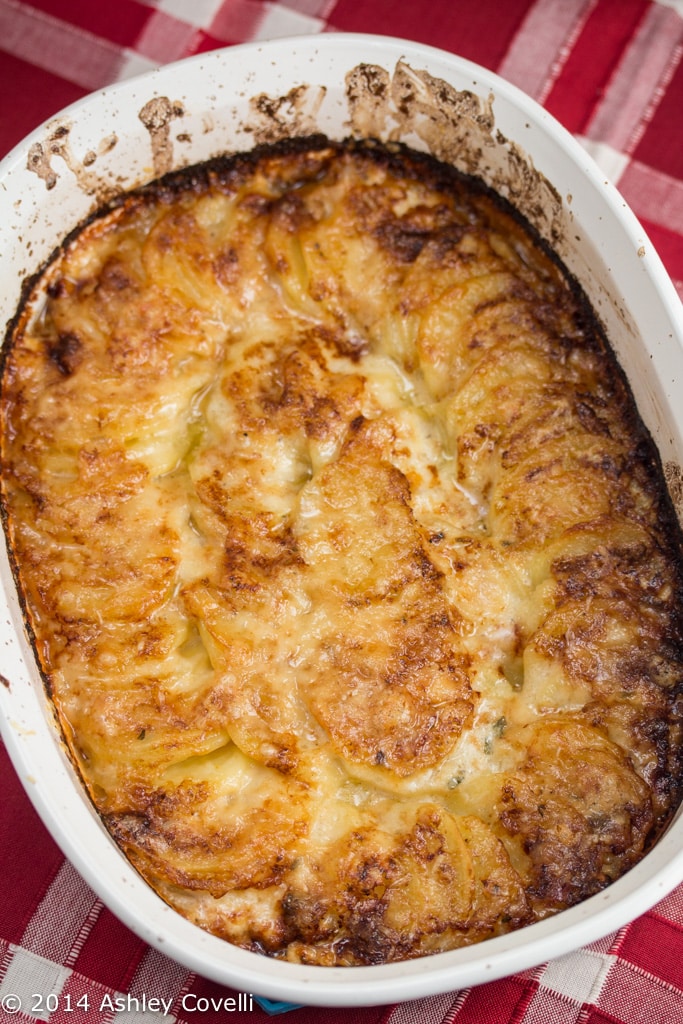
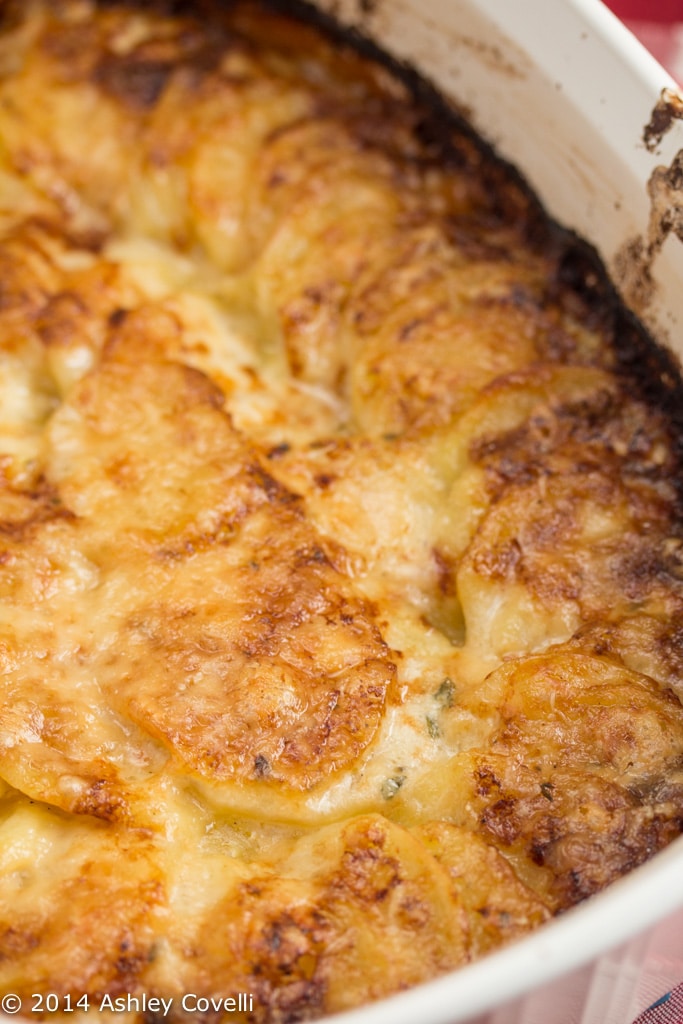
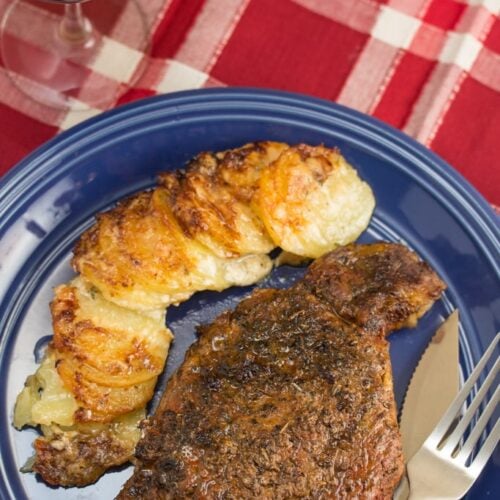
    So when I presented him with 2 giant steaks from the Farmers Market and asked him to cook 'em up to go with the Hasselback Potato Gratin that I was making for dinner, he was totally on board.

    He was practically Ron Swanson giddy over the whole thing.

    Steakhouse Style Steaks

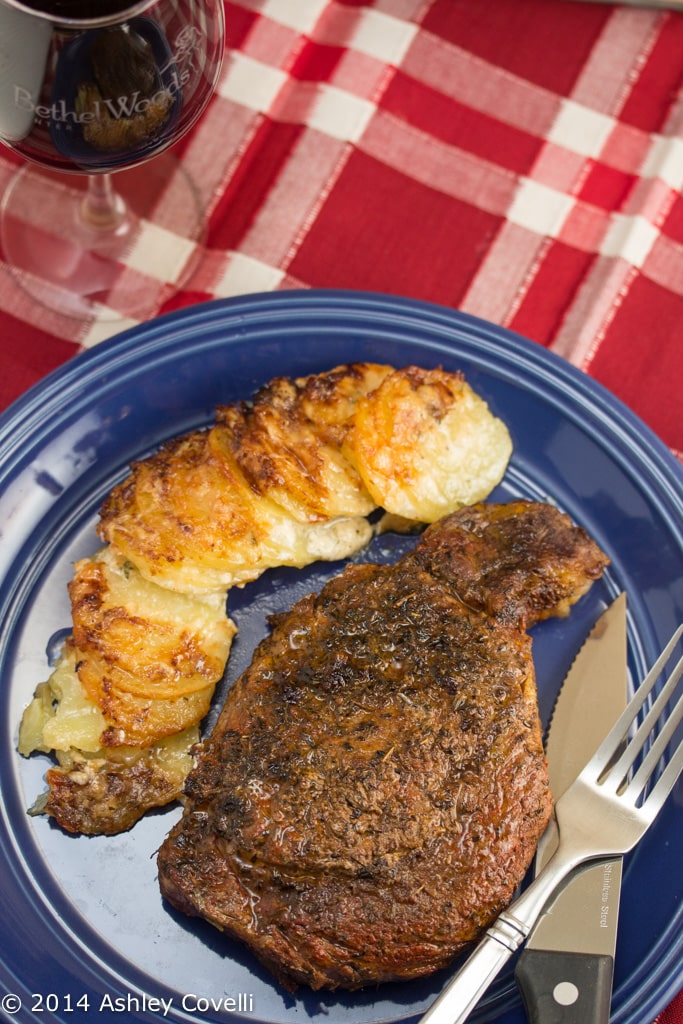
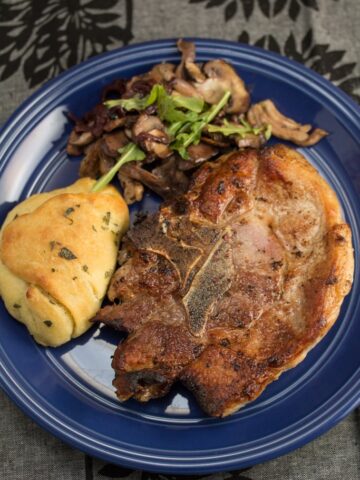
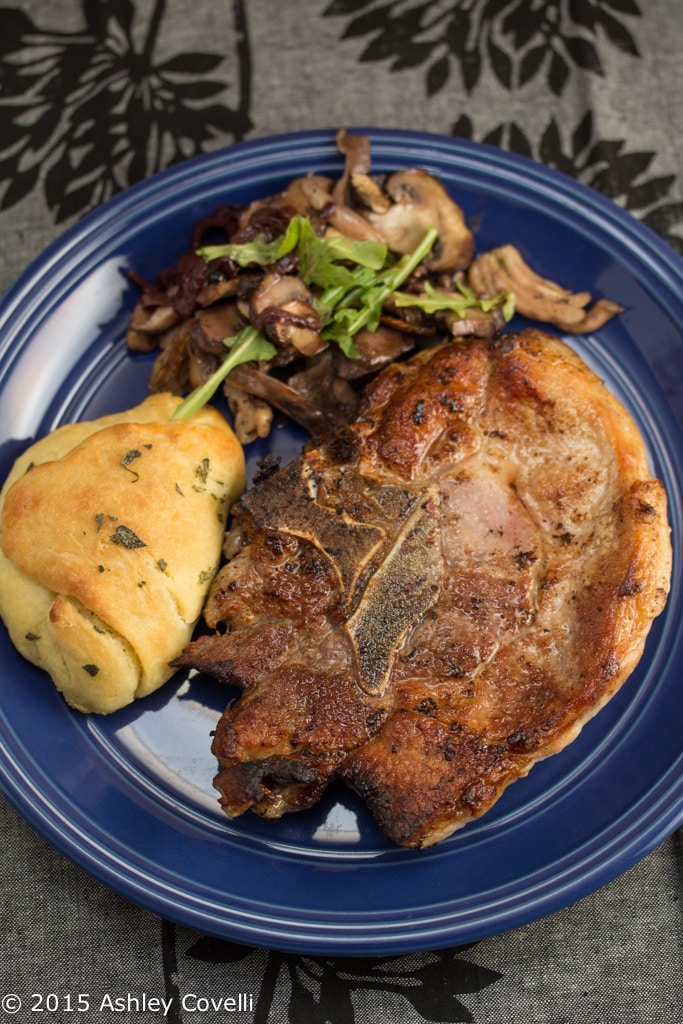
    This method of cooking steak is the closest you can get to having a steakhouse in your own home. Searing it quickly in the cast iron skillet and then finishing it off in a low oven ensures that your steak gets that beautiful crust on the outside without overcooking.

    This would be an impressive main course for Valentine's Day for sure! Serve it with a nice glass of wine and a chocolatey dessert for a supremely romantic evening.

    One-Pan Orecchiette with Chickpeas and Olives

    February 11, 2015 by Ashley Leave a Comment

    One-Pan Orecchiette with Chickpeas and Olives

    I'll get right to it - this pasta dish rocks! It's simple and delicious, and a nice change of pace from the standard quick pasta dishes that I've had in the past.

    Gather your ingredients and cook 'em all at once in this simple Mediterranean inspired pasta dish. The water that cooks the pasta and it all gets infused with wonderful aromatics that reduce to a beautiful sauce.

    One-Pan Orecchiette with Chickpeas and Olives

    I wasn't able to get orecchiette, so I ended up using large shells and it worked out beautifully.

    I was majorly impressed with this dish. I kept going back for more. My husband isn't usually a big fan of olives, but they really helped balance the flavors in this dish, which he enjoyed.

    The chickpeas make it nice and substantial, and the fragrant rosemary and spicy pepper flakes tied it all together. And wilting the greens down into the pasta means that salad is included in the bowl. Winning!

    12 ounces orecchiette
    1 can (15.5 ounces) chickpeas, drained and rinsed
    ½ cup Kalamata olives, pitted
    2 tablespoons tomato paste
    3 cloves garlic, thinly sliced
    1 6-inch sprig rosemary
    3 tablespoons extra-virgin olive oil, plus more for serving
    ¼ teaspoon red-pepper flakes, plus more for serving
    Coarse salt and freshly ground pepper
    ½ cup grated Parmigiano-Reggiano (about 1 ½ ounces), plus more for serving
    2 cups baby arugula (about 2 ounces)

    See Martha Stewart Living for the full recipe.

    8 Favorite Chocolate Desserts for Valentine's Day

    February 10, 2015 by Ashley Leave a Comment

    Peanut Butter Brownie Pie with a Pretzel Crust

    Valentine's day is right around the corner, and nothing says "I love you" like chocolate.

    And none of those cheesy heart shaped bargain bin chocolate assortments - we're talking about decadent, homemade treats.

    Let's celebrate with 8 of my favorite chocolate recipes that are perfect for your sweetheart... or just yourself and a Netflix marathon. Chocolate doesn't require a partner in crime!

    Peanut Butter Brownie Pie with a Pretzel Crust

    Peanut Butter Brownie Pie with a Pretzel Crust - Why choose between baking a batch of brownies or a pie when you can have BOTH? Especially when it's topped with an ooey gooey peanut butter swirl, all baked into a pretzel crust.

    Espresso-Chocolate Shortbread Cookies

    Espresso-Chocolate Shortbread Cookies - These cookies are beyond fabulous! They're delicate yet rich, and have the perfect balance of bittersweet chocolate and espresso.

    Baked Chocolate Doughnuts with Chocolate Glaze

    Baked Chocolate Doughnuts with Chocolate Glaze - These donuts are nice and tender, and the glaze is dark and delicious. They hold up really well for a few days, too. Plus, do we ever need an excuse to use sprinkles?

    Nutter Butter Icebox Cake

    Nutter Butter Icebox Cake - We already know that chocolate and peanut butter are besties. But this icebox cake brings it to an all-new, no-bake level of decadence.

    Chocolate Cupcakes with Salted Caramel Frosting

    Chocolate Cupcakes with Salted Caramel Frosting - The sweetness of the salted caramel cream cheese frosting is balanced by the bittersweet chocolate in these tender cupcakes.

    One-Bowl Mocha Brownies

    One-Bowl Mocha Brownies - Easy and delicious! A chocolate fix and an extra caffeine kick at the same time? Sign. Me. Up.

    Melt-in-Your-Mouth Buttermilk Chocolate Cookies

    Melt-in-Your-Mouth Buttermilk Chocolate Cookies - These cookies really do melt in your mouth. The buttermilk keeps the cookies incredibly moist, and the chocolate chips get melty and delicious.

    Chocolate Chip Cookie in a Cup

    Chocolate Chip Cookie in a Cup - Need something incredibly low maintenance yet still homemade? This is crazy easy and can be put together in a snap with just a few ingredients.

    Not in the mood to make something from scratch? No problem! Millcreek Cacao Roasters sent me a drop dead gorgeous assortment of their chocolates and Cacao Tea to sample, and I must admit I was majorly impressed! Millcreek consider themselves Farm to Bar Chocolate Makers for good reason - they have traveled the world searching for responsibly grown cacao and buy direct from farmers who use sustainable growing methods.

    Millcreek Cacao Roasters

    They do all of the sorting, roasting, winnowing and milling at their factory in Utah. The cacao used in their chocolate products is a pure heritage cacao called Arriba Nacional from Equador. They also use a proprietary method to naturally cure their chocolate with hints of flavor, such as in the Cool Peppermint and Luscious Raspberry pictured above.

    Millcreek Cacao Roasters

    I'm a big fan of dark chocolate, and this stuff did not disappoint. All of the varieties I tried were 70% dark, and they were incredibly smooth. My favorites are the Pure and Himalayan Pink Salt. This would be a great gift for your Valentine... or yourself!

    Note: I was given samples of Millcreek's products for review purposes, but was in no other way compensated. All opinions are 100% my own. Just sharing the chocolate love!

    Linguine with Cauliflower Pesto

    February 9, 2015 by Ashley Leave a Comment

    Linguine with Cauliflower Pesto

    Reserved pasta water "cooks" the sauce in this delicious vegetarian pasta dish.

    The food processor does most of the work for this dish. You pulse ingredients and then mix them together with piping hot linguine, adding pasta water to thin it out to your desired consistency.

    Linguine with Cauliflower Pesto

    It takes a little bit of time to toast the nuts and get everything pulsed and mixed together, but you can do most of it while the pasta water comes up to a boil.

    I really enjoyed the richness that the sun-dried tomatoes and capers added to this dish. I used Pecorino Romano cheese and it worked out great! Next time, I'd probably pulse the cauliflower a little bit finer, but the taste was great, and my Italian husband really enjoyed it, too.

    Salt
    1 small head or ½ large head cauliflower (about 1 pound or 455 grams), trimmed of leaves, cored and cut into large chunks
    1 garlic clove
    Generous pinch of red pepper flakes
    ½ cup (70 grams) almonds or pine nuts, toasted and cooled
    2-ounce (55-gram) chunk Romano or Parmesan cheese, plus a little more for passing
    4 sun-dried tomatoes (dry variety; if oil- packed, be sure to mince them by hand separately, so the oil doesn't gum up the food processor mixture, before you add them)
    1 tablespoon drained capers
    Few tablespoons fresh parsley leaves
    ⅓ cup (80ml) olive oil
    ½ to 1 teaspoon sherry vinegar (to taste)
    1 pound (455 grams) linguine

    See The Smitten Kitchen Cookbook for the full recipe.

    Hearty Red Lentil Soup

    February 7, 2015 by Ashley Leave a Comment

    Hearty Red Lentil Soup

    This cumin and chili-scented 5 ingredient soup comes together in a snap! A big dollop of yogurt at the end cools it off.

    I enjoyed this soup, but Dino wasn't really into it. He may have liked it more if I puréed it after cooking, but I didn't mind the texture. It came together really quickly, which was perfect for a busy weeknight.

    Hearty Red Lentil Soup

    185g dried red lentils, rinsed
    ½ - 1 teaspoon dried chilli flakes
    1 tablespoon ground cumin
    400g can tomatoes, chopped
    natural yoghurt, to serve

    See 5 Ingredients 10 Minutes: Delicious, Healthy Recipes for Tired and Hungry Cooks - Jules Clancy for the full recipe.

    Honey Mustard Chicken

    February 6, 2015 by Ashley Leave a Comment

    Honey Mustard Chicken

    This sweet-and-tangy, rosemary-scented baked chicken is perfect for a no-fuss, tasty dinner.

    This was so easy to put together, and the flavor was great. I should have added a little more Dijon than honey because it was a bit on the sweet side, but I really liked the flavor that the rosemary added.

    Honey Mustard Chicken

    I served this with Creamed Spinach with Chickpeas and some No-Knead Crusty White Bread that I had leftover, and it was a delicious meal!

    My only complaint is that the chicken didn't brown on top too much, so the skin was a little... meh. But when Dino reheated it for lunch the next day, he baked it a little and then broiled for a few to get the skin a little crispy. Good call!

    Honey Mustard Chicken

    • ¼ to ⅓ cup smooth Dijon mustard
    • ¼ to ⅓ cup honey
    • 1 tablespoon olive oil
    • 2-3 pounds chicken thighs (or legs)
    • Salt
    • 2 sprigs rosemary (or a generous sprinkling of dried rosemary)
    • Freshly ground black pepper

    See Simply Recipes for the full recipe.


    Creamed Spinach with Chickpeas

    February 5, 2015 by Ashley Leave a Comment

    Creamed Spinach with Chickpeas

    My husband loves creamed spinach, but I rarely make it because it's so indulgent. But when I came across this recipe in one of my favorite cookbooks, I knew it would be a hit!

    Chickpeas make this a heartier, healthier version of this classic side dish. It was simple to put together and really tasty. Don't shy away from salt and pepper to really make this dish pop!

    Creamed Spinach with Chickpeas

    I served this with Honey Mustard Chicken and some leftover homemade No-Knead Crusty White Bread and it made for a really delicious dinner.

    And, of course, I took the leftovers and put a fried egg on top for lunch the next day. It was fantastic! The egg yolk mixed with the spinach and chickpeas... it was just so, so good.

    I highly recommend topping pretty much all of your leftovers with fried eggs 🙂

    A photo posted by Ashley Covelli (@bigflavors) on Jan 27, 2015 at 10:28am PST

    2 cloves garlic, finely chopped
    250g frozen spinach, thawed
    400g can chickpeas, drained
    4-6 tablespoons whipping cream
    lemon juice

    See 5 Ingredients 10 Minutes: Delicious, Healthy Recipes for Tired and Hungry Cooks - Jules Clancy for the full recipe.

    Old-Fashioned Lemon Cream Scones

    February 4, 2015 by Ashley Leave a Comment

    Old-Fashioned Lemon Cream Scones

    A friend of mine had a few people over for a pre-blizzard brunch party recently. I really enjoy making muffins and scones and love trying out new recipes, so this was the perfect excuse!

    Old-Fashioned Lemon Cream Scones

    Tender, lemon scented scones are topped with cinnamon sugar and baked till golden brown.

    I went the round route with these scones, and using a 2.5" cutter, got 10 scones from one batch of dough. I ended up making a second batch since it came together so easily. I didn't want to show up with not enough scones!

    Old-Fashioned Lemon Cream Scones

    The friend who recommended this recipe to me said that butter and homemade strawberry jam are the way to go with these beauties. I was going to make some jam but ran out of time, so I used some from Bonne Maman and it worked out beautifully.

    I really loved the extra spice that the cinnamon sugar topping added to these. I had a few leftover and they were perfect, reheated in the oven till warm, topped with just butter or a butter/jam/preserves combo.

    Old-Fashioned Lemon Cream Scones

    I'm interested in trying out the recipe author's suggestion for incorporating berries into the scones next time I make these (because there will be a next time) - it sounds heavenly!

    2 cups unbleached all-purpose flour
    2 tablespoons sugar
    1 tablespoon baking powder
    Grated zest of 2 lemons
    ¼ teaspoon salt
    4 tablespoons (½ stick) cold unsalted butter, cut into pieces
    2 large eggs
    ½ cup heavy cream
    ½ teaspoon ground cinnamon mixed with 2 tablespoons sugar (optional), for sprinkling

    See The Best Quick Breads - Beth Hensperger for the full recipe.

    Pan-Fried Barramundi with Thyme Roasted Peppers & Tomatoes

    February 3, 2015 by Ashley Leave a Comment

    Pan-Fried Barramundi with Thyme Roasted Peppers & Tomatoes

    Frozen seafood is a lifesaver on busy weeknights. I was in the middle of a hectic week that had me missing homemade food when I put this one together.

    Quick, colorful and delicious is always a good thing when it comes to weeknight meals!

    Pan-Fried Barramundi with Thyme Roasted Peppers & Tomatoes

    Mexican-Style "Rice" & Beef Casserole with Black Beans & Monterey Jack Cheese

    January 31, 2015 by Ashley Leave a Comment

    Mexican-Style "Rice" & Beef Casserole with Black Beans & Monterey Jack Cheese

    Mexican spiced quinoa, black beans and beef are baked underneath a layer of cheese until bubbly and golden.

    This was a really tasty, hearty casserole that was perfect for the cold weather we've been having here in New York. I liked it without any jalapeños on top, so I gave my husband all of the peppers.

    Mexican-Style "Rice" & Beef Casserole with Black Beans & Monterey Jack Cheese

    This recipe made a generous 4 servings for us, and it was great reheated for lunch later in the week.

    Just a note - the recipes from Blue Apron call for "1 bunch" of herbs, and that correlates to the size of the "bunch" they send if you're using their service (which I'm absolutely in love with!). I'd say their bunches are about 1-2 tablespoons.

    8 Ounces Ground Beef
    ¾ Cup White Quinoa
    1 15-Ounce Can Diced Tomatoes
    1 Cup Black Beans
    1 Green Bell Pepper
    1 Red Onion
    1 Bunch Cilantro
    3 Ounces Monterey Jack Cheese
    1 Jalapeño Pepper
    ½ Cup Mexican Crema
    2 Teaspoon Mexican Casserole Spice Blend (Ground Cumin, Smoked Paprika, Chile Powder, Garlic Powder & Cayenne Pepper)

    See Blue Apron for the full recipe.

    Brandied Cherry Clafouti

    January 29, 2015 by Ashley Leave a Comment

    Brandied Cherry Clafouti

    Our second contribution to this month's boozy Supper Club dinner was this Brandied Cherry Clafouti.

    Tart cherries are soaked in brandy and sugar before being baked into a lemon and allspice-scented batter.

    Brandied Cherry Clafouti

    I made a Blueberry Clafouti yeeeeeears ago and didn't really care for it, so when Dino said that he wanted to make a clafouti for our Supper Club dinner, I wasn't too excited.

    But boy did this recipe prove me wrong! This was light and airy, beautifully scented with lemon and allspice, not to mention those delicious brandied cherries. The taste is eggy/custardy and it went beautifully with the rest of our meal.

    Brandied Cherry Clafouti
    2 cups canned tart cherries, drained
    ¼ cup brandy
    ⅔ cup white sugar, divided
    cooking spray (such as Pam®)
    1 cup milk
    ⅔ cup sifted all-purpose flour
    3 large eggs
    1 tablespoon vanilla extract
    1 tablespoon lemon zest
    ¼ teaspoon salt
    ⅛ teaspoon allspice
    1 teaspoon confectioners' sugar, or as needed

    See Allrecipes for the full recipe.

    Whiskey-Glazed Carrots

    January 28, 2015 by Ashley 1 Comment

    Whiskey-Glazed Carrots

    Our January Supper Club dinner theme was Booze. We each picked a different type of alcohol to cook with, and the results were absolutely delicious!

    Whiskey, butter and brown sugar are reduced to give these tender carrots a shiny, delicious glaze.

    Whiskey-Glazed Carrots

    These carrots were sweet and delicious. They were simple to prepare, the only caveat being that the glaze took much longer than 5 minutes to reduce. I had a feeling it would - there's no way all that liquid is going to cook down into a glaze in such a short time.

    This would be a great side dish to go with pot roast, chicken or pork. And it's a great way to use up any extra carrots you have hanging out in the fridge.

    1 stick Butter, Divided
    2 pounds (to 3 Pounds) Carrots, Peeled And Cut Into Thick Circles
    ½ cup Jack Daniels Or Other Whiskey
    ¾ cups (to 1 Cup) Brown Sugar
    ½ teaspoon (to 1 Teaspoon) Salt
    Freshly Ground Pepper, to taste

    See The Pioneer Woman for the full recipe.

    Behind BF Volume 6

    January 27, 2015 by Ashley 1 Comment

    Apple, Cucumber, Avocado and Kale Green Smoothie

    This post was created in partnership with Stonyfield. As always, all opinions are 100% my own.

    How is January almost over already?! Time seems to be flying by faster than ever now, especially with a toddler at home. This past year has been a good one for me, health-wise, but there's always room for improvement.

    So when Stonyfield asked members of their YoGetters team to share their healthy family New Year's resolutions, I thought it would be a good opportunity for me to think about the ways that I want to involve my entire family in more healthy habits for 2015.

    A photo posted by Ashley Covelli (@bigflavors) on Jan 2, 2015 at 3:16pm PST

    My 3-year-old has a lot of fun helping out in the kitchen, so I'd like to get him in there more often this year. He usually helps out with things like cookies and scrambled eggs, so I'm hoping to get him to work on some more fun, healthy recipes. He's eager to learn, and hopefully if he helps to prep more ingredients, he'll be open to eating more things.

    Apple, Cucumber, Avocado and Kale Green Smoothie

    I'm hoping that we can also include more healthy snack options this year. It's so easy to reach for less-than-ideal options when you don't prepare in advance or have healthy treats in the house. And I was on a great smoothie kick for quite a while - that's a fun option that definitely gets my son excited about eating his fruits and veggies.

    A photo posted by Ashley Covelli (@bigflavors) on Jun 24, 2014 at 9:18am PDT

    Last year, my toddler was a big help with planting our annual container garden. He absolutely loved digging around, planting seeds, watering and snacking on the fruits and veggies that we grew. This year I'll have him help out even more!

    A photo posted by Ashley Covelli (@bigflavors) on Sep 9, 2014 at 2:53pm PDT

    We tried planting a few things from seed for the first time and got some... modest results. Tasty, but tiny. Hopefully we'll have a bigger bounty this year!

    A photo posted by Ashley Covelli (@bigflavors) on Sep 1, 2014 at 9:27am PDT

    And finally, exercise. Last year, we started doing a lot of family outings on the bike trails near my house. It was a great way to get some fresh air and spend time together doing something active and healthy. I want to do more of that this year. Plus, I got a hamburger bicycle bell, which makes me smile extra big every time we're out there. It's the small things, people!

    I'm still planning to continue running and doing yoga on my own - it's become very essential "me" time, but I definitely want to encourage healthy activity for the rest of my family, too, so I may see if there are ways that I can get them into that a bit, too.

    What are your goals for the year? Any favorite recipes that are good for the kids to help out with? Drop me a note in the comments - I'd love to hear your ideas.

    Hope 2015 treats everyone well!

    Strawberry Bread

    January 26, 2015 by Ashley Leave a Comment

    Strawberry Bread

    Strawberries were on sale at my local grocery store, so I wanted to find a creative way to use them. That's when I came across this recipe for strawberry bread.

    Strawberries and pecans are stirred into a cinnamon-scented bread dough and baked until golden.

    Strawberry Bread

    My son really enjoyed helping to slice the strawberries for this recipe, and it kept him busy while I got all of the other ingredients together. I cut the recipe in half to make one loaf, because I only have one loaf pan and I didn't think we needed 2 in the house.

    This bread turned out really well! It was nicely sweet and a little crunchy, with a nice crispy top. It was good plain and also toasted with a little butter smeared on each slice. It was pretty easy to put together, too, which made it a good choice for my toddler sous chef :).

    Strawberry Bread

    Strawberry Bread
    Allrecipes

    2 cups fresh strawberries
    3 ⅛ cups all-purpose flour
    2 cups white sugar
    1 tablespoon ground cinnamon
    1 teaspoon salt
    1 teaspoon baking soda
    1 ¼ cups vegetable oil
    4 eggs, beaten
    1 ¼ cups chopped pecans

    1. Preheat oven to 350 degrees F (175 degrees C). Butter and flour two 9 x 5-inch loaf pans.

    2. Slice strawberries and place in medium-sized bowl. Sprinkle lightly with sugar, and set aside while preparing batter.

    3. Combine flour, sugar, cinnamon, salt and baking soda in large bowl; mix well. Blend oil and eggs into strawberries. Add strawberry mixture to flour mixture, blending until dry ingredients are just moistened. Stir in pecans. Divide batter into pans.

    4. Bake in preheated oven until a tester inserted in the center comes out clean, 45 to 50 minutes (test each loaf separately). Let cool in pans on wire rack for 10 minutes. Turn loaves out of pans, and allow to cool before slicing.

    Big Flavors Rating: 4 Stars

    Jamie Oliver's Perfect Roast Chicken

    January 23, 2015 by Ashley 3 Comments

    Perfect Roast Chicken

    They say the way to a man's heart is through his stomach, and my husband happens to have an incredible affinity for chicken. Roast chicken, fried chicken, grilled chicken... he loves it all.

    I've been making Thomas Keller's Favorite Simple Roast Chicken for a few years now, and it's always a hit, but I decided to mix it up a little and try out something new.

    Perfect Roast Chicken

    Fresh herbs and a whole lemon are placed inside a chicken that's nestled atop a bed of mixed vegetables and roasted till juicy and tender. The lemon perfumes the chicken and steams it from the inside while the veggies collect the drippings from the chicken as it cooks.

    This chicken turned out beautifully! It had a lot of flavor, and I made a gravy with the drippings and some homemade chicken stock that went absolutely perfectly with it. The veggies were so beautifully caramelized - major yum! I also served it with some stuffing for a complete, delicious meal.

    Perfect Roast Chicken

    Perfect Roast Chicken
    Jamie Oliver

    1.6 kg higher-welfare chicken
    2 medium onions
    2 carrots
    2 sticks celery
    1 bulb garlic
    olive oil
    sea salt
    freshly ground black pepper
    1 lemon
    1 small bunch fresh thyme, rosemary, bay or sage, or a mixture

    Having learnt the things I've learnt about chickens over the last few years, of course I'm going to suggest that you buy free-range or organic. But if you're a little tight for cash, the RSPCA Freedom Food chickens are very good and available in all good supermarkets.

    To prepare your chicken
    Take your chicken out of the fridge 30 minutes before it goes into the oven. Preheat your oven to 240°C/475°F/gas 9. There's no need to peel the vegetables - just give them a wash and roughly chop them. Break the garlic bulb into cloves, leaving them unpeeled.

    Pile all the veg and garlic into the middle of a large roasting tray and drizzle with olive oil. Drizzle the chicken with olive oil and season well with salt and pepper, rubbing it all over the bird. Carefully prick the lemon all over, using the tip of a sharp knife (if you have a microwave, you could pop the lemon in these for 40 seconds at this point as this will really bring out the flavour). Put the lemon inside the chicken's cavity, with the bunch of herbs.

    To cook your chicken
    Place the chicken on top of the vegetables in the roasting tray and put it into the preheated oven. Turn the heat down immediately to 200°C/400°F/gas 6 and cook the chicken for 1 hour and 20 minutes. If you're doing roast potatoes and veggies, this is the time to crack on with them - get them into the oven for the last 45 minutes of cooking.

    Baste the chicken halfway through cooking and if the veg look dry, add a splash of water to the tray to stop them burning. When cooked, take the tray out of the oven and transfer the chicken to a board to rest for 15 minutes or so. Cover it with a layer of tinfoil and a tea towel and put aside. Now is the time to make your gravy.

    To carve your chicken
    Remove any string from the chicken and take off the wings (break them up and add to your gravy for mega flavour). Carefully cut down between the leg and the breast. Cut through the joint and pull the leg off.

    Repeat on the other side, then cut each leg between the thigh and the drumstick so you end up with four portions of dark meat. Place these on a serving platter. You should now have a clear space to carve the rest of your chicken. Angle the knife along the breastbone and carve one side off, then the other.

    When you get down to the fussy bits, just use your fingers to pull all the meat off, and turn the chicken over to get all the tasty, juicy bits from underneath. You should be left with a stripped carcass, and a platter full of lovely meat that you can serve with your piping hot gravy and gorgeous roast veg.

    Amount per serving:
    Calories 553
    28%
    Carbs 10.2g
    4%
    Sugar 6.7g 7%
    Fat 36.7g 52%
    Saturates 9.3g 47%
    Protein 43.4g 96%

    Big Flavors Rating: 5 Stars

    Pan-Fried Cod Over Garlicky Tomato & Pea Buckwheat Groats

    January 22, 2015 by Ashley 2 Comments

    Pan-Fried Cod Over Garlicky Tomato & Pea Buckwheat Groats

    I had a package of buckwheat groats that I hadn't tried out yet, so I figured that pairing them with some simply seasoned fish would make a nice dinner.

    Garlic and shallots perfume tomato-and-pea studded buckwheat groats. A beautifully flaky piece of cod is the perfect, light accompaniment.

    Pan-Fried Cod Over Garlicky Tomato & Pea Buckwheat Groats

    This bright, colorful dinner was surprisingly flavorful. I really enjoyed the sweetness of the tomatoes and peas mixed in with the groats, while the vinegar added a little bit of tanginess. The fish was simple and tasty and went really well with the groats.

    I even shaved some Parmesan cheese over the leftover groats for lunch the next day. Yum!

    This recipe has also been published in the Birkett Mills Buckwheat Cookbook in July 2021.

    30 Minute Sage and Onion Parker House Rolls

    January 21, 2015 by Ashley 1 Comment

    30 Minute Sage and Onion Parker House Rolls

    Homemade bread is always such a treat, but I don't always have time to make my favorite No-Knead Crusty White Bread. I also love the idea of dinner rolls, and haven't made them for quite some time.

    I pinned this recipe a while back. Sage always makes me think of cooler weather, and I knew that these would go well with our Seared Almond Milk Brined Pork Chops and Herb-Roasted Wild Mushrooms with Red Wine and Cream.

    30 Minute Sage and Onion Parker House Rolls

    Quick and easy dinner rolls are flavored with grated onion and sage-infused butter, baked till golden, then brushed with a little more sage butter for an extra punch of flavor.

    These came together quickly, but I did have trouble with the dough being too sticky when trying to form the rolls, so I needed to dust my work surface and hands with flour to make it more workable.

    30 Minute Sage and Onion Parker House Rolls

    These were a hit with dinner, and were very useful for mopping up the red wine cream sauce from the mushrooms. Yum!

    30 Minute Sage and Onion Parker House Rolls
    The Sugar Hit

    Makes 12

    INGREDIENTS
    150g (1 ½ sticks) butter
    2 tablespoon chopped sage leaves (about 15 leaves of sage)
    3 ½ cups flour
    1 tablespoon + 1tsp dried instant yeast
    2 tablespoon sugar
    pinch of salt
    1 egg
    250ml (1 cup) warm water
    ½ onion, grated

    Preheat the oven to 220C/425F and line a baking sheet with baking paper. Place the butter and sage in a small pan and place on the stove to melt. Meanwhile, place all the remaining ingredients into the bowl of a stand mixer, and begin to mix in low speed with the dough hook. By now the butter should be melted. Measure ⅓ cup of the butter-sage mixture and pour it into the dough. Continue to mix just until the dough comes together.

    Remove the dough from the mixer and divide into 12 pieces. Flatten out each piece into an oval shape with your hands and brush liberally with the melted butter, before folding them each in half and placing them on the baking sheet. Brush the tops of the buns with the remaining butter and leave to prove for 5 minutes. Once the proving time is up, bake the rolls for 10 minutes, rotating them halfway through. When they come out of the oven, brush any remaining butter over the tops of the rolls and serve!

    Big Flavors Rating: 4 Stars

    Soft Molasses Cookies

    January 20, 2015 by Ashley 5 Comments

    Soft Molasses Cookies

    One of the members of our Supper Club brought these beauties to our annual homemade cookie/candy swap, and I was quick to ask for the recipe so I could make a batch or 3 of my own.

    Soft Molasses Cookies

    These spice-packed cookies are soft and chewy and bursting with warm molasses flavor. They're perfect for wintertime and a keep well for several days.

    These are great cookies to get the kids to help out with - rolling the dough in sugar is so much fun for them! My toddler was a big help with these. He patented a new technique when he informed me that, "Flattening the flour makes the cookies fluffy, Mommy!".

    Duly noted.

    Soft Molasses Cookies

    This made about 4 dozen cookies for us, which was perfect for holiday gift giving. The dough is also delicious... if you're into that sort of thing 😉

    Soft Molasses Cookies
    Food.com

    TOTAL TIME: 40mins
    PREP: 30 mins
    COOK: 10 mins
    YIELDS: 42 cookies

    3⁄4 cup shortening
    1 cup packed brown sugar
    1⁄2 cup white sugar (reserved for coating raw dough balls)
    1 large egg
    1⁄2 cup molasses
    2 1⁄2 cups all-purpose flour
    1⁄2 teaspoon salt
    2 teaspoons baking soda
    1 teaspoon ground cinnamon
    1 teaspoon ground ginger
    1 teaspoon allspice
    1 teaspoon nutmeg

    Cream together shortening and brown sugar.

    Stir in egg and molasses and mix well.

    Fold in dry ingredients and stir.

    Cover and chill till firm (1-2 hours).

    Preheat oven to 350°.

    Roll dough into small balls and roll in white sugar.

    Place on lightly greased cookie sheet.

    Bake at 350° for 9-10 minutes.

    Leave on sheet one minute until set.

    Big Flavors Rating: 5 Stars

    Broccoli Steaks with Tofu Fries

    January 18, 2015 by Ashley 2 Comments

    Broccoli Steaks with Tofu Fries

    Tofu is coated with spices and cornstarch, crisped in the oven and served with a garlicky Sriracha mayo dipping sauce.

    This was another recipe from the latest issue of Cooking Light. It's a tasty vegetarian meal, and although the broccoli was nothing special, we really enjoyed the tofu fries and were seriously addicted to the sauce.

    Broccoli Steaks with Tofu Fries

    I really liked the method of seasoning the tofu and putting them on a hot baking sheet and baking them till crispy. I'd definitely make those again. And that Sriracha mayo would be great on SO many things! I didn't have canola mayo, but I did have light, so I used that.

    Broccoli Steaks with Tofu Fries
    Cooking Light January/February 2015

    Serves 4 (serving size: one-fourth of broccoli, 6 tofu fries, and about 1 tablespoon sauce)
    Hands-on time: 30 Minutes
    Total time: 40 Minutes

    1 (14-ounce) package water-packed extra-firm tofu, drained
    1 ½ pounds broccoli crowns
    ¼ cup water
    ¾ teaspoon kosher salt, divided
    3 tablespoons cornstarch
    1 teaspoon garlic powder
    1 teaspoon onion powder
    ½ teaspoon paprika
    ½ teaspoon freshly ground black pepper
    3 tablespoons canola oil
    ¼ cup canola mayonnaise
    1 ½ teaspoons Sriracha (hot chile sauce, such as Huy Fong)
    1 garlic clove, grated
    Preparation

    1. Place a large jelly-roll pan in oven. Preheat oven to 500° (leave pan in oven as it preheats).

    2. Cut tofu crosswise into 4 (½-inch-thick) slabs. Arrange slabs on several layers of paper towels; cover with additional paper towels. Weight tofu down with a large skillet or roasting pan; let stand 5 minutes.

    3. While tofu drains, place broccoli in a large microwave-safe dish. Add ¼ cup water. Cover with plastic wrap; microwave at HIGH for 5 minutes. Uncover and cool slightly.

    4. Uncover tofu; sprinkle evenly with ½ teaspoon salt. Cut each tofu slab lengthwise into 6 thin strips. Combine cornstarch and next 4 ingredients (through pepper) in a shallow dish. Gently dredge tofu in cornstarch mixture, gently shaking off excess.

    5. Remove pan from oven. Add oil to pan; carefully tilt pan to coat evenly with oil. Add tofu to pan. Bake at 500° for 10 minutes.

    6. Cut broccoli into 1-inch-thick "steaks." Remove pan from oven; carefully turn tofu over using a thin metal spatula, and move to one side of pan. Add broccoli to other side of pan. Bake at 500° for 10 minutes, turning broccoli after 5 minutes. Sprinkle with remaining ¼ teaspoon salt.

    7. Combine mayonnaise, Sriracha, and garlic. Serve with tofu and broccoli.

    Nutritional Information:
    Calories 325
    Fat 21 g
    Satfat 2 g
    Monofat 10.2 g
    Polyfat 8 g
    Protein 14 g
    Carbohydrate 22 g
    Fiber 5 g
    Cholesterol 0.0 mg
    Iron 3 mg
    Sodium 562 mg
    Calcium 156 mg

    Big Flavors Rating: 3 Stars

    Seared Almond Milk Brined Pork Chops

    January 16, 2015 by Ashley Leave a Comment

    Seared Almond Milk Brined Pork Chops

    Nothing says comfort food like a big, juicy pork chop. I was really intrigued when I saw the almond milk brine in Tyler Florence's latest book.

    Almond milk is infused with fresh herbs and dried porcini mushrooms to accentuate the natural flavors of the pork, rather than cover them up. What results is an incredibly tender, subtly flavored piece of pork that's ready for a quick sear.

    Seared Almond Milk Brined Pork Chops

    I made these chops for some friends who were over for dinner, and they were a huge hit! I used the book's suggested method of leaving the oven at 200°F and placing the chops in there to keep warm while I cooked the second batch (they were so big that only 2 would fit in the pan at a time).

    The caramelization on the outside of the chops was beautiful and absolutely delicious! They didn't need any more salt at the end, but a few cracks of black pepper was definitely welcome. I served these with his Herb-Roasted Wild Mushrooms with Red Wine and Cream and 30 Minute Sage and Onion Parker House Rolls (recipe coming soon!).

    Brining pork chops was much easier than I expected, and with results this delicious it will be on the menu many more times in the future!

    Seared Almond Milk Brined Pork Chops
    Tyler Florence Inside the Test Kitchen: 120 New Recipes, Perfected

    Almond Milk Brine
    Makes 1 quart, enough for 4 pork chops

    1 quart unsweetened almond milk
    ¼ cup salt
    ⅓ cup brown sugar
    2 fresh save leaves
    1 thyme sprig
    ½ bay leaf
    1 tablespoon dried porcini mushroom pieces

    Heat the almond milk, salt, brown sugar, sage, thyme, bay leaf and mushrooms in a large saucepan over medium-low heat. You do not need to boil the liquid; just heat it enough so the salt and sugar dissolve. Stir with a whisk, then transfer to a bowl. Let cool down completely.

    Seared Brined Pork Chops
    Serves 4

    1 quart Almond Milk Brine (above)
    4 (1-inch thick) pork chops
    Grapeseed or vegetable oil
    Kosher salt
    Freshly ground black pepper

    Soak the pork chops in the brine in the refrigerator for at least 30 minutes and up to 1 hour. Remove from the brine and allow the chops to come to room temperature, then pat dry with paper towels. As they have been brined, there is no need to season the chops before cooking.

    Heat a heavy sauté pan over medium-high heat. Add enough oil to generously slick the bottom of the pan. When the oil shimmers, carefully add as many pork chops as will fit comfortably in the pan. Sear the pork chops for about 5 minutes on each side, so they have a nice, even brown color and are cooked to medium (if using a meat thermometer, the center should read 145°F.) Remove and season with salt and pepper to taste. If cooking in two batches, add the remaining chops, and cook as directed for the first batch.

    Big Flavors Rating: 5 Stars

    Red Pepper Jelly-Brie Bites

    January 14, 2015 by Ashley 2 Comments

    Red Pepper Jelly-Brie Bites

    I had some puff pastry shells in the freezer that I wanted to use to make a simple appetizer for some friends who were over for dinner. I had been hearing about this recipe for years, so I finally went for it!

    Red Pepper Jelly-Brie Bites

    Hot pepper jelly is topped with creamy brie cheese and crunchy almonds inside pastry shells and baked till golden, crispy and gooey. The recipe calls for phyllo shells, which would have worked better, but I wanted to use the puff pastry up.

    I didn't end up measuring anything, just a smear of pepper jelly, a chunk of brie and some chopped almonds. I baked them according to the puff pastry directions and they worked out great! Since they were bigger than phyllo shells and had to bake longer, the cheese was super melty and got some nice crispy bits around the edges. I had smoked almonds, which added a nice depth of flavor.

    Red Pepper Jelly-Brie Bites

    I definitely want to try these again someday with the proper pastry, but it's a great, simple appetizer that's great for a dinner party!

    Red Pepper Jelly-Brie Bites
    Southern Living December 2009

    2 (1.9-oz.) packages frozen mini phyllo pastry shells, thawed
    3 ounces Brie cheese, rind removed
    Red pepper jelly
    3 tablespoons chopped roasted salted almonds

    Preheat oven to 350°. Place mini phyllo pastry shells, on a baking sheet. Cut Brie cheese, into 30 very small pieces. Spoon rounded ¼ teaspoon red pepper jelly into each shell; top with cheese. Sprinkle with almonds. Bake tartlets 5 to 6 minutes or until cheese is melted.

    Big Flavors Rating: 4 Stars

    Herb-Roasted Wild Mushrooms with Red Wine and Cream

    January 13, 2015 by Ashley 2 Comments

    Herb-Roasted Wild Mushrooms with Red Wine and Cream

    I've been following along with the development of Tyler Florence's latest cookbook via his Instagram, and was so excited to get my own copy for Christmas. I can't recommend this book highly enough. Thanks, Santa 😉

    Anyhow, after I bookmarked pretty much every recipe in this beauty, I knew I needed to pick just 2 to try out on some friends who were in town for dinner.

    Mixed wild mushrooms are roasted with fresh herbs and shallots, then topped with a reduced, shallot laden red wine cream sauce.

    Herb-Roasted Wild Mushrooms with Red Wine and Cream

    The varied mushrooms really adds to the depth of flavor here, and the sauce is rich and luxurious. I didn't strain the sauce because I wanted to keep the shallots in there, but then we ended up running into whole peppercorns every once in a while, which wasn't entirely pleasant. Next time, I'd maybe use some cheesecloth or a spice ball to make removing them easy.

    This dish just looked awesome, too. The arugula on top was the perfect pop of color. It was a beautiful side dish that went perfectly with our Seared Almond Milk Brined Pork Chops and 30 Minute Sage and Onion Parker House Rolls.

    Herb-Roasted Wild Mushrooms with Red Wine and Cream
    Tyler Florence Inside the Test Kitchen: 120 New Recipes, Perfected

    Serves 4 to 6

    2 pounds assorted mushrooms (such as cremini, oyster, shiitake, chanterelle, black trumpet)
    Extra-virgin olive oil
    6 bay leaves
    4 thyme sprigs
    2 rosemary sprigs, cut into 1-inch pieces
    3 shallots, 2 cut in half
    Kosher salt
    Freshly ground black pepper
    1 tablespoon unsalted butter
    1 teaspoon whole peppercorns
    2 cups good red wine*
    ¼ cup heavy cream
    ¼ cup arugula leaves

    Preheat the oven to 450°F. Brush the mushrooms clean of any dirt and trim off any deep blemishes. Slice about ¼ inch thick. Put the mushrooms in one layer on one or more sheet pans (as necessary), and drizzle with a little olive oil. Add 4 bay leaves, the thyme and rosemary sprigs, and the 2 halved shallots. Season generously with salt and pepper. Roast about 15 minutes, until the mushrooms caramelize and are golden brown.

    Slice the remaining shallot into rings and break the rings apart with your hands. Heat a small saucepan with the butter over medium heat. Add the shallot, 2 remaining bay leaves, the peppercorns, and 1 tablespoon olive oil. Cook the shallot, stirring, until a deep caramel brown. Add the wine and let the mixture reduce until it coats the back of a spoon, about 10 minutes. Add the cream and cook until it thickens again, about 2 minutes more. Season with salt to taste.

    Transfer the roasted mushrooms to a serving dish, removing the bay leaves and herb stems, and drizzle with the sauce. Garnish with the arugula.

    *Most wine is gluten free, but double check your bottle if you have a gluten sensitivity.

    Big Flavors Rating: 5 Stars

    Zucchini Fritters with Yogurt-Dill Sauce

    January 11, 2015 by Ashley 3 Comments

    Zucchini Fritters with Yogurt-Dill Sauce

    When we lived with my in-laws, we had fritters pretty frequently. My father-in-law loves making vegetable fritters, especially with asparagus. So when I came across this recipe for zucchini fritters, I knew I wanted to try them out at home.

    Plus, any food served with a dip is just guaranteed to be more fun, right?

    Zucchini Fritters with Yogurt-Dill Sauce

    These fritters are light and fluffy and go beautifully with the tangy Greek yogurt-dill dipping sauce. I called them "zucchini pancakes" and my toddler gobbled them up. Bonus!

    Zucchini Fritters with Yogurt-Dill Sauce

    I had planned to take some of the leftover fritters and eat them with a fried egg later in the week, but they didn't last long. Ahem.

    Zucchini Fritters with Yogurt-Dill Sauce
    Jim Botsacos of New York City's Molyvos restaurant (via Martha Stewart)

    SERVINGS: 12

    1 cup all-purpose flour
    1 ¼ teaspoons baking powder
    Coarse salt and freshly ground black pepper
    3 medium zucchini
    1 medium onion, halved
    2 tablespoons Greek-style plain full-fat yogurt
    1 large egg, lightly beaten
    ½ cup olive oil, plus more as needed
    Yogurt-Dill Sauce, for serving (recipe follows)

    In a small bowl, whisk together flour, baking powder, and ⅛ teaspoon salt; set aside.

    Grate onion on the large holes of a box grater into a medium bowl. Transfer grated onion to a piece of cheese cloth. Squeeze excess liquid from onion and discard. Transfer onion to a clean medium bowl; you should have about ½ cup grated onion. Grate zucchini into bowl with onion on the large holes of a box grater; you should have about 3 ½ cups grated zucchini. Add ½ teaspoon salt and toss to combine; let stand 30 seconds.

    Transfer zucchini and onion mixture to a clean piece of cheesecloth and cover. Squeeze out as much liquid as possible and discard. Transfer zucchini and onion to a large bowl. Add yogurt and egg; season with salt and pepper. Stir until well combined.

    Slowly add ¾ cup of the flour mixture, while folding it into the zucchini mixture. If mixture seems too wet, fold in ¼ cup more.

    Heat olive oil in a medium skillet over medium-high heat. Working in batches, using about 3 tablespoons of the zucchini mixture, gently form a patty and place in skillet. Cook until fritters are firm and begin to turn golden on the bottom, about 2 minutes. Turn fritters and continue to cook about 2 minutes more. Turn fritters again and cook for 30 seconds; transfer to a paper towel-lined plate. Repeat process with remaining zucchini mixture, adding more oil as necessary.

    Season fritters with salt and serve immediately with yogurt-dill sauce.

    Yogurt-Dill Sauce

    YIELD: MAKES ENOUGH FOR 12 FRITTERS

    1 cup Greek-style plain full-fat yogurt
    2 tablespoons milk
    3 tablespoons fresh chopped dill
    Coarse salt and freshly ground white pepper

    Mix together yogurt and milk in a small bowl until well combined. Fold in dill; season with salt and pepper. Keep refrigerated until ready to use.

    Big Flavors: 4 Stars

    Zucchini Lasagna

    January 8, 2015 by Ashley 5 Comments

    Zucchini Lasagna

    Thin sliced zucchini takes the place of pasta in this flavorful, layered comfort food dinner.

    Don't get me wrong, I still love all forms of pasta. But this rich, meaty lasagna is delicious without any. Color me impressed!

    Zucchini Lasagna

    After carefully slicing zucchini on a mandoline, it is layered with a flavorful sauce and dollops of ricotta cheese. Fresh oregano works really well with the ground turkey, and a healthy dose of red pepper flakes gives it a really nice kick.

    Zucchini Lasagna

    This meal was a big hit at the dinner table! My only note is that the recipe says it serves 8 and I'd say it really only serves 4. It's being baked in an 8-inch pan, and I don't know anyone who will be happy with only one square inch of lasagna. Nonsense!

    The notes on this recipe say that it freezes well, so next time (and there will be a next time!) I'm going to make a double batch so I can freeze some of it. Delicious!

    Zucchini Lasagna

    Pork Tenderloin with Pears and Shallots

    January 6, 2015 by Ashley Leave a Comment

    Pork Tenderloin with Pears and Shallots

    It's been several years since I've made this dish, and it's one of our favorites!

    Pork is seared then roasted, and paired with caramelized pears and shallots with lots of fresh thyme and a pear nectar pan sauce.

    Pork Tenderloin with Pears and Shallots | Big Flavors from a Tiny Kitchen

    One tip I have is that if your pears are large and/or not too ripe, cut them into smaller pieces so they cook through. I forgot to do that this time around, and they were a bit tough. The pan sauce is sweet, so a little extra salt isn't a bad idea at all.

    I served this with some rice that I cooked in chicken stock, and it was a great meal!

    Pork tenderloin is such a versatile ingredient! Some of our very favorite recipes utilize it, like this balsamic marinated pork tenderloin, this pan-roasted pork tenderloin with balsamic tomatoes, these peanut noodles with roasted pork tenderloin + honeyed oranges, and this breaded pork tenderloin with lemon caper sauce.

    Pork Tenderloin with Pears and Shallots
    Bon Appétit January 2010

    3 tablespoons olive oil
    2 garlic cloves, finely chopped
    1 tablespoon chopped fresh thyme plus fresh thyme sprigs for garnish
    1 ¼ pounds pork tenderloin
    3 large shallots, each cut into 6 wedges through stem end, peeled
    3 unpeeled small Bosc or Anjou pears, quartered, cored
    4 teaspoons butter, room temperature
    2 teaspoons all purpose flour
    1 ½ cups low-salt chicken broth
    ¾ cup pear nectar

    Preheat oven to 475°F. Mix oil, garlic, and chopped thyme in small bowl. Rub mixture over pork, shallots, and pears. Heat large ovenproof nonstick skillet over medium high heat. Add pork and shallots; brown on all sides, turning, about 7 minutes. Transfer shallots to platter. Transfer pork to baking sheet (do not clean skillet). Roast pork until thermometer inserted into center registers 145°F, about 10 minutes.

    Meanwhile, add pears to same skillet and cook over medium-high heat until brown on cut side, turning once or twice, about 4 minutes. Transfer pears to platter (do not clean skillet).

    Mix butter and flour in small cup. Add broth, pear nectar, and butter mixture to same skillet; boil until sauce thickens, scraping up browned bits, about 7 minutes.

    Slice pork; arrange on platter. Surround with pears and shallots. Drizzle sauce over pork. Garnish with thyme sprigs.

    Big Flavors Rating: 5 Stars

    Quinoa Breakfast Bake

    January 5, 2015 by Ashley Leave a Comment

    Quinoa Breakfast Bake

    I love breakfast food, but find that I often fall into a rut when making breakfast at home. My husband usually makes breakfast on weekends, which is awesome, but I like to make something during the week for breakfast occasionally.

    And breakfast for dinner is where it's at!

    Quinoa Breakfast Bake

    Quinoa is tossed with frozen berries, apple, milk, eggs, maple syrup, nuts and spices and baked till set for a light and healthy breakfast. I drizzled a little extra milk over my son's portion to cool it off and liked the texture that gave it (a little porridge-y).

    I used a frozen berry mix that contained strawberries, blackberries, blueberries and raspberries. I chose pecans to go with the fruit and it was a really nice match.

    As for the serving size in the recipe, I'd say it's more like 4 servings than 6, unless you're eating it with something else. We enjoyed this one as breakfast for dinner one night with some bacon, but maybe it would have been more filling first thing in the morning.

    Quinoa Breakfast Bake

    Quinoa Breakfast Bake
    Greatist

    Serves 4-6

    1 cup quinoa (uncooked)
    2 teaspoon cinnamon
    ½ teaspoon allspice
    2 eggs
    2 cups skim milk
    ¼ cup maple syrup
    1 ½ cups frozen berries
    1 apple or pear, peeled, cored, and chopped into ½ inch cubes
    ½ cup coarsely chopped nuts (optional)

    Preheat the oven to 350 degrees. Lightly grease an 8x8 inch square baking pan, and set aside. (Note: a 9x11 works fine, too!)

    In a medium bowl, stir together uncooked quinoa, cinnamon, and allspice to coat quinoa with spices. Pour quinoa over bottom of prepared pan.

    In the same bowl used for the quinoa, beat the eggs until fully mixed. Whisk in the milk and maple syrup, and beat to combine.

    Scatter the berries, apple or pear pieces, and nuts (if using) evenly on top of the quinoa.

    Pour the egg and milk mixture over the top of the fruit and quinoa. Lightly stir to partially submerge the fruit. (The milk mixture will cook the quinoa to create a very soft texture on the inside, while creating a lightly crunchy crust on the outside!)

    Bake for 1 hour, or until casserole is mostly set with only a small amount of liquid left. Serve warm, and refrigerate leftovers.

    Big Flavors Rating: 4 Stars

    Hasselback Potato Gratin

    January 4, 2015 by Ashley 1 Comment

    Hasselback Potato Gratin

    Want to make a fantastically luxurious, decadent side dish full of lots of cheese and cream? Then this gratin is exactly what the doctor ordered.

    Well, not the doctor that would be checking your cholesterol or anything (see the aforementioned cheese and cream).

    Hasselback Potato Gratin

    Thin slices of potato are tossed with 2 cheeses, cream, garlic and fresh thyme, arranged in a dish and baked till bubbly and golden brown on top.

    And those browned bits? Absolutely heavenly!

    Hasselback Potato Gratin

    I think I should have stacked my potatoes a little snugger so this would have made a bit more. Me and Dino took out over half of this gratin in one sitting, and that's with 2 massive steaks, too. True story.

    The only thing I had an issue with was that my cheese mixture was really thick, so it was hard to "pour" some over the potatoes to make it come halfway up the sides. I just kind of spread some around, and then after the initial 30 minute bake time, I ended up using a turkey baster to remove some of the excess grease. I may have grated the cheese too fine, causing it to thicken.

    At any rate, this dish is beyond delicious, and I can't recommend it highly enough! It would be perfect at any holiday dinner table!

    Oh, and speaking of grating - there are still a few days left to enter my Kitchen IQ & Stonyfield Giveaway. I've been loving this grater!

    Hasselback Potato Gratin
    Serious Eats

    Note: because of variation in the shape of potatoes, the amount of potato that will fit into a single casserole dish varies. Longer, thinner potatoes will fill a dish more than shorter, rounder potatoes. When purchasing potatoes, buy a few extra in order to fill the dish if necessary. Depending on exact shape and size of potatoes and casserole dish, you may not need all of the cream mixture.

    YIELD: Serves 4 to 6
    ACTIVE TIME: 15 minutes
    TOTAL TIME: 1 hour 45 minutes
    SPECIAL EQUIPMENT:
    2 quart oval or rectangular baking dish

    3 ounces finely grated Gruyère or comté cheese
    2 ounces finely grated Parmigiano-reggiano
    2 cups heavy cream
    2 medium cloves garlic, minced
    1 tablespoon fresh thyme leaves, roughly chopped
    Kosher salt and freshly ground black pepper
    3 to 3 ½ pounds russet potatoes, peeled and sliced ⅛th-inch thick on a mandoline slicer (5 to 6 medium, see note above)
    2 tablespoons unsalted butter

    1. Adjust oven rack to middle position and preheat oven to 400°F. Combine cheeses in a large bowl. Transfer ⅓ of cheese mixture to a separate bowl and set aside. Add cream, garlic, and thyme to cheese mixture. Season generously with salt and pepper. Add potato slices and toss with hands until every slice is coated with cream mixture, making sure to separate any slices that are sticking together to get the cream mixture in between them.

    2. Grease a 2-quart casserole dish with butter. Pick up a handful of potatoes, organizing them into a neat stack, and lay them in the casserole dish with their edges aligned vertically. Continue placing potatoes in casserole, working around the perimeter and into the center until all potatoes have been added. Potatoes should be very tightly packed. If necessary, slice additional potato, coat with cream mixture, and add to casserole (see note above). Pour excess cream/cheese mixture evenly over potatoes until the mixture comes half way up the sides of the casserole. You may not need all excess liquid (see note above).

    3. Cover tightly with foil and transfer to oven. Bake for 30 minutes. Remove foil and continue baking until top is pale golden brown, about 30 minutes longer. Carefully remove from oven, sprinkle with remaining cheese, and return to oven. Bake until deep golden brown and crisp on top, about 30 minutes longer. Remove from oven, let rest for a few minutes, and serve.

    Big Flavors Rating: 5 Stars

    Rainbow Slaw with Smoked Paprika Mayo

    January 3, 2015 by Ashley 4 Comments

    Ramekins of Rainbow Slaw with Smoked Paprika Mayo.

    When I made the Hit 'n' Run Traybaked Chicken, I wanted to also make a cool, crunchy dish to go with it. I wanted to keep it low maintenance, so when I saw a package of rainbow salad mix at the grocery store, I knew what I would be working with.

    Smoked paprika adds depth to this colorful, fresh and tangy slaw. This is really easy to put together, and can be made in advance, stored in the refrigerator until you're ready to eat.

    Rainbow Slaw with Smoked Paprika Mayo

    You could substitute cole slaw mix if you can't find rainbow salad, but definitely keep an eye out for it - it's at most stores in my area and it's a really nice combination of veggies. You could also make your own by shredding your own, but that'll add quite a bit more prep time.

    Hit ‘n’ Run Traybaked Chicken

    December 31, 2014 by Ashley 1 Comment

    Hit ‘n’ Run Traybaked Chicken

    I recently found a new Jamie Oliver show that my toddler absolutely loves to watch with me. His food always looks so approachable and fun, and he's so engaging while he's cooking.

    It inspired me to try out some more of his recipes - I realized that it had been way too long!

    Hit 'n' Run Traybaked Chicken

    This recipe is super simple - just chop a bunch of veggies and plop them into a baking tray along with chicken, herbs, oil and vinegar. Toss it together and let it bake! You need to stir it a few times, but that's really all there is to it.

    This dish was a great combination of roasted veggies and tender chicken. The sweetness of the tomatoes went beautifully with the vegetables, and the smoked paprika added a nice depth of flavor all around. There were plenty of pan juices left - perfect for dipping a chunk of crusty bread into!

    Hit 'n' Run Traybaked Chicken

    I served this with some peas, crusty bread and a Rainbow Slaw with Smoked Paprika Mayo. It was a nice, comforting meal that took very little effort - perfect for a weeknight!

    Hit 'n' Run Traybaked Chicken
    Jamie Oliver

    Serves 4
    1h 10m

    4 large ripe tomatoes
    2 red onions
    1 red pepper
    1 yellow pepper
    6 skinless, boneless free-range chicken thighs
    4 cloves of garlic
    ½ bunch of fresh thyme
    1 teaspoon smoked paprika
    2 tablespoons olive oil
    2 tablespoons balsamic vinegar

    Everyone needs a hit 'n' run recipe like this - it's the kind of fallback meal you can enjoy when prep time isn't on your side. It's simply a case of putting together a combination of ingredients that really love each other, then just tearing, mixing, marinating and baking. It's super quick to prepare, and you're letting the oven do all the work.

    Preheat the oven to 180ºC/350ºF/gas 4. Quarter the tomatoes and place them in a large baking dish or roasting tray (roughly 25cm x 30cm). Peel the onions and cut into large wedges, then deseed and roughly chop the peppers. Add all these to the tray along with the chicken thighs.

    Squash the unpeeled garlic cloves with the back of your knife and add to the tray, then pick over the thyme leaves and sprinkle over the paprika. Add the oil, balsamic and a good pinch of salt and pepper. Toss everything together really well to coat, then spread across the tray, making sure the chicken isn't covered by the vegetables. Roast for around 1 hour, or until the chicken is golden and cooked through, turning and basting it a couple of times during cooking with the juices from the tray.

    Serve the traybake with a lovely green salad on the side. You could also buddy it up with a little rice, polenta or a loaf of crusty bread to mop up the juices.

    Jamie's Tip: Roasting garlic cloves whole in their skins makes them really sweet - don't waste that lovely soft flesh, squeeze it out and enjoy it!

    Nutritional Information
    Amount per serving:
    Calories 340 17%
    Carbs 18.5g 7%
    Sugar 15.2g 17%
    Fat 13.9g 20%
    Saturates 3.2g 16%
    Protein 32.6g 72%

    Big Flavors Rating: 4 Stars

    Top 10 Recipes of 2014: Reader Favorites

    December 30, 2014 by Ashley 3 Comments

    Falafel in pita bread with toppings served with yogurt-herb sauce.

    It's been a whirlwind of a year here in my tiny kitchen. I've made a ton of new recipes, created a lot of originals including a dish inspired by one of my all-time favorite movies, a salad that I named after a classic rap album, and a pie with a seriously swoon worthy lattice. I also started cooking a new (to me) fish, had a lot more fun with my Supper Club and participated in the Great Food Blogger Cookie Swap.

    I've had the opportunity to work with a lot of brands, both new and old favorites this year, and am looking forward to more of that in 2015. And I'm still in awe of the amazing, celebrity chef studded experience I had at the FoodNetwork NYC Wine & Food Festival Blue Moon Burger Bash.

    As the end of 2014 draws near, I want to take a moment to reflect on the most delicious food to come out of my kitchen this year. So without further ado, here are the top 10 recipes from 2014, based on popularity with my readers:

    Greek Yogurt Mustard Cole Slaw
    #10: Greek Yogurt Mustard Cole Slaw - this slaw was something I created for Stonyfield as an accompaniment to a Crockpot BBQ Beer Chicken (which happens to be number 8 on this top 10 list). I wanted to make a tangy slaw that wasn't heavy, and fat free Greek yogurt did the trick!

    Roasted Spaghetti Squash and Kale
    #9: Roasted Spaghetti Squash and Kale - this was the spaghetti squash recipe that led me to my "a-ha!" moment with scraping the squash in a specific direction to get the nice strands of "spaghetti" instead of a pile of squash flavored mush. And it was delicious, too. Score!

    Crockpot BBQ Beer Chicken
    #8: Crockpot BBQ Beer Chicken - I feel like slow cooker recipes can be hit or miss a lot of times, and I definitely had a few misses this year, but this one was a MAJOR hit. This is sloppy, delicious comfort food, especially when you pile up a bunch of my Greek Yogurt Mustard Cole Slaw from #10 above. Yesssss.

    Chewy Peanut Butter Chocolate Chip Cookies
    #7: Chewy Peanut Butter Chocolate Chip Cookies - these cookies were a HUGE hit at a game night I had at my house. They disappeared in no time, and I've been getting bribes requests for another batch ever since. Chocolate and peanut butter are ALWAYS a good idea!

    Falafel with Yogurt-Herb Sauce
    #6: Falafel with Yogurt-Herb Sauce - I'm not gonna say that I make the best falafel out there, but I will say that I've never had one out at a restaurant that was anywhere near as tasty as this recipe. Ever. I don't even bother. They are soooooo good. I can't even explain the involuntary noises and facial expressions that me and my husband make while eating them... it's just... better for us to enjoy alone where nobody will judge us. Food heaven, pure and simple.

    Buffalo Chickpea Dip
    #5: Buffalo Chickpea Dip - why choose between buffalo wings and hummus when you can have the best of both worlds? This dip is spicy, creamy, crunchy and delicious. It's sure to be a hit at your next Superbowl party.

    Slow Cooker Indian Chickpea Curry
    #4: Slow Cooker Indian Chickpea Curry - this simple, tasty curry has options for preparing it in the slow cooker, pressure cooker or on the stovetop. We enjoyed it paired with garlic naan and plain yogurt. It's great cold weather comfort food.

    Ratatouille's Ratatouille
    #3: Ratatouille's Ratatouille - this was hands-down one of the tastiest recipes we've ever made. It's beautiful, healthy and totally impressed our Supper Club. It was so good we made it again the next day. And it was inspired by an a super cute movie!

    Brussels Sprouts in Garlic Butter
    #2: Brussels Sprouts in Garlic Butter - this recipe proves that you don't need to be afraid of Brussels sprouts. They can be simple, elegant and absolutely delicious. Plus, breaking out the cast iron skillet and some Parmesan cheese never hurts!

    Cilantro-Lime Rice
    #1: Cilantro-Lime Rice - I'm down for Taco Tuesday any day of the week, and this rice went beautifully with the Cilantro and Lime Fish Tacos with Cilantro and Lime Crema that I made to ring in the new year at the end of 2013.

    Thanks again to everyone who reads, comments and/or drools over the things I post here in my tiny kitchen. I appreciate all of the support, questions, suggestions and food discussions that we've had over the last several years. Hope you all have a safe,  happy and healthy end of 2014, and I look forward to many more delicious adventures in 2015!

    Was your favorite showcased here? Is there something that you haven't seen over on Big Flavors from a Tiny Kitchen that you'd like to see in the new year? Drop me a note in the comments - I'd love to hear your suggestions!

    Miss last year's roundup? Here are the Top 10 Recipes of 2013.

    Bircher Muesli + Kitchen IQ & Stonyfield Giveaway {CLOSED}

    December 29, 2014 by Ashley 22 Comments

    Bircher Muesli

    This post was created in partnership with Stonyfield and Kitchen IQ. As always, all opinions are 100% my own.

    Let's start the week out on a healthy note, shall we? Not because we ate way too much rich, decadent food for Italian Foodpalooza Christmas dinner or anything. Nope.

    But perhaps we should lighten things up a bit. Which is where my first foray into muesli began.

    Bircher Muesli

    To make this particular muesli, you mix oats, milk, apple juice and lemon juice together and stash it away in the fridge overnight. Then in the morning, you stir in grated apple, yogurt, honey and cinnamon and top with an assortment of fresh and dried fruit and nuts.

    The results are delicious! You can use whatever combination you like on top. I served ours up on a big cutting board with dried cranberries, coconut flakes, chopped hazelnuts, fresh strawberries and raisins. My family really enjoyed it - my toddler especially liked picking and choosing what he was going to add on top (and how much of each item).

    Bircher Muesli

    I was pleasantly surprised with how much brightness the lemon juice added to the dish. I wasn't expecting to love that, but it was very nice. For the apple, I used a ginger crisp (a new favorite!) and grated is using Kitchen IQ's V-etched Container Grater.

    This is a new addition to my kitchen, and I'm really digging it! It's a nice alternative to the standard box grater - it has 3 different grater blades and one slicer blade that you can attach to the container to grate and slice ingredients easily. I particularly like that it's horizontal (versus the standard upright box grater), because I feel like I have a little more control with items while I'm grating them. It has a non-slip base, so it stays in place on the counter/cutting board, and there are measurements along the edges of the container.

    I've used it a few times now, and it was awesome for grating loads of cheeses and slicing potatoes. One word of warning when using the slicing blade though - be careful! It's similar to a mandoline but it doesn't have a hand guard, so you have to proceed with caution to prevent any potential injuries. Those blades are sharp!

    Bircher Muesli + Kitchen IQ & Stonyfield Giveaway

    All in all, this was a great breakfast. I think that it would be great to do this for a weekday morning breakfast, but do all of the ingredient prep the night before (chop up all the fruits/nuts and go ahead and add the grated apple in with the oats, milk and juices) to make the hands-on time a lot shorter the following morning. I'll definitely be making this one again!

    Want to win your very own Kitchen IQ V-etched Container Grater plus an assortment of Stonyfield coupons? To enter to win, leave a comment below telling me what item you grate most frequently in your kitchen. The contest will close on Friday, January 9, 2014 at 12 noon (Eastern Standard Time). One winner will be chosen via random.org and will be contacted via email to get mailing information. U.S. residents only. Good luck, everyone!

    UPDATE - The winner has been selected via random.org - CONGRATS to Rana!

    Butternut Squash Lasagna Rolls

    December 28, 2014 by Ashley 3 Comments

    Butternut Squash Lasagna Rolls

    One of my best friends was in New York from Wisconsin recently to visit her sister, brother-in-law and their new baby girl. She was upstate, but rented a car to drive down to visit me for a day so we could catch up, get in some long overdue hugs and laughs and cook a nice vegetarian meal for her to bring back upstate to the new parents.

    Butternut Squash Lasagna Rolls

    She recommended lasagna, and I was excited to try out this recipe that I've had pinned for quite some time now. I doubled the recipe so I could send one tray back with her, and we could enjoy one for dinner that night.

    A few notes... this recipe took quite a bit of effort to pull off. You have to cook squash, cook lasagna noodles, thaw spinach, make a spinach/cheese mixture, blend a sauce (I used an immersion blender so I didn't have to get the blender dirty, too), and then dry off the lasagna noodles before you roll them up and pile them in the dish with the sauce and more cheese. Phew! It's worth it, but it took a lot longer than I was expecting.

    Butternut Squash Lasagna Rolls

    We all really enjoyed the flavor combination, but felt that it was a little bland. A few extra grinds of salt and pepper and a bit of freshly grated nutmeg did the trick for us. The spinach went really well with the sweetness of the squash. Not to mention I love cheese, and this had lots! And leftovers were great for lunch with a fried egg on top!

    I think this is a great idea for a recipe, and I want to roll up all sorts of things in these individual portions now. I will say that one roll is nowhere near enough for dinner, unless you have a side salad or something else to go with it. We each ate 2-3 and were satisfied. I was able to fit 8 rolls in each pan, so I had a few cooked lasagna noodles leftover.

    I'd say this is worth doubling and freezing some with the directions below. I also think it would be awesome with meat sauce. Yum!

    Butternut Squash Lasagna Rolls
    The Skinnytaste Cookbook - Gina Homolka (via Epicurious)

    Serves 9, Serving size 1 lasagna roll

    Butternut Squash
    1 pound peeled butternut squash, diced
    kosher salt

    Lasagna Rolls
    1 teaspoon olive oil
    ¼ cup minced shallots
    2 cloves garlic, minced
    2 ½ tablespoons fresh grated parmesan cheese
    10 ounces frozen chopped spinach, cooked according to package directions, cooled, and squeezed dry
    1 ¾ cups (15 ounces) fat-free ricotta cheese
    ½ cup grated Parmesan cheese
    1 large egg
    ½ teaspoon kosher salt
    Freshly cracked black pepper
    9 lasagna noodles, wheat or gluten-free, cooked
    9 tablespoons shredded part skim mozzarella cheese (about 3 ounces)

    Preheat the oven to 350°F.

    For the butternut squash
    Place squash in a large pot with enough water to cover the squash by 2 inches. Add 1 teaspoon salt and bring to a boil. Cover and cook over medium-low heat until soft, about 12 to 14 minutes. Remove butternut squash with a slotted spoon and place in a blender with ¼ cup of the liquid it was cooked in. Reserve an additional 1 cup of liquid and set aside.

    For the lasanga rolls
    In a medium nonstick skillet, add the oil and saut¿he shallots and garlic over medium-low heat until soft and golden, about 4 to 5 minutes. Add pureed butternut squash, season with ¼ teaspoon salt and a pinch of fresh cracked pepper adding about ½ cup to ¾ cup of the reserved liquid to thin out the sauce until smooth. Stir in the parmesan cheese and set aside.

    In a medium bowl, combine the spinach, ricotta, the remaining ½ cup Parmesan, egg, ¼ teaspoon salt, and the black pepper.

    Ladle about ½ cup of the butternut sauce into the bottom of a 9 ¿13-inch baking dish.

    Put a piece of wax paper on a work surface and lay the cooked lasagna noodles out on it. Make sure the noodles are dry. Spread ⅓ cup of the ricotta mixture over each noodle. Carefully roll them up and put them seam side down in the baking dish. Ladle the remaining sauce over the lasagna rolls and top each with 1 tablespoon mozzarella. Tightly cover the dish with foil.

    Bake until the inside is heated through and the cheese is melted, about 40 minutes.

    Skinnyscoop:
    For best freezing results, freeze the lasagna rolls after you bake them in a freezer-safe zip-top bag or container. To reheat put the frozen lasagna rolls in a baking dish. Cover with foil and bake at 375°F for 45 to 50 minutes.

    Big Flavors Rating: 4 Stars

    Furikake-Topped Salmon with Fresh Edamame & Miso-Sesame Black Noodles

    December 24, 2014 by Ashley 1 Comment

    Furikake-Topped Salmon with Fresh Edamame & Miso-Sesame Black Noodles

    Salmon is such a versatile fish - it has such a subtle flavor which is good on its own, yet lends itself to being a great canvas for other flavors.

    This particular salmon recipe included a new ingredient to us - black rice noodles. They were really light and delicious, and my toddler went crazy for them!

    Furikake-Topped Salmon with Fresh Edamame & Miso-Sesame Black Noodles

    This was a big, colorful plate of food that was bursting with freshness. The furikake sprinkled over top adds just the right amount of seasoning.

    Just a note - the recipes from Blue Apron call for "1 bunch" of herbs, and that correlates to the size of the "bunch" they send if you're using their service (which I'm absolutely in love with!). I'd say their bunches are about 1-2 tablespoons.


    3 Scallions
    2 Cloves Garlic
    2 Skinless Salmon Fillets
    2 Tablespoons White Miso Paste
    1 1-Inch Piece Ginger
    1 Kirby Cucumber
    1 Large Bunch Cilantro
    1 Tablespoon Sesame Oil
    ¼ Pound Edamame, In Shells
    6 Ounces Black Rice Noodles
    2 Teaspoons Furikake

    See Blue Apron for the full recipe.

    No Bake Chocolate Oat Bars

    December 23, 2014 by Ashley 6 Comments

    No Bake Chocolate Oat Bars

    I was looking through some of the photos of dishes that I've uploaded but have yet to post to Big Flavors, and I realized that I forgot to post this tasty no bake dessert!

    Since Christmas is 2 days away (already!), I figured this would be a great last minute option to share for your holiday table.

    No Bake Chocolate Oat Bars

    These bars are simple to put together, and after chilling out in the refrigerator for a few hours, they're ready to devour. They're rich and decadent, so a little goes a long way.

    They were a big hit with our friends the night that I made them along with Cauliflower "Caviar" with Frizzled Prosciutto, a batch of my Grandpa Henderson's Beef Stew and some No-Knead Crusty White Bread.

    No Bake Chocolate Oat Bars

    No Bake Chocolate Oat Bars
    Allrecipes

    Original recipe makes 1 - 9x9 inch pan
    Prep: 30 mins
    Ready in 3 hrs 30 mins

    1 cup butter
    ½ cup packed brown sugar
    1 teaspoon vanilla extract
    3 cups quick cooking oats
    1 cup semisweet chocolate chips
    ½ cup peanut butter

    Grease a 9x9 inch square pan.

    Melt butter in large saucepan over medium heat. Stir in brown sugar and vanilla. Mix in the oats. Cook over low heat 2 to 3 minutes, or until ingredients are well blended. Press half of mixture into the bottom of the prepared pan. Reserve the other half for topping.

    Meanwhile, melt chocolate chips and peanut butter in a small heavy saucepan over low heat, stirring frequently until smooth. Pour the chocolate mixture over the crust in the pan, and spread evenly with a knife or the back of a spoon.

    Crumble the remaining oat mixture over the chocolate layer, pressing in gently. Cover, and refrigerate 2 to 3 hours or overnight. Bring to room temperature before cutting into bars.

    Big Flavors Rating: 5 Stars

    Roasted Buttercup Squash with Gnocchi, Bacon, Brussels Sprouts + Parmesan #12WksWinterSquash

    December 22, 2014 by Ashley 5 Comments

    Roasted Buttercup Squash with Gnocchi, Bacon, Brussels Sprouts + Parmesan

    It's been a few weeks since I got in on the 12 Weeks of Winter Squash action, and I'm glad to be back! I was excited to cook with buttercup squash for the first time when I found it at the Farmers Market a while back.

    This turned out really nicely. I liked the contrast between the soft gnocchi and crunchy almonds. The Parmesan and bacon help add a bit of saltiness, which is a nice compliment to the roasted squash.

    Roasted Buttercup Squash with Gnocchi, Bacon, Brussels Sprouts + Parmesan

    I wasn't super crazy about the flavor of the actual squash - I think I prefer other varieties more. But it was tasty, and this dish would be equally good with a different squash (or even on its own without it).

    Shrimp & Mustard Green Laing with Jasmine Rice

    December 21, 2014 by Ashley Leave a Comment

    Shrimp & Mustard Green Laing with Jasmine Rice

    A coconut-y, chile-infused sauce is the base of this Filipino dish.

    This dish has potential, but unfortunately for us, it just kind of fell flat. I partially seeded the chile to try to get something between mild and super spicy, but unfortunately it didn't really pack any heat at all.

    Shrimp & Mustard Green Laing with Jasmine Rice

    I like the idea of adding greens to a dish like this, but I think it needs some more assertive flavors to really pop. My husband added some hoisin to his, and seemed to like it better that way, I thought maybe a little lime or honey might help.

    Ah well. They can't all be winners!

    8 Ounce Peeled, Deveined Shrimp (Tails Off)
    ¾ Cup Jasmine Rice
    1 13.5 Ounce Can Coconut Milk
    1 Bunch Mustard Greens
    1 Green Bell Pepper
    1 Yellow Onion
    1 Bunch Cilantro
    1 1-Inch Piece Ginger
    1 Tablespoon Bagoong
    1 Bird's Eye Chile

    See Blue Apron for the full recipe.

    Chicken Schnitzel with Watercress, Apple, Beet & Red Walnut Salad

    December 19, 2014 by Ashley 2 Comments

    Chicken Schnitzel with Watercress, Apple, Beet & Red Walnut Salad

    I love a good chicken cutlet. There are so many things you can do to dress them up! Meyer lemon adds brightness to the fresh, crispy salad atop this fried chicken cutlet.

    This was another hit from Blue Apron. We really enjoyed this dish, even though I was distracted while cooking and forgot to dip the chicken in the mustard mixture before breading. Oops! I drizzled a little of the mixture over the cutlets while they were frying to try to make sure I got that flavor in the dish, but the breading was a mess. Gah!

    Chicken Schnitzel with Watercress, Apple, Beet & Red Walnut Salad

    The salad makes a nice camouflage, eh? ;). It was still tasty and a bright and colorful meal on a cold, windy day.

    This was my first time working with red walnuts. They were nice, but in this dish, I'm not sure I'd be able to tell them apart from regular walnuts, so don't go nuts (pun not intended, but not edited, because I totally made myself giggle at that one) trying to find them. Same with lemon vs. Meyer lemon.

    2 Chicken Cutlets
    1 Cup Panko Breadcrumbs
    1 Bunch Baby Red Beets
    1 Bunch Watercress
    1 Granny Smith Apple
    1 Meyer Lemon
    1 Stalk Celery
    3 Tablespoons Red Walnuts
    1 Shallot
    1 Tablespoon Sherry Vinegar
    ¼ Cup Dijon Mustard

    See Blue Apron for the full recipe.

    Beef on Weck Sandwiches with Heirloom Potato Salad

    December 16, 2014 by Ashley 4 Comments

    Beef on Weck Sandwiches with Heirloom Potato Salad

    We were up in Buffalo a few months ago, and one of the things I was told that I had to try was a Beef on Weck Sandwich. We didn't end up having time to try one there, so when I saw the recipe on an upcoming Blue Apron shipment, I knew I needed to get in on that!

    Beef on Weck Sandwiches with Heirloom Potato Salad

    Shaved beef and onions are fried together, piled on a Kimmelweck roll and topped with arugula and a spicy horseradish mayonnaise. The meat melts in your mouth. The sweet onions are a nice counterpoint to the horseradish, and the arugula adds a bit of freshness.

    Caraway seeds are one of the few foods that I don't care for, but on top of the rolls, they were mild enough that I didn't mind them.

    The potato salad was a nice accompaniment to the sandwiches. The mustard was nice and spicy, too. This was a really nice meal! My only note is that I would have liked a bit more au jus, but it was still delicious!

    Beef on Weck Sandwiches with Heirloom Potato Salad

    9 Ounces Shaved Beef
    2 Kimmelweck Rolls
    ½ Pound Multicolored Heirloom Potatoes
    2 Ounces Arugula
    1 Yellow Onion
    3 Tablespoons Beef Demi-Glace
    2 Tablespoons Mayonnaise
    1 Tablespoon Prepared Horseradish
    1 Tablespoon Sherry Vinegar
    1 Tablespoon Whole Grain Mustard

    See Blue Apron for the full recipe.

    Graham Cracker Snickerdoodles + The Great Food Blogger Cookie Swap 2014!

    December 15, 2014 by Ashley 7 Comments

    Graham Cracker Snickerdoodles

    For the last 3 years, I've seen The Great Food Blogger Cookie Swap riiiiight after the sign-up deadline. This year, I finally managed to get in on the delicious cookie action!

    I tested these cookies out once before deciding that they were definitely THE cookies to send out to my swap partners. They got lots of rave reviews from my taste test professionals husband's co-workers. I absolutely adore a good snickerdoodle, and Mrs. Sigg's Snickerdoodle recipe was our favorite until I found these beauties.

    Graham Cracker Snickerdoodles

    Crushed graham crackers deepen the flavor of traditional snickerdoodles in this moist, chewy cookie recipe. This spin on a classic cookie was a pure genius move, thanks to Sydney over at The Crepes of Wrath. These are definitely some of our favorite homemade cookies to date!

    I sent these beauties to Haley over at Cheap Recipe Blog, Lisa at Healthy Nibbles & Bits and Ayana at Savor Good Food. In return, I got delicious cookies from Ashley at Our Full Table, Kristen at Dinner for 2 and Kat at I Want Crazy. Head over to their blogs to see what they made for the swap!

    This was an awesome way to make some new food blog buddies, support a good cause (Cookies for Kids' Cancer) and get delicious treats in the mail! Thanks to Lindsay at Love & Olive Oil and Julie at The Little Kitchen for hosting this rockstar group again!

    Graham Cracker Snickerdoodles
    The Crepes of Wrath

    Prep time: 30 mins
    Cook time: 45 mins
    Total time: 1 hour 15 mins
    Serves: 25 cookies

    Crispy on the outside, chewy in the center cinnamon sugar snickerdoodles made with graham cracker dough.1. Pre-heat your oven to 350 degrees F. Grease and/or line your baking sheets. In a large bowl, cream together the butter and sugars until light and fluffy, at least 3-5 minutes. Beat in the egg and vanilla until just combined. 2. Crush your graham crackers in a blender or a food processor, pulsing until they are just crumbs. In a small bowl, whisk together flour, graham cracker crumbs, baking powder and salt. Add to the butter mixture and mix at a low speed until combined. 3. Combine the ½ cup granulated sugar and 2 teaspoons of cinnamon in a small bowl. Roll the dough into balls, then roll the balls in the cinnamon-sugar mixture. I sprinkled mine with some extra sanding sugar, but that is completely optional. Place on the baking sheet and flatten a bit with the palm of your hand. Bake for 10-12 minutes, until baked through but still soft and just barely golden.

    For the Cookies:
    ½ cup unsalted butter, room temperature
    ¼ cup brown sugar
    ½ cup white granulated sugar
    1 large egg, room temperature
    1 teaspoon vanilla extract
    1 ⅓ cups all-purpose flour
    1 cup graham cracker crumbs (about 9-10 graham crackers)
    1 teaspoon baking powder
    ¼ teaspoon kosher salt

    For the Cinnamon Sugar Coating:
    1 cup white granulated sugar (or raw sugar, for extra crunch)
    2-3 teaspoons cinnamon

    Pre-heat your oven to 350 degrees F. Grease and/or line your baking sheets.

    In a large bowl, cream together the butter and sugars until light and fluffy, at least 3-5 minutes. Beat in the egg and vanilla until just combined.

    Crush your graham crackers in a blender or a food processor, pulsing until they are just crumbs. In a small bowl, whisk together flour, graham cracker crumbs, baking powder and salt. Add to the butter mixture and mix at a low speed until combined.

    Combine the ½ cup granulated sugar and 2 teaspoons of cinnamon in a small bowl. Roll the dough into balls, then roll the balls in the cinnamon-sugar mixture. I sprinkled mine with some extra sanding sugar, but that is completely optional. Place on the baking sheet and flatten a bit with the palm of your hand. Bake for 10-12 minutes, until baked through but still soft and just barely golden.

    Big Flavors Rating: 5 Stars

    Bourbon Salted Caramel Candy

    December 14, 2014 by Ashley 2 Comments

    Bourbon Salted Caramel Candy

    The second offering that we brought to our Supper Club's annual cookie/candy swap was these bourbon-infused salted caramel candies. I actually had a different recipe lined up to make, but when I saw these on Sommer's Instagram feed, I made a last minute change to my game plan.

    And I'm glad I did! These were a huge hit with both our Supper Club and my husband's co-workers. This recipe makes a TON of caramel candy, so it's perfect for gift giving!

    Bourbon Salted Caramel Candy

    The only changes I made were that I didn't use California dairy, and I used unsalted butter (that's what I keep on hand), so I added ¼ teaspoon of kosher salt per stick of butter (so ½ teaspoon total for the recipe).

    The caramel took quite some time to come to temperature. I ended up bringing a book into the kitchen to read while I waited (related: Mindy Kaling's book is a super fun read). Since that took so long, I decided to cool the caramel in the refrigerator overnight, and then the next morning, I took the container out and set it on the counter to come up to room temperature before cutting.

    Cutting the caramels, salting them and wrapping them is quite an undertaking. Expect to spend quite a bit of time on it. But know that it will be totally worth it.

    Bourbon Salted Caramel Candy

    These bite-sized sweet-and-salty candies with a hint of bourbon are an impressive treat, perfect for holiday gift giving. A few of my husband's co-workers said that they'd put them in their mouths while sipping coffee and that it was pure heaven. They've been begging asking him to bring more ever since I made them!

    Bourbon Salted Caramel Candy
    A Spicy Perspective

    2 cups packed brown sugar
    1 cup granulated sugar
    1 ½ cups California cream
    1 cup salted California butter (2 sticks)
    1 cup light corn syrup
    ½ cup bourbon
    1 tablespoon vanilla extract
    Course or flake sea salt

    Place the sugars, heavy cream, butter, corn syrup and bourbon in a large sauce pot. Attach a candy thermometer to the edge of the pot with the tip touching the ingredients, then place over medium heat.

    Bring to a boil, stirring occasionally, then reduce the heat to medium- low. Allow the mixture to simmer until it reaches 245-260 degrees F and is the desired color you like for caramel. If the temperature starts rising faster than the caramel is browning, lower the heat even more to give it time to caramelize.

    Meanwhile, line a 9 X 13 inch baking dish with parchment paper and cut the corners so it folds into the dish neatly. Spray the parchment with non-stick cooking spray. Then prepare a cup of ice water to test the caramel. Once the caramel reaches at least 245 degrees F, use a spoon to drop a little bit of molten caramel into the ice water. Lift it out and test for texture. It should be firm enough to cut, yet soft enough to chew. If needed, simmer the caramel a little longer, but do not allow it to go over 260 degrees F. Once it's ready, stir in the vanilla extract.

    Carefully pour the molten caramel into the prepared dish and allow it to cool completely. You can speed up the cooling process by placing the dish in the refrigerator. Once cooled, lift the whole sheet of caramel candy out of the dish by the edges of the parchment paper and cut into 1 inch squares. Sprinkle generously with sea salt, then wrap each candy in small pieces of wax paper.

    NOTE: "California" butter and cream are butter and cream that are made in California.

    Big Flavors Rating: 5 Stars

    • « Previous Page
    • 1
    • …
    • 11
    • 12
    • 13
    • 14
    • 15
    • …
    • 35
    • Next Page »

    Hi, I'm Ashley and I’ve been writing about food & recipes here at Big Flavors from a Tiny Kitchen since 2006. I want to help you (yes, you!) gain confidence in the kitchen so you are excited to cook at home for yourself and your loved ones.

    More about me →

    Favorite Spring Recipes

    • Mayo-free Deviled Eggs
    • Middle Eastern Fattoush Salad with Homemade Pita Chips
    • Birthday Cake Confetti Pancakes with Sprinkles
    • Italian Cream Cheese and Ricotta Cheesecake
    • Garlicky Mushroom Ricotta Pizza with Wild Arugula + Aged Balsamic
    • Slow Cooker "Roasted" Beets
    • Honey Balsamic Roasted Carrots
    • Italian Ricotta Cookies
    • Rhubarb Custard Pie
    • Easy Instant Pot Herbed Potato Salad

    Mother's Day + Easter Brunch

    • Epic Brunch Board on a Budget
    • Baby Spinach and Cheddar Quiche Made with Fresh Spinach
    • Turkey Salad Tea Sandwiches with Dried Cherries
    • Great Grandma Maria Francesca Cardile's Italian Easter Cookies
    • Brie Waffle Bites
    • Challah French Toast
    • Creamsicle Smoothies
    • DM Bloody Mary
    • Turkey Scotch Eggs
    • The Herbalist

    Popular Now

    • Cast iron skillet full of chicken fajitas.
      Favorite Restaurant-Style Chicken Fajitas
    • Overhead view of spinach and cheddar quiche with forks.
      Baby Spinach and Cheddar Quiche Made with Fresh Spinach
    • Chicken and bell pepper stir-fry served over white rice.
      Chicken and Bell Pepper Stir-Fry
    • Serving dish of cooked shrimp garnished with chopped parsley.
      Quick and Easy Sautéed Shrimp
    • Overhead view of a dutch oven filled with sausages, peppers, and onions.
      Sausage and Peppers
    • Overhead view of assorted breakfast items displayed on a board.
      Epic Brunch Board on a Budget

    Footer

    ↑ back to top

    About

    • About Ashley
    • Press + Recognition
    • Events
    • Virtual Cooking Classes
    • Podcast
    • Contact
    • Privacy Policy

    Newsletter

    • Sign up to receive delicious recipes and exclusive content right to your inbox!

    As an Amazon Associate I earn from qualifying purchases at no added cost to you.

    ©2006–2026  BIG FLAVORS FROM A TINY KITCHEN LLC | ALL RIGHTS RESERVED

    *Third-party advertisers may collect or use non-personally identifiable information to serve you more relevant ads.