Big Flavors from a Tiny Kitchen

menu icon
go to homepage
  • Recipes
  • About
  • Events
  • Contact
  • Subscribe
    • Facebook
    • Instagram
    • Pinterest
  • subscribe
    search icon
    Homepage link
    • Recipes
    • About
    • Events
    • Contact
    • Subscribe
    • Facebook
    • Instagram
    • Pinterest
  • ×
    Home » Recipes

    Nutella-Stuffed Brown Butter + Sea Salt Chocolate Chip Cookies

    December 13, 2014 by Ashley 2 Comments

    Nutella-Stuffed Brown Butter + Sea Salt Chocolate Chip Cookies

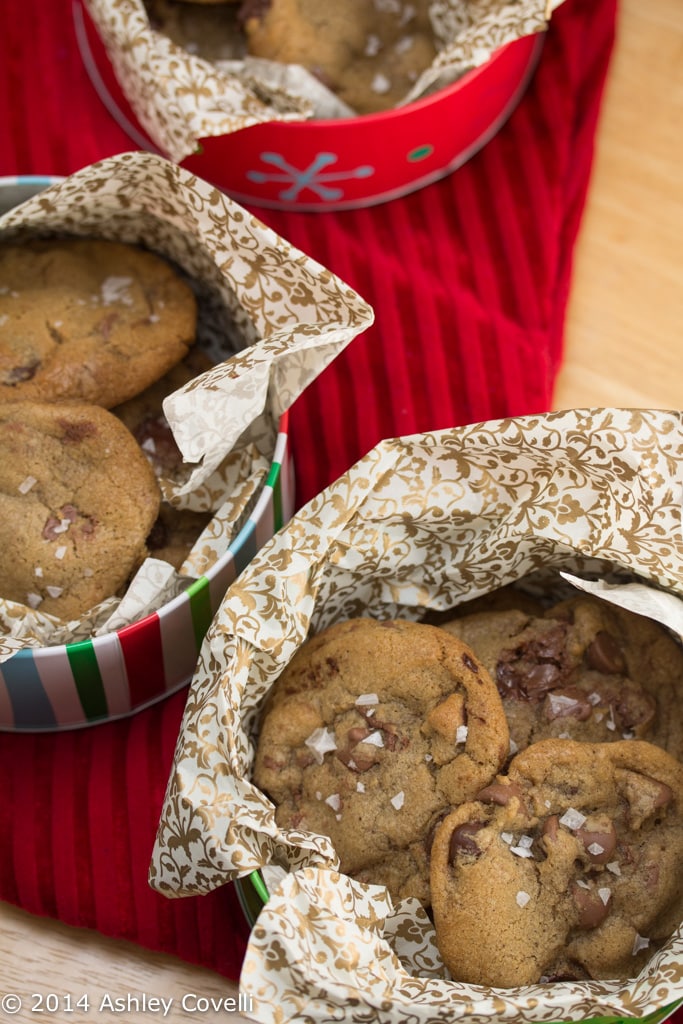
    Every December, my Supper Club goes out to a nice dinner instead of cooking a 6 (or more!) course meal and eating at one of our houses. We all bring homemade cookies/candies and do a swap. We've had lots of delicious hits over the past 7 years, and this year was no exception.

    The first homemade goodie that we brought to this year's swap was this beyond decadent cookie recipe. This is something that my friend Becky over at Hudson + Daughter has made several times, and I've been lucky enough to binge indulge in over at her house several times. As soon as I took my first bite, I was asking her for the recipe. I'm surprised she could hear me through the mouthful of cookies 😉

    Nutella-Stuffed Brown Butter + Sea Salt Chocolate Chip Cookies

    Let me start by saying that these cookies are fairly labor intensive. You have to make brown butter, make cookie dough with said brown butter, let that batter chill for a few hours, stuff cookies with Nutella, bake, salt and cool… it takes a while. But it is oh so very worth it!

    I used Ghirardelli baking chips, which are larger than standard sized chocolate chips, so stuffing the cookies with Nutella was extremely difficult. The dough kept breaking apart by the chips and it was hard to keep it all contained. But I wasn't going to NOT stuff, them, so I ended up flattening the dough into little cups, adding a small bit of Nutella to the middle and sealing them up. It was tricky, but they turned out great. Next time (yes, there will totally be a next time!) I'll use regular chips.

    Nutella-Stuffed Brown Butter + Sea Salt Chocolate Chip Cookies

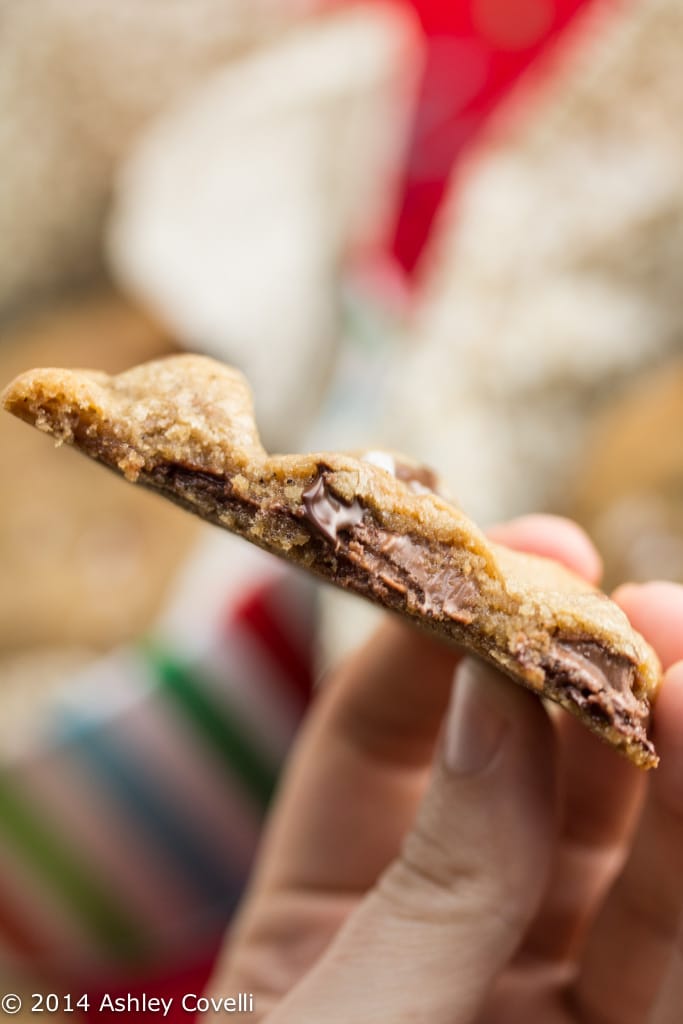
    The mix of several types of chocolate and Nutella with a dusting of flake salt on top with a brown butter backdrop makes these cookies outrageously decadent. They're soft and chewy and beyond addictive. I like popping leftovers in the microwave for 5-10 seconds before devouring. Yum!

    Nutella-Stuffed Brown Butter + Sea Salt Chocolate Chip Cookies
    Ambitious Kitchen

    Prep time
    2 hours
    Cook time
    10 mins
    Total time
    2 hours 10 mins

    Nutella is stuffed between a hazelnut brown butter flavor enhanced chocolate chip cookie then sprinkled with sea salt.

    Recipe type: Cookies
    Serves: 2 dozen cookies

    2 ¼ cup all-purpose flour
    1 ¼ teaspoons baking soda
    ¼ teaspoon of salt
    2 sticks (1 cup) unsalted butter
    1 ¼ cup packed dark brown sugar
    ¼ cup granulated sugar
    1 large egg plus 1 egg yolk
    1 ½ teaspoons vanilla extract
    1 tablespoon plain greek yogurt
    ¾ cup semi-sweet chocolate chips
    ½ cup milk chocolate chips
    ½ cup dark chocolate chips
    1 jar of Nutella, chilled in refrigerator
    Coarse sea salt for sprinkling

    Whisk together the flour, baking soda, and salt in a bowl and set aside. Melt butter in a saucepan over medium heat. The butter will begin to foam. Make sure you whisk consistently during this process. After a couple of minutes, the butter will begin to brown on the bottom of the saucepan; continue to whisk and remove from heat as soon as the butter begins to brown and give off a nutty aroma. Immediately transfer the butter to a bowl to prevent burning. Set aside to cool for a few minutes.

    With an electric mixer, mix the butter and sugars until thoroughly blended. Beat in the egg, yolk, vanilla, and yogurt until combined. Add the dry ingredients slowly and beat on low-speed just until combined. Gently fold in all of the chocolate chips.

    Chill your dough for 2 hours in the refrigerator, or place in freezer for 30 minutes if you are super eager, although I cannot promise the same results if you do this.

    Preheat the oven to 350 degrees F. Once dough is chilled measure about 1 ½ tablespoons of dough and roll into a ball. Flatten the dough ball very thinly into the palm of your hand. Place 1 teaspoon of chilled Nutella in the middle and fold dough around it; gently roll into a ball -- it doesn't have to be perfectly rolled! Make sure that the Nutella is not seeping out of the dough. Add more dough if necessary. Place dough balls on cookie sheet, 2 inches apart and flatten with your hand VERY gently. (Really only the tops need to be flattened a bit!)

    Bake the cookies 9-11 minutes or until the edges of the cookies begin to turn golden brown. They will look a bit underdone in the middle, but will continue to cook once out of the oven. Cool the cookies on the sheets at least 2 minutes. Sprinkle with a little sea salt. Remove the cooled cookies from the baking sheets after a few minutes and transfer to a wire rack to cool completely. Repeat with remaining dough.

    If dough is hard once chilled, place out to thaw for 20-30 minutes or until you can work with it.

    Big Flavors Rating: 5 Stars

    Mustard-Glazed Salmon Fillets with Roasted Cauliflower

    December 12, 2014 by Ashley Leave a Comment

    Mustard-Glazed Salmon Fillets with Roasted Cauliflower

    Salmon fillets are brushed with a lemon-dill honey mustard mixture and baked until tender and flaky. They're served with simple roasted cauliflower and buttery lentils with shallots.

    We really enjoyed this meal. The salmon was beautifully flavored and went well with the cauliflower. I made the suggested lentil accompaniment form the magazine and wasn't too crazy about it - it didn't get nice and creamy and didn't have too much flavor. I'd probably skip that part next time.

    Mustard-Glazed Salmon Fillets with Roasted Cauliflower

    The addition of lemon and fresh dill really brightens this simple seafood dinner.

    I cooked my fillets for less time than suggested because they were thin and we like our salmon medium-rare. It was a great meal!

    Mustard-Glazed Salmon Fillets with Roasted Cauliflower
    Cooking Light December 2014

    Serves 4 (serving size: 1 fillet and about ¼ cup cauliflower)

    6 cups cauliflower florets
    2 tablespoons olive oil
    ½ teaspoon freshly ground black pepper, divided
    ¼ teaspoon kosher salt, divided
    3 tablespoons Dijon mustard
    1 tablespoon honey
    2 teaspoons chopped fresh dill
    2 teaspoons fresh lemon juice
    4 (6-ounce) sustainable salmon fillets
    Cooking spray

    1. Preheat oven to 400°.

    2. Combine cauliflower, oil, ¼ teaspoon pepper, and ⅛ teaspoon salt on a baking sheet; toss to coat. Bake at 400° for 25 minutes or until lightly browned, stirring after 10 minutes.

    3. Combine mustard, honey, dill, and juice in a small bowl. Arrange fillets, skin sides down, on a foil-lined baking sheet coated with cooking spray; sprinkle with remaining ¼ teaspoon pepper and remaining ⅛ teaspoon salt. Spread mustard mixture evenly over fillets. Bake at 400° for 17 minutes or until desired degree of doneness. Serve fillets with cauliflower.

    Calories 371
    Fat 16.9 g
    Satfat 3.1 g
    Monofat 8.1 g
    Polyfat 4 g
    Protein 39 g
    Carbohydrate 15 g
    Fiber 3 g
    Cholesterol 90 mg
    Iron 1 mg
    Sodium 519 mg
    Calcium 54 mg

    Buttery Lentils with Shallots
    Cooking Light December 2014

    ⅔ cup dried petite green lentils
    1 tablespoon butter
    ½ cup chopped shallots
    2 tablespoons chopped fresh flat-leaf parsley
    1 teaspoon chopped thyme
    ¼ teaspoon kosher salt
    ¼ teaspoon pepper

    Place lentils in a medium saucepan. Cover with water to 3 inches above lentils; bring to a boil. Reduce heat, and simmer 20 minutes or until lentils are tender. Drain. Melt butter in a large skillet over medium heat. Sauté shallots 2 minutes. Add lentils, parsley, thyme, salt, and pepper; toss.

    Calories 154
    Fat 3.3 g
    Satfat 1.9 g
    Sodium 151 mg

    Big Flavors Rating: 4 Stars

    Sausage and Kale Sauté with Polenta

    December 11, 2014 by Ashley 6 Comments

    Sausage and Kale Sauté with Polenta

    This quick and delicious meal from the current issue of Cooking Light was exactly what I needed for dinner on a busy night. I don't like sweet sausage, so I used spicy and it was awesome!

    Italian sausage and kale are topped with fresh mozzarella in this quick and simple one skillet wonder!

    Sausage and Kale Sauté with Polenta

    The only trouble I had with this recipe was that the polenta stuck to the pan, so the browned bits didn't stay with the rounds (but they did end up in the sausage/kale mixture afterward). I didn't want to use a nonstick pan because it needs to broil at the end. But it still tasted great!

    Side note: I highly recommend topping leftovers with a fried egg, as suggested in the magazine. Pure awesomeness! Thanks to everyone on Instagram for all the love on this one, too!

    A photo posted by Ashley Covelli (@bigflavors) on Dec 12, 2014 at 10:14am PST

    Sausage and Kale Sauté with Polenta
    Cooking Light December 2014

    Serves 4 (serving size: 2 polenta slices and about ¾ cup sausage mixture)

    1 tablespoon olive oil
    4 ounces sweet pork Italian sausage, casings removed
    8 ounces prepared polenta, cut into 8 (½-inch-thick) slices
    6 ounces prechopped kale
    1 tablespoon water
    ½ teaspoon freshly ground black pepper
    1 ½ cups lower-sodium marinara sauce (such as Dell'Amore)
    2 ounces fresh mozzarella cheese, torn into small pieces

    1. Preheat broiler to high.

    2. Heat olive oil in a skillet over medium-high. Add sausage; cook 3 minutes, stirring. Remove sausage. Add polenta to pan; cook 5 minutes. Remove polenta. Add kale, 1 tablespoon water, and pepper to pan. Cover; cook 2 minutes. Uncover; stir in sausage and marinara. Nestle polenta, browned side up, into sausage mixture; sprinkle with cheese. Broil 2 minutes.

    Calories 260
    Fat 16.6 g
    Satfat 5.7 g
    Monofat 6.6 g
    Polyfat 1.6 g
    Protein 10 g
    Carbohydrate 18 g
    Fiber 3 g
    Cholesterol 33 mg
    Iron 3 mg
    Sodium 408 mg
    Calcium 79 mg

    Big Flavors Rating: 4 Stars

    Olive Oil-Poached Fish with Fresh Herbs and Lemon

    December 10, 2014 by Ashley Leave a Comment

    Olive Oil-Poached Fish with Fresh Herbs and Lemon

    I've had this recipe in my "to try" pile for a few months now, and finally made it one night when my in-laws were over for dinner.

    Pieces of fish are poached in a garlicky, lemon-infused olive oil and tossed with mixed herbs. The fish is wonderfully light, flaky and tender and bursting with fresh flavors.

    Olive Oil-Poached Fish with Fresh Herbs and Lemon

    I used cod for this recipe and it worked beautifully. I served this with Farro with Honey-Garlic Roasted Tomatoes for a light, refreshing dinner. It was a nice reprieve from all of the heavy holiday food we've been eating lately. And it was really easy to put together, so it's definitely something I'll make again.

    Olive Oil-Poached Fish with Fresh Herbs and Lemon
    The New Persian Kitchen - Louisa Shafia

    Serves 4

    1 ½ pounds US-caught swordfish fillet or other meaty white fish like Pacific halibut or Atlantic cod, cut into 1 ½-inch pieces
    Sea salt and freshly ground black pepper
    ½ cup extra-virgin olive oil
    3 cloves garlic, minced
    Zest of 1 lemon
    5 tablespoons freshly squeezed lemon juice
    2 cups loosely packed fresh dill, minced
    2 cups loosely packed fresh flat-leaf parsley, minced

    Season the fish with 1 teaspoon salt and 1 teaspoon pepper

    Heat the oil in a large, deep pan over low heat for 1 minute. Stir in the garlic and lemon zest, then place the fish in the pan in a single layer and cook for 5 minutes undisturbed. Turn the fish and cook for 5 minutes, or until it's just opaque in the center. Turn off the heat and add the lemon juice. Fold in the herbs and season with salt and pepper.

    Let the fish rest for 5 minutes before serving, or let cool completely and serve at room temperature. The fish tastes best within a day of being made.

    Big Flavors Rating: 4 Stars

    Farro with Honey-Garlic Roasted Tomatoes

    December 9, 2014 by Ashley 1 Comment

    Farro with Honey-Garlic Roasted Tomatoes

    I love farro and am always looking for new ways to use it. So when I saw this side dish featuring another favorite ingredient (tomatoes!) in my Cooking Light magazine, I knew I had to make it.

    Plus, I got to top it with cheese. What could be better?!

    Farro with Honey-Garlic Roasted Tomatoes

    Tomatoes are roasted with honey and garlic until soft and sweet, then tossed with chewy farro, toasted walnuts, salty feta and fresh thyme. This can be made ahead of time and popped in the refrigerator for a few hours while the flavors mingle, which makes it perfect for busy weeknights or dinner parties.

    This was a big hit with my family. I'll definitely be making it again.

    Farro with Honey-Garlic Roasted Tomatoes
    Cooking Light December 2014

    Recipe Time:
    Hands-on: 15 Minutes
    Total: 1 Hour
    Serves 6 (serving size: about ½ cup)

    1 ½ tablespoons olive oil
    1 tablespoon honey
    3 garlic cloves, minced
    1 pound cherry or grape tomatoes, halved lengthwise
    ¾ cup uncooked farro
    1 ½ teaspoons sherry vinegar
    ⅝ teaspoon kosher salt
    3 tablespoons toasted walnuts, coarsely chopped
    2 ounces feta cheese, crumbled (about ½ cup)
    2 teaspoons chopped fresh thyme
    Preparation

    1. Preheat oven to 375°.

    2. Combine oil, honey, and garlic in a large bowl. Add tomatoes; gently, with your hands, toss until thoroughly coated. Pour tomatoes onto a jelly-roll pan; turn tomatoes until they're all cut side down. Draw tomatoes together until they're cozy and touching. If there's any honey mixture left, drizzle over tomatoes. Bake at 375° for 20 to 25 minutes or until wrinkled and soft but not mushy; do not brown. (Note: Grape tomatoes may take less time than cherry tomatoes.) Remove tomatoes from oven; cool to room temperature.

    3. While tomatoes cook, place farro in a medium saucepan; cover with water to 2 inches above farro. Bring to a boil. Cover, reduce heat, and simmer 15 minutes or until nicely chewy and not puffed open and starchy. Drain and rinse with cold water; drain.

    4. Combine farro, tomato mixture, vinegar, and salt in a large bowl; toss gently to combine. Top with walnuts and feta; garnish with thyme. Serve immediately, or let the flavors marry in the fridge for an hour or 2.

    Calories 191
    Fat 8.4 g
    Satfat 2.1 g
    Monofat 3.3 g
    Polyfat 2.2 g
    Protein 6 g
    Carbohydrate 25 g
    Fiber 4 g
    Cholesterol 8 mg
    Iron 2 mg
    Sodium 310 mg
    Calcium 73 mg

    Big Flavors Rating: 4 Stars

    Roasted Chicken with Bacon and Sweet Paprika

    December 8, 2014 by Ashley 1 Comment

    Roasted Chicken with Bacon and Sweet Paprika

    Oh yes I did...

    This recipe looked too irresistible, so I made it for my parents when they were in town. Chicken is slathered in a orange zest-paprika oil, then topped with a bacon lattice, which adds a beautiful saltiness to the tender meat.

    Roasted Chicken with Bacon and Sweet Paprika

    The flavors work really well together, and the bacon is a fun twist. I recommend assembling the bacon on a cutting board before you put it on top of the partially roasted chicken so you don't burn your fingers.

    My chicken was really large and took quite a bit longer than the recipe suggested to cook through, but the meat was succulent and delicious. It was a big hit at the dinner table!

    This was one of my most popular Instagram photos - I almost didn't post it, because raw bacon... but apparently the people loved it! Bacon lovers UNITE!

    Roasted Chicken with Bacon and Sweet Paprika
    50 Shades of Chicken - F.L. Fowler

    1 orange
    1 tablespoon sweet paprika
    1 ½ teaspoons coarse kosher salt
    1 teaspoon freshly ground black pepper
    1 teaspoon extra-virgin olive oil
    1 (3 ½- to 4-pound) chicken, patted dry with paper towels
    4 ounces bacon (about 4 strips)

    1 .Preheat the oven to 400°F. Finely grate the zest of the orange into a bowl. Stir in the paprika, salt, and pepper.

    2. Massage the oil all over the skin of the chicken. Sprinkle some of the paprika mixture into the cavity; massage the remaining mixture all over the bird (you'll know you've done a good job if your hand begins to redden). Cut the orange into quarters and thrust the fruit deep into the cavity of the bird.

    3. Move the chicken to a rack set over a roasting pan. Roast for 45 minutes, basting with any pan juices occasionally. Crisscross the bacon over the breasts. Continue to roast until the chicken is cooked through and the bacon is crisp, about 20 minutes longer. Let rest 10 minutes before carving.

    Big Flavors Rating: 5 Stars

    Slow Cooker Corn Pudding

    December 7, 2014 by Ashley 3 Comments

    Slow Cooker Corn Pudding

    I was looking for a simple side dish to bring to my in-laws' house for Thanksgiving this year.

    I had my hands full making a Sweet Potato Pie and a Chocolate Cream Pie with Orange Zested Whipped Cream as well as our favorite Bourbon Cranberry Sauce and Best Ever Green Bean Casserole. So this was a perfect, no-fuss side dish that I could let cook away in the slow cooker while I was working on everything else.

    Slow Cooker Corn Pudding

    Just 5 ingredients are stirred together in the slow cooker, where they thicken into a rich, decadent corn pudding. Mine was still pretty loose after 3 hours, so I put it on high for a little bit and then ended up just stirring it together and it was fine. I think because of the muffin mix, I was expecting it to be firmer, but it was great the way it was.

    It's super rich, so a little will go a long way. We ended up putting some of the leftover corn pudding in the waffle iron the next day, and then making griddle cakes with some of it. Both were super tasty, but the "batter" was so sticky that it kind of made a mess. A delicious mess!

    Slow Cooker Corn Pudding
    Reddit

    2 cans whole corn, undrained
    2 cans creamed corn
    2 boxes corn muffin mix
    1 stick butter, melted
    8 oz sour cream

    Combine all ingredients in a 4 quart crockpot. Cover & cook on low 2-3 hours until thickened and set.

    Big Flavors Rating: 5 Stars

    Pork Medallions with Ruth Ann's Muskego Ave Seasoning

    December 6, 2014 by Ashley 1 Comment

    Pork Medallions with Ruth Ann's Muskego Ave Seasoning

    Pork tenderloin is seasoned, seared, then finished in the oven. A little white wine and butter turn the pan drippings into a delicious sauce for this quick and flavorful pork dinner.

    This was something I made on a whim when I found some pork tenderloin in the freezer. It was quick and delicious, thanks to a flavorful spice blend from Penzeys.

    Pork Medallions with Ruth Ann's Muskego Ave Seasoning

    The green onions really freshen up the flavor of this dish. The golden sear on the outside of the pork and tender inside really hit the spot for us that day.

    I served this with Roasted Butternut Squash & Broccolini with Truffle Salt and it was the perfect accompaniment!

    Chocolate Cream Pie with Orange Zested Whipped Cream

    December 5, 2014 by Ashley 1 Comment

    Chocolate Cream Pie with Orange Zested Whipped Cream

    In addition to the Sweet Potato Pie that I made for Thanksgiving this year, I made this decadent, chocolatey pie.

    Chocolate Cream Pie with Orange Zested Whipped Cream

    I actually had part of this pie saved from a while back when I made Bourbon Bacon Pecan Pie, because I was reading the ingredients from the wrong page! I had already mixed together the first 4 (dry) ingredients when I realized it didn't sound like the pie I was planning to make. So I bagged it up and saved it for another time.

    This pie wasn't too tricky to put together, but you do need to allow some time for the chocolate to set. This made it a perfect candidate for Thanksgiving, as I made it on Wednesday and then made the whipped cream on Thursday afternoon.

    Chocolate Cream Pie with Orange Zested Whipped Cream

    This was a big hit with my family! The orange flavor really comes through in the whipped cream, and the chocolate is rich and decadent.

    I used 2% milk instead of whole, since that's what I usually keep on hand, and it worked out just fine.

    I went for a pretty garnish of orange curls atop this pie, which gave it a major wow factor.

    Chocolate Cream Pie with Orange Zested Whipped Cream

    Chocolate Cream Pie with Orange Zested Whipped Cream
    Teeny's Tour of Pie - Teeny Lamothe

    Prep time: 30 minutes
    Chill time: 4 hours
    Total time: 4 hours 30 minutes
    Makes: One 9-inch single-crust pie (6 to 8 slices) or four 5-inch single-crust teeny pies

    ¾ cup granulated sugar
    ¼ cup unsweetened cocoa powder
    3 tablespoons packed cornstarch
    ¼ teaspoon salt
    1 ½ cups whole milk
    ½ cup heavy (whipping) cream
    4 large egg yolks
    1 cup semisweet chocolate chips
    1 prebaked 9-inch Buttery All-Purpose Crust (recipe follows)
    Orange Zested Whipped Cream, for topping (recipe follows)

    1. Whisk together the sugar, cocoa powder, cornstarch, and salt in a large saucepan until well combined.

    2. Whisk together the milk, cream, and egg yolks in a separate small bowl until smooth. Pour the milk mixture into the saucepan and whisk until everything comes together and the mixture looks like frothy chocolate milk.

    3. Place the saucepan over medium heat and cook, whisking constantly, until the mixture comes to a low simmer and begins to to thicken, about 8 minutes. Continue cooking, whisking constantly and being sure to scrape the bottom of the pan to prevent scorching, until the mixture begins to boil, about 5 minutes more. Still whisking constantly, let it boil for a full minute, then immediately remove it from the heat.

    4. Add the chocolate chips to the thickened chocolate cream and whisk until they melt completely and the mixture is smooth.

    5. Pour the chocolate filling into the pie crust and, while still hot, cover it with plastic wrap to prevent a film from forming on the top. Refrigerate the pie until it's set, at least 4 hours.

    6. Before serving, remove the plastic and top with the whipped cream. Serve cold.

    Buttery All-Purpose Crust

    Prep time: 15 minutes
    Chill time: 1 hour
    Total time: 1 hour 15 minutes
    Makes: One 9-inch double crust or four 5-inch double crusts

    2 ½ cups all-purpose flour
    2 teaspoons salt
    2 tablespoons granulated sugar
    ¾ cup (1 ½ sticks) cold unsalted butter, cut into 1-inch pieces
    ¼ cup (4 tablespoons) cold vegetable shortening
    ¼ cup (4 tablespoons) cold vodka
    6 tablespoons cold water, plus extra as needed

    1. In a large bowl mix together the flour, salt, and sugar until everything is thoroughly combined. Add the butter and shortening and cut the mixture together using a pastry cutter until it forms small pea-size crumbs coated in flour.

    2. Pour the vodka over the dry ingredients a few tablespoons at a time while using a rubber spatula to press the dough together. Similarly, add the water, and continue to press the dough together to form a large ball. The dough should be fairly wet and sticky; if for some reason it seems particularly dry, add a little extra ice water a tablespoon at a time until everything comes together easily. (Be careful to work the dough as little as possible, otherwise the crust may be tough.)

    3. Divide the dough into two equal balls, press each into a 1-inch disk, wrap each in plastic and refrigerate for at least 2 hour or up to 2 days before rolling out.

    Orange Zested Whipped Cream

    Prep time: 5 to 10 minutes
    Total time: 5 to 10 minutes
    Makes: about 2 cups

    1 cup heavy (whipping) cream
    3 tablespoons confectioners' sugar
    1 teaspoon pure vanilla extract
    1-2 teaspoons freshly grated orange zest

    In the bowl of a stand mixer fitted with the whisk attachment, or in a large bowl using a handheld electric mixer, beat together the cream, sugar, vanilla and orange zest on high speed until the mixture has doubled in size and becomes stiff enough to stick to the whisk, about 3 minutes. (If you whisk it for too long it will begin to turn into butter, which is never a pretty sight - unless that's your intention! - so just keep an eye on it and stop whisking when it reaches the consistency that you like.)

    Big Flavors Rating: 4 Stars

    Sweet Potato Pie

    December 4, 2014 by Ashley 1 Comment

    Sweet Potato Pie

    I did something crazy this year for Thanksgiving. I didn't make our favorite pumpkin pie.

    I didn't even make our favorite apple pie. Nope.

    I decided I wanted to try my hand at making sweet potato pie for the first time. And boy am I glad I did...

    Sweet Potato Pie

    I learned a few things while making this pie. First of all, I assumed that roasted sweet potatoes were used in the pie filling. But in this recipe, they're boiled until tender, then peeled and blended with butter, sugar, eggs and spices until smooth.

    I also had no idea that the peel of a sweet potato would slide right off after it has been boiled. It was super easy! I did need to bake it for a bit longer than the recipe called for to get it firm enough in the middle, so I definitely recommend giving yourself a little extra time just in case.

    Sweet Potato Pie

    This silky smooth pie is sure to be a hit at your holiday table. Plus, it's made from vegetables, so it's totally healthy, right? 😉

    I liked this even better the next day, straight out of the fridge. Mmmm...

    Sweet Potato Pie

    Sweet Potato Pie I
    Allrecipes

    PREP: 30 mins
    COOK: 1 hr 50 mins
    READY IN: 2 hrs 20 mins

    Makes 1 - 9 inch pie

    1 (1 pound) sweet potato
    ½ cup butter, softened
    1 cup white sugar
    ½ cup milk
    2 eggs
    ½ teaspoon ground nutmeg
    ½ teaspoon ground cinnamon
    1 teaspoon vanilla extract
    1 (9 inch) unbaked pie crust

    Boil sweet potato whole in skin for 40 to 50 minutes, or until done. Run cold water over the sweet potato, and remove the skin.

    Break apart sweet potato in a bowl. Add butter, and mix well with mixer. Stir in sugar, milk, eggs, nutmeg, cinnamon and vanilla. Beat on medium speed until mixture is smooth. Pour filling into an unbaked pie crust.

    Bake at 350 degrees F (175 degrees C) for 55 to 60 minutes, or until knife inserted in center comes out clean. Pie will puff up like a soufflé, and then will sink down as it cools.

    Big Flavors Rating: 5 Stars

    Roast Chicken with Brandy-Vanilla Butter

    December 2, 2014 by Ashley Leave a Comment

    Roast Chicken with Brandy-Vanilla Butter

    A while back, I was passing a display at my local library and saw something that immediately caught my attention: Fifty Shades of Chicken: A Parody in a Cookbook. The book is hilarious but it also has lots of swoon-worthy chicken recipes (not to mention the photos... ahem).

    The recipe one I chose to make from the book was this Roast Chicken with Brandy-Vanilla Butter.

    Roast Chicken with Brandy-Vanilla Butter

    A seasoned brandy and vanilla infused butter is slathered underneath the skin before this chicken roasts away. It's a simple, flavorful and very unique combination that was a big hit with my family.

    My in-laws were over for dinner that night, so I had my father-in-law carve the chicken (he's a rockstar in the kitchen and the best at carving meat).

    Roast Chicken with Brandy-Vanilla Butter

    I served the chicken with Maple-Balsamic Roasted Carnival Squash and some dinner rolls and I picked up from the store.

    This was a wonderful, comforting meal that was perfect for the autumn weather.

    Roast Chicken with Brandy-Vanilla Butter

    Roast Chicken with Brandy-Vanilla Butter
    50 Shades of Chicken - FL Fowler

    4 tablespoons unsalted butter, very soft
    1 tablespoon brandy
    2 teaspoons vanilla extract
    1 ½ teaspoons sugar
    1 ½ teaspoons coarse kosher salt
    1 teaspoon freshly ground black pepper
    1 (3 ½- to 4-pound) chicken, patted dry with paper towels

    1. Preheat the oven to 400°F. In a medium bowl, whisk together the butter, brandy, vanilla, sugar, ½ teaspoon salt and ½ teaspoon black pepper until it forms a smooth, supple spread (at first it will seem to curdle, but continue beating until it submits).

    2. Season the chicken, including the cavity, with the remaining 1 teaspoon salt and ½ teaspoon pepper.

    3. Fill your hand with butter and gently slide your fingers beneath the skin of the breast, slathering butter on the flesh as you go. Work your way down to the tight. Repeat until you have used all of the butter.

    4. Place the chicken on a rack set over a rimmed baking sheet. Roast until the thigh juices run clear when pierced with the tip of a knife and the skin is crisp and golden, about 1 hour and 15 minutes. Let rest for 10 minutes before carving.

    Big Flavors Rating: 5 Stars

    Roasted Butternut Squash & Broccolini with Truffle Salt #12WksWinterSquash

    December 1, 2014 by Ashley 3 Comments

    Roasted Butternut Squash & Broccolini with Truffle Salt

    This recipe came to be when I found myself with half a butternut squash and a whole bunch of random produce that needed to be used up before it all spoiled. I was a little leery of combining tomatoes with the squash at first, but I'm so glad I did, because it went together beautifully!

    This dish has it all - creamy, caramelized butternut squash, slightly crispy broccolini, sweet baby bell peppers, tangy white wine vinegar and juuuust enough garlic. Plus a touch of truffle salt.

    Woah, Nelly.

    Roasted Butternut Squash & Broccolini with Truffle Salt

    I need to get bold with combining odds and ends from my produce drawers more often! This is a very worthy addition to this year's 12 Weeks of Winter Squash celebration. Can you believe it's already halfway over?!

    Interested in checking out what else we've been cooking up for this year's 12 Weeks of Winter Squash?


    Pan-Roasted Chicken with Saba-Grape Sauce, Roasted Fennel & Sunchokes

    November 30, 2014 by Ashley 1 Comment

    Pan-Roasted Chicken with Saba-Grape Sauce, Roasted Fennel & Sunchokes

    I chose this Blue Apron meal because it called for 2 ingredients that I don't particularly care for - fennel and sunchokes. Over the last few years, I've had quite a bit of success with trying to enjoy foods that I didn't previously enjoy (seafood, blue cheese,beets and tarragon to name a few). I've found that trying them in various preparations with different combinations of ingredients can really help.

    Earthy vegetables and rosemary are roasted until golden and topped with tender chicken and a lemon-infused saba-grape sauce. Fennel fronds act as an herbaceous garnish for this warm, comforting dish.

    Pan-Roasted Chicken with Saba-Grape Sauce, Roasted Fennel & Sunchokes

    While I still don't love the flavor of sunchokes, they weren't bad in this dish. Fennel is really growing on me. When it's roasted like this, it gets nice and sweet and isn't overly licorice-y. My husband really enjoyed this meal, and I was pretty happy with it too.

    Just a note - the recipes from Blue Apron call for "1 bunch" of herbs, and that correlates to the size of the "bunch" they send if you're using their service (which I'm absolutely in love with!). I'd say their bunches are about 1-2 tablespoons.

    2 Airline Chicken Breasts

    4 Ounces Black Grapes
    1 Fennel Bulb With Fronds
    1 Lemon
    10 Ounces Purple Top Turnip
    1 Red Onion
    ½ Pound Sunchokes
    1 Bunch Rosemary
    2 Tablespoons Butter
    1 Tablespoon Saba

    See Blue Apron for the full recipe.

    Chicken Pot Pie

    November 28, 2014 by Ashley 4 Comments

    Chicken Pot Pie

    My parents were in town for the week, and I was excited to cook for them. They drive a semi truck for a living, so a home-cooked meal is hard to come by.

    And when I was brainstorming what to make for my meat-and-potatoes loving dad, I thought of just the perfect thing - chicken pot pie.

    Chicken Pot Pie

    This pot pie is simple to put together, especially if you use store-bought pie crusts (or if you have a stash of homemade crusts in the freezer!).

    Chicken and veggies are simmered until tender, coated with a creamy sauce and baked in pie crust until golden and bubbly. This was pure comfort food, and we polished it off in no time.

    I think next time, I'll add potatoes and maybe some fresh herbs - thyme would be nice, and maybe a bay leaf while the chicken and veggies boil. I think this recipe lends itself to lots of nice variations. It was a big hit!

    Chicken Pot Pie

    Chicken Pot Pie IX
    Allrecipes

    PREP: 20 mins
    COOK:50 mins
    READY IN: 1 hr 10 mins

    Makes 1 9-inch pie

    1 pound skinless, boneless chicken breast halves - cubed
    1 cup sliced carrots
    1 cup frozen green peas
    ½ cup sliced celery
    ⅓ cup butter
    ⅓ cup chopped onion
    ⅓ cup all-purpose flour
    ½ teaspoon salt
    ¼ teaspoon black pepper
    ¼ teaspoon celery seed
    1 ¾ cups chicken broth
    ⅔ cup milk
    2 (9 inch) unbaked pie crusts

    Preheat oven to 425 degrees F (220 degrees C.)

    In a saucepan, combine chicken, carrots, peas, and celery. Add water to cover and boil for 15 minutes. Remove from heat, drain and set aside.

    In the saucepan over medium heat, cook onions in butter until soft and translucent. Stir in flour, salt, pepper, and celery seed. Slowly stir in chicken broth and milk. Simmer over medium-low heat until thick. Remove from heat and set aside.

    Place the chicken mixture in bottom pie crust. Pour hot liquid mixture over. Cover with top crust, seal edges, and cut away excess dough. Make several small slits in the top to allow steam to escape.

    Bake in the preheated oven for 30 to 35 minutes, or until pastry is golden brown and filling is bubbly. Cool for 10 minutes before serving.

    Big Flavors Rating: 4 Stars

    Moussaka-Style Lasagna with Eggplant & Spinach

    November 27, 2014 by Ashley 1 Comment

    Moussaka-Style Lasagna with Eggplant & Spinach

    Baked eggplant is layered with a spinach-packed meat sauce, béchamel and feta cheese in this Greek-meets-Italian classic.

    Moussaka-Style Lasagna with Eggplant & Spinach

    This was probably the most work any of the Blue Apron meals have taken so far, and while I liked it, I wasn't blown away. I think that the orange zest worked in the meat sauce, but didn't care much for the pieces of orange within it. I think it overwhelmed the other flavors. Dino really dug it though! And it was definitely comfort food, perfect for the cool weather we've been having here in New York.

    The sweetness of the raisins works really well with the spinach. Those warm little bites of sweetness were great throughout this dish.

    Moussaka-Style Lasagna with Eggplant & Spinach

    One more note - I only used about ⅓ of the package of pasta. Maybe I'll make a version of this without the orange to use up the rest!

    8 Ounces Ground Beef
    9 Ounces Oven-Ready Lasagna Noodles
    1 15-Ounce Can Crushed Tomatoes
    1 Cup Low-Fat Milk
    4 Ounces Baby Spinach
    1 Eggplant
    1 Orange
    1 Yellow Onion
    2 Tablespoons Golden Raisins
    2 Tablespoons All-Purpose Flour
    2 Teaspoon Moussaka Spice Blend (Dried Greek Oregano, Ground Coriander, Sumac, Ground Cinnamon & Aleppo Pepper)
    ¼ Cup Crumbled Feta Cheese

    See Blue Apron for the full recipe.

    Lasagna-Stuffed Spaghetti Squash #12WksWinterSquash

    November 24, 2014 by Ashley 3 Comments

    Lasagna-Stuffed Spaghetti Squash

    The other texture we picked for our Supper Club's texture grab bag this month was "stringy". I immediately thought of spaghetti squash and melted mozzarella cheese.

    Spaghetti squash are roasted then layered with ricotta and meat sauce and topped with mozzarella and baked till bubbly. It's noodle-free comfort food and it's absolutely delicious!

    Lasagna-Stuffed Spaghetti Squash

    I used ground turkey for these and it worked out beautifully. They were a big hit at our Supper Club dinner, and one that I'll definitely be making again. My parents came to town a few days after I made these and really enjoyed the leftovers, too!

    Lasagna-Stuffed Spaghetti Squash
    The Kitchn

    Makes 4 very generous servings

    5 pounds spaghetti squash (2 medium-sized squash)
    1 teaspoon olive oil
    1 yellow onion, diced
    2 to 3 cloves garlic, minced
    1 pound ground beef
    1 ½ teaspoons salt, divided
    1 (15-ounce) can crushed tomatoes
    2 cups ricotta, whole or 2%
    ¼ cup roughly chopped parsley
    1 cup shredded mozzarella
    Chopped parsley or basil, to garnish

    Preheat the oven to 400°F. Cut the squashes in half and scoop out the seeds. Lay them cut-side down in a roasting pan or other baking dish, and add about an inch of water. Roast for 45 to 60 minutes, until soft when poked with a fork. Transfer to a cooling rack until cool enough to handle.

    While the squash is roasting, warm the olive oil in a high-sided skillet or saucepan over medium-high heat. Stir in the onions and cook until translucent, 5 to 8 minutes. Stir in the garlic and cook until fragrant, 30 seconds. Add the ground beef and 1 teaspoon of salt. Cook until well-browned, breaking up the beef into small crumbles, 5 to 8 minutes. Stir in the crushed tomatoes and bring to a simmer. Continue simmering the sauce until the squashes are ready, 5 to 20 minutes. Taste the sauce and add more salt if desired.

    Use a fork to shred the inside of the squash, leaving about a half-inch of squash left in the shell. Mix the shredded squash into the tomato sauce. In a separate bowl, mix together the ricotta cheese, the parsley and ½ teaspoon of salt.

    Wipe out the roasting pan and arrange the squash shells inside, like bowls. Divide half of the ricotta mixture between the shells, using a spoon to spread the ricotta evenly over the bottom of the shells. Divide half the tomato sauce between the shells, spooning over top of the ricotta. Top with another layer of ricotta and tomato sauce.

    → At this point, the shells can be covered and refrigerated for up to 24 hours. Add an extra 10 minutes to the cooking time.

    Bake the shells for 15 minutes at 400°F. Sprinkle the mozzarella over the tops of the squashes and bake for another 15 to 20 minutes, until the cheese is bubbly and browned in spots. (For a more golden top, run the squashes under the broiler for a minute or two.)

    Sprinkle parsley or basil over the tops and serve immediately. Leftovers will keep for 1 week in the fridge.

    Recipe Notes
    Casserole Version: Instead of stuffing the squash shells, this can be baked casserole-style in an 2-quart (8x8-inch) baking dish. Layer ⅓ of the tomato sauce into the dish, followed by ½ the ricotta and another ⅓ of the sauce. Top with the remaining ricotta and the tomato sauce. Bake for 15 minutes, then sprinkle with mozzarella. Bake another 15 to 20 minutes, until bubbly.

    Big Flavors Rating: 5 Stars

    Interested in checking out what else we've been cooking up for this year's 12 Weeks of Winter Squash?


    The Best Yorkshire Pudding

    November 23, 2014 by Ashley 2 Comments

    The Best Yorkshire Pudding

    For our November Supper Club theme, we had a texture grab bag. We all wrote one down on a piece of paper and drew randomly. Dino drew "fluffy" and at first wanted to do a soufflé. I'm all on board for trying out making one of those, but not for a dinner where we have to travel to someone else's house. So I suggested something that's been on my culinary bucket list for quite a while now - Yorkshire pudding.

    The Best Yorkshire Pudding

    I got some Yorkshire pudding tins a while ago and was excited to finally try them out. You can also use a muffin tin if that's all you have.

    The recipe wasn't nearly as difficult as I thought it would be! You just need to have a bit of patience, because the batter has to sit for a while. I prepared it in the morning for us to cook that evening.

    There's a really helpful video here that I recommend watching before you try these out.

    The Best Yorkshire Pudding

    We used vegetable shortening in the tins to keep them vegetarian. We were serving them with a really large meal, so we didn't make any gravy to go with them, but that's the way they're traditionally served.

    They were super light and fluffy and really tasty! I think they would make a great alternative to dinner rolls for Thanksgiving dinner.

    We had some leftover straight from the fridge the next day with strawberry jam, and they were delicious that way as well. Definitely something I'll be making again!

    The Best Yorkshire Pudding

    The Best Yorkshire Pudding
    About.com

    Serves 6

    4 large, fresh eggs, measured into a jug
    Equal quantity of milk to your measured eggs
    Equal quantity of all purpose/plain flour to measured eggs
    Pinch of salt
    2 tablespoon lard, beef dripping or vegetable oil

    Heat the oven to the highest temperature possible, however, do not exceed 230°C / 450°F or the fat may burn.

    Pour the eggs and milk into a large mixing bowl and add the pinch of salt. Whisk thoroughly with an electric hand beater or hand whisk. Leave to stand for 10 minutes.

    Gradually sieve the same volume of flour (as the eggs) into the milk and egg mixture, again using an electric hand beater or hand-whisk to create a lump free batter resembling thick cream, if there are any lumps pass the batter through a fine sieve.

    Leave the batter to rest in the kitchen for a minimum of 30 minutes, longer if possible - up to several hours.

    Place a pea-sized piece of lard, dripping or ½ teaspoon vegetable oil into your chosenYorkshire pudding tin, or a 4 x 2"/5cm hole tin or 12-hole muffin tin and heat in the oven until the fat is smoking. Give the batter another good whisk adding 2 tbsps of cold water and fill a third of each section of the tin with batter and return quickly to the oven.

    Leave to cook until golden brown approx 20 minutes. Repeat the last step again until all the batter is used up.

    Serving Yorkshire Pudding

    In Yorkshire serving the pudding is traditionally with gravy as a starter dish followed by the meat and vegetables. More often smaller puddings cooked in muffin tins are served alongside meat and vegetables.

    Yorkshire pudding isn't reserved only for Sunday lunch. A large pudding filled with a meaty stew or chili is a dish in its own right.

    Cold left-over Yorkshire Puddings make a lovely snack with a little jam or honey.

    Yorkshire Puddings do not reheat well, becoming brittle and dry.

    Big Flavors Rating: 4 Stars

    Caprese-Inspired Salad

    November 22, 2014 by Ashley Leave a Comment

    Caprese-Inspired Salad

    I firmly believe that salads  serve as an excuse to eat more cheese. It just so happens that most of the salads I make involve at least one type of cheese. What can I say, all those years of living in Wisconsin really left an impression.

    Caprese-Inspired Salad

    For this particular salad, I topped a spring mix with bocconcini, sun-dried tomatoes, thinly sliced shallots, fresh parsley (I was out of basil), gray salt, freshly cracked black pepper, aged balsamic and a really nice olive oil. I really liked the sweet tomatoes with the creamy mozzarella and the bite of the shallots. It was a fun spin on a traditional Italian salad.

    Big Flavors Rating: 4 Stars

    Tyler Florence's Banana Nut Muffins

    November 21, 2014 by Ashley Leave a Comment

    Tyler Florence's Banana Nut Muffins

    Since I have a toddler in the house, I pretty much always have at least one bunch of bananas in the house. We go through them so quickly that they don't often get ripe enough to make banana bread with, but I set a few aside a few weeks ago so we could make Tyler Florence's Banana Nut Muffins.

    Tyler Florence's Banana Nut Muffins

    Half of the bananas are mashed with a fork to add texture to these tender, fluffy muffins. Chopped pecans give them a nice bit of crunch.

    These muffins were a big hit - perfect for breakfast and or dessert.

    Tyler Florence's Banana Nut Muffins

    This recipe will dirty a lot of dishes, but it's pretty easy to put together. My son was really excited to help make these muffins.

    One note - the yield on this says 12, but the recipe instructs you to grease 2 muffin tins. We got 19 muffins out of this recipe.

    Baking a batch of @tylerflorence's Banana Nut #Muffins with my little guy this afternoon. He's getting pretty good at this kitchen thing!! #recipe via @foodnetwork

    A photo posted by Ashley Covelli (@bigflavors) on Nov 11, 2014 at 11:14am PST

    Banana Nut Muffins
    Tyler Florence

    Total Time: 27 min
    Prep: 7 min
    Cook: 20 min
    Yield: 12 muffins (see my note above)

    2 cups all-purpose flour
    1 ½ teaspoons baking soda
    ½ teaspoon salt
    4 overripe bananas
    1 cup brown sugar
    ¾ cup (1 ½ sticks) unsalted butter, melted and cooled
    2 eggs
    1 teaspoon pure vanilla extract
    ½ cup pecans, chopped

    Preheat oven to 375 degrees F and lightly butter 2 muffin tins.

    In a large bowl, combine the flour, baking soda, and salt; set aside. Mash 2 of the bananas with a fork in a small bowl so they still have a bit of texture. With an electric mixer fitted with a wire whisk, whip the remaining bananas and sugar together like you mean it, for a good 3 minutes. Add the melted butter, eggs, and vanilla and beat well, scraping down the sides of the bowl once or twice. Mix in the dry ingredients just until incorporated. Fold in the nuts and the mashed bananas with a rubber spatula. Spoon the batter into the muffin tins to fill them about halfway. Give them a rap on the counter to get any air bubbles out.

    Bake until a toothpick stuck in the muffins comes out clean, 18 to 20 minutes. Let cool for a few minutes before turning the muffins out. Serve warm or at room temperature.

    Big Flavors Rating: 4 Stars

    Congee & Caramelized Pork with Crispy Shallots and Black Garlic

    November 20, 2014 by Ashley 1 Comment

    Congee & Caramelized Pork with Crispy Shallots and Black Garlic

    This was my first time making congee at home, and it was a huge success! A big bowl of creamy Chinese porridge is topped with sweet, tangy pork, crispy shallots and fresh herbs.

    The balance of sweet, salty and tangy is really nice in this dish. The textural contrast is great, too - creamy porridge, tender pork and crispy shallots. The fresh cilantro and green onions on top bring it all together.

    Congee & Caramelized Pork with Crispy Shallots and Black Garlic

    It's no wonder this dish won over the judges on Top Chef. It was a big hit at my house! It took a lot of work but it was well worth it.

    Just a note - the recipes from Blue Apron call for "1 bunch" of herbs, and that correlates to the size of the "bunch" they send if you're using their service (which I'm absolutely in love with!). I'd say their bunches are about 1-2 tablespoons.

    Congee & Caramelized Pork with Crispy Shallots and Black Garlic
    Blue Apron - Top Chef's Mei Lin

    Makes: 2 Servings
    Calories: About 700 Per Serving

    10 Ounces Ground Pork
    ½ Cup Sushi Rice
    2 Scallions
    1 Bunch Cilantro
    2 Cloves Black Garlic
    2 Tablespoons Soy Sauce
    2 Teaspoons Chinese Black Vinegar
    2 Teaspoon Congee Spice Blend (Ground Galangal, Garlic Powder, Ground Ginger, Ground Lemongrass, Cayenne Pepper)
    1 Shallot
    ¼ Cup Coconut Palm Sugar
    ¼ Cup All-Purpose Flour

    1. Prepare the ingredients:
    Wash and dry the fresh produce. Peel the black garlic cloves. In a small bowl, using a fork, mash the black garlic cloves into a paste; add 1 tablespoon of water and stir to combine. Cut off and discard the root ends of the scallions; thinly slice the scallions, separating the white bottoms and green tops. Pick the cilantro off the stems; discard the stems. Peel and thinly slice the shallot into rings; separate the rings and place in a bowl of cold water.

    2. Make the congee:
    In a large pot, heat 2 teaspoons of oil on medium-high until hot. Add half the white parts of the scallions and half the spice blend. Cook, stirring frequently, 30 seconds to 1 minute, or until fragrant. Add the rice; season with salt and pepper. Cook, stirring frequently, 30 seconds to 1 minute, or until the rice is toasted and starts to crackle. Add 6 cups of water; cook, stirring occasionally, 23 to 26 minutes, or until the rice is tender and creamy. Remove from heat and season with salt and pepper to taste.

    3. Start the pork:
    After the rice has cooked for about 5 minutes, in a large pan (nonstick, if you have one), heat 2 teaspoons of oil on medium-high until hot. Add the ground pork and cook, frequently breaking the meat apart with a spoon, 1 to 3 minutes, or until browned. Add half the soy sauce and the remaining white parts of the scallions and the remaining spice blend. Cook, stirring occasionally, 2 to 4 minutes, or until the meat is cooked through. Transfer to a plate. Wipe out the pan.

    4. Make the caramel & finish the pork:
    Place the coconut palm sugar in the same pan used to cook the pork. Heat on medium-high, without stirring, 2 to 3 minutes, or until melted and dark amber in color. Turn off the heat and add the black vinegar, mashed black garlic mixture and remaining soy sauce. Stir until well combined. Add the cooked pork (along with any juices on the plate) and ¼ cup of water. Cook on medium-high, stirring occasionally, 1 to 2 minutes, or until well combined and heated through. Remove from heat.

    5. Cook the shallots:
    Drain the shallot rings. Place the flour in a small bowl. Add the drained shallot rings to the bowl of flour and toss to thoroughly coat. In a small pan, heat a thin layer of oil on medium until hot. Tap any excess flour off the shallots. Add them to the pan in a single layer. (If necessary, work in batches to avoid overcrowding.) Cook 30 seconds to 1 minute, or until golden brown. Transfer to a paper towel-lined plate and immediately season with salt.

    6. Plate your dish:
    Divide the congee and caramelized pork between 2 dishes. Top with the crispy shallots and green parts of the scallions. Garnish with the cilantro. Enjoy!

    Big Flavors Rating: 5 Stars

    Crispy Fish Sandwiches with Coleslaw & Homemade Tartar Sauce

    November 19, 2014 by Ashley Leave a Comment

    Crispy Fish Sandwiches with Coleslaw & Homemade Tartar Sauce

    Does anyone else think of Tim Meadows whenever they hear the term "fish sandwich"? Just me? I'm OK with that...

    Anyhow, this was the first time I've made a fish sandwich, and it wasn't nearly as tricky as I thought it would be!

    Crispy Fish Sandwiches with Coleslaw & Homemade Tartar Sauce

    Hake fillets are coated with panko, fried till crispy and topped with homemade tartar sauce and cole slaw. I really liked the addition of capers in the tartar sauce. Using a mix of Dijon and water as a way to get the breadcrumbs to stick added a really nice flavor to the fish.

    I really love cole slaw, but found that the combination of the tangy tartar sauce plus a big side of tangy cole slaw was a bit too much. I'd suggest serving these sandwiches with a different side dish.

    Crispy Fish Sandwiches with Coleslaw & Homemade Tartar Sauce

    Just a note - the recipes from Blue Apron call for "1 bunch" of herbs, and that correlates to the size of the "bunch" they send if you're using their service (which I'm absolutely in love with!). I'd say their bunches are about 1-2 tablespoons.

    2 Hake Fillets
    2 Potato Buns With Celery Seeds And Salts
    ½ Cup Light Mayonnaise
    1 Pound Green Cabbage
    1 Large Bunch Parsley
    1 Tablespoon Champagne Vinegar
    1 Tablespoon Capers
    1 Shallot
    1 Tablespoon Sugar
    1 Mini Bottle Tabasco Hot Sauce
    ½ Cup Panko Breadcrumbs
    ¼ Cup Dijon Mustard

    See Blue Apron for the full recipe.

    Blackened Chile-Dusted Chicken with Zucchini Rice Pilaf & Corn-Tomato Salsa

    November 18, 2014 by Ashley 1 Comment

    Blackened Chile-Dusted Chicken with Zucchini Rice Pilaf & Corn-Tomato Salsa

    Start up the exhaust fan - we're blackening chicken!

    This intensely seasoned chicken is topped with a warm salsa and a zucchini-studded rice pilaf. The accompanying lime-crema cools it all off perfectly.

    Blackened Chile-Dusted Chicken with Zucchini Rice Pilaf & Corn-Tomato Salsa

    We really enjoyed this meal. It has a lot of components, but it's delicious.

    Just a note - the recipes from Blue Apron call for "1 bunch" of herbs, and that correlates to the size of the "bunch" they send if you're using their service (which I'm absolutely in love with!). I'd say their bunches are about 1-2 tablespoons.

    4 Ounces Cherry Tomatoes
    3 Scallions
    3 Cloves Garlic
    2 Airline Chicken Breasts
    1 Ear Of Corn
    1 Large Bunch Cilantro
    1 Lime
    1 Zucchini
    ¼ Cup Mexican Crema
    ½ Cup Basmati Rice
    2 Teaspoons Ancho Chile Powder

    See Blue Apron for the full recipe.

    Maple-Balsamic Roasted Carnival Squash

    November 17, 2014 by Ashley 12 Comments

    Plate of maple-balsamic roasted carnival squash with fresh thyme.

    Wedges of squash are tossed with a sweet-and-tangy vinaigrette and roasted till tender.

    Plate of maple-balsamic roasted carnival squash with fresh thyme.

    This was my first time cooking with carnival squash, and the results were wonderful! 

    The most difficult part was cutting the squash into wedges.

    Try to keep them a consistent size so they'll roast up evenly. If they're thicker, they'll take a little longer. No biggie.

    This squash was the perfect accompaniment to a delicious roast chicken that I made for a dinner with my in-laws.

    I love the idea of picking up a squash and tossing it with pantry staples for a delicious side dish.

    It worked out beautifully! The thyme in my garden is still going strong, and it was the perfect herbaceous accompaniment to the sweet, tangy sauce.

    Still hungry? You may also like...

    Bowl of red lentil fusilli with bacon, butternut squash, and spinach topped with Parmesan cheese.
    Red Lentil Fusilli with Bacon, Butternut Squash, and Spinach
    Overhead view of Roasted Honeynut Squash with Burrata, Pomegranate + Pepitas
    Roasted Honeynut Squash with Burrata, Pomegranate + Pepitas
    Maple Roasted Butternut Squash Pizza with Brussels Sprouts, Bacon + Pomegranate
    Maple Roasted Butternut Squash Pizza with Brussels Sprouts, Bacon + Pomegranate
    Overhead view of 2 bowls of curried pumpkin soup with cilantro leaves, sour cream, and a bottle of chili oil.
    Curried Pumpkin Soup - A Comforting Bowl of Soup in Under 30 Minutes

    Doing some online shopping? Check out my Amazon shop page for recommendations!

    Check out my latest posts...

    • Jar of homemade Italian seasoning blend.
      Italian Seasoning Blend
    • Bowl of tzatziki with olive oil drizzled over the top.
      Easy Homemade Tzatziki
    • Turkey sausage patties and a jar of breakfast sausage seasoning.
      Turkey Sausage Patties

    Greek-Style Braised Chicken Thighs with Fingerling Potatoes

    November 15, 2014 by Ashley 1 Comment

    Greek-Style Braised Chicken Thighs with Fingerling Potatoes

    Lemon, oregano, feta and olives are the stars in this hearty, Greek chicken dish!

    This was a really nice, comforting weeknight meal. The only thing I didn't love was that the cucumbers piled on top of the chicken started to get warm, losing their crisp, cool. texture. Next time, I'd serve that on the side. Otherwise, this was a very well seasoned and delicious Greek meal.

    Greek-Style Braised Chicken Thighs with Fingerling Potatoes

    Just a note - the recipes from Blue Apron call for "1 bunch" of herbs, and that correlates to the size of the "bunch" they send if you're using their service (which I'm absolutely in love with!). I'd say their bunches are about 1-2 tablespoons.

    2 Bone-In, Skin-On Chicken Thighs
    10 Ounces Fingerling Potatoes
    5 Ounces Red Cherry Tomatoes
    3 Cloves Garlic
    1 Persian Cucumber
    1 Lemon
    1 Bunch Parsley
    3 Tablespoons Chicken Demi-Glace
    2 Tablespoons Butter
    2 Tablespoon Greek Chicken Spice (Dried Greek Oregano, Ground Coriander & Ground Cardamom)
    1 Ounce Kalamata Olives
    ½ Cup Crumbled Feta Cheese

    See Blue Apron for the full recipe.

    Pan-Seared Salmon with Arugula, Candy Stripe Beets & Horseradish Sour Cream

    November 14, 2014 by Ashley 1 Comment

    Pan-Seared Salmon with Arugula, Candy Stripe Beets & Horseradish Sour Cream

    Flaky, pan-seared salmon is nestled atop a bed of farro and wilted arugula, then topped with a tangy Brussels sprout salad. A dollop of horseradish sour cream adds the perfect kick!

    The farro and arugula is nice and hearty, and the earthy, sweetness of the beets ties it all together.

    Pan-Seared Salmon with Arugula, Candy Stripe Beets & Horseradish Sour Cream

    This salmon dish is the first time I grated my own horseradish for a recipe! We really enjoyed the combination of flavors in this one.

    Just a note - the recipes from Blue Apron call for "1 bunch" of herbs, and that correlates to the size of the "bunch" they send if you're using their service (which I'm absolutely in love with!). I'd say their bunches are about 1-2 tablespoons.

    2 Salmon Fillets
    ¾ Cup Pearled Farro
    3 Ounces Brussels Sprouts
    2 Ounces Arugula
    6 Ounces Baby Candy Stripe Beets
    1 Bunch Chives
    1 1-Inch Piece Fresh Horseradish
    1 Shallot
    1 Tablespoon Sherry Vinegar
    ¼ Cup Sour Cream

    See Blue Apron for the full recipe.

    Pan-Fried Onion Dip

    November 13, 2014 by Ashley 1 Comment

    Pan-Fried Onion Dip

    The same night that I made the light Creamy Parmesan Spinach Dip, I also tried out a homemade version of French onion dip. It's always a favorite at parties, but the store-bought stuff is usually full of unpronounceable ingredients. Ick.

    Pan-Fried Onion Dip

    Sweet, caramelized onions are blended with sour cream and cream cheese for a rich, decadent dip that's accented with a kick of cayenne. This dip isn't exactly healthy, but you can definitely save some calories by using reduced fat cream cheese, mayo and/or sour cream.

    This was a big hit with our friends! It's nice and creamy and highly addictive, just like all the best dips should be!

    Pan-Fried Onion Dip

    My only note is that it took a LOT longer for me to get the onions to caramelize, as is tradition with recipes. Which always reminds me of an article I read in Cooking Light years ago about why recipe writers lie about how long it takes to actually caramelize onions. It's a time investment, but it's totally worth it. Get on board!

    Pan-Fried Onion Dip
    Life and Kitchen (Adapted from Ina Garten)

    2 large yellow onions
    4 tablespoons unsalted butter
    ¼ cup vegetable oil
    ¼ teaspoon ground cayenne pepper
    1 teaspoon kosher salt
    ½ teaspoon garlic powder
    ½ teaspoon freshly ground black pepper
    4 ounces cream cheese, at room temperature
    ½ cup sour cream
    1 Tbsp. Worcestershire sauce (vegetarian version if you prefer)
    ½ cup good mayonnaise

    Cut the onions in half and then slice them into ⅛-inch thick half-rounds. (You will have about 3 cups of onions.) Heat the butter and oil in a large saute pan over medium heat. Add the onions, cayenne, salt, garlic powder, and pepper and saute for 10 minutes. Reduce the heat to medium-low and cook, stirring occasionally, for 20 more minutes until the onions are browned and caramelized. Allow the onions to cool.
     
    Place the cream cheese, sour cream, Worcestershire sauce, and mayonnaise in the bowl of an electric mixer fitted with the paddle attachment and beat until smooth. Add the onions and mix well. Taste for seasonings. Keep in the fridge for at least half an hour, and up to a few days, so that the flavors can combine before serving.

    Sriracha Chicken Noodle Bowls

    November 12, 2014 by Ashley 6 Comments

    Sriracha Noodle Bowls

    Tender chicken thighs are basted with a sweet-and-spicy glaze and served over noodles for a fiery bowl of comfort food.

    This was a super simple meal to put together, and it was a big hit at the dinner table. I used some homemade chicken stock which made it even tastier! It's a nice, quick weeknight meal that we'll definitely enjoy again.

    Sriracha Noodle Bowls

    One note: the dried Chinese noodles are literally a package of noodles that say, "Chinese noodles". I'm sure you could substitute soba or spaghetti or rice noodles if you want. I wasn't aware that any were just called Chinese noodles until I saw them over by the Asian condiments at the grocery store. We really enjoyed the texture of them!

    Sriracha Chicken Noodle Bowls
    Rachael Ray

    Makes: 4 servings
    Prep: 10 mins
    Cook: 30 mins

    3 tablespoons fresh orange juice (from 1 small orange)
    2 tablespoons honey
    2 tablespoons sriracha, plus more for drizzling
    4 bone-in, skin-on chicken thighs (about 1 ½ lbs.)
    3 tablespoons EVOO
    3 cloves garlic, minced
    2 ¾ cups chicken or vegetable broth
    1 10 ounce package dried Chinese noodles
    2 teaspoons soy sauce
    3 scallions, thinly sliced on an angle

    Preheat the oven to 425 degrees . In a small bowl, whisk the orange juice, honey and 1 tbsp. sriracha for the glaze. Season the chicken with salt and pepper and place, skin side up, on a rack set over a foil-lined baking sheet. Bake, brushing with glaze every 5 minutes, until juices run clear when pierced with a knife, about 30 minutes.

    Meanwhile, in a large skillet, heat the EVOO over medium. Add the garlic and stir until fragrant, about 3 minutes. Stir in the stock, noodles, soy sauce and remaining 1 tbsp. sriracha; bring to a boil. Reduce the heat to medium; cook until the noodles soften, about 5 minutes.

    Cut the meat from the bones, then thinly slice. Divide the noodles among bowls and drizzle with sriracha. Top with the sliced chicken and scallions.

    Big Flavors Rating: 4 Stars

    Pork Cutlets with Butternut Squash, Apple, and Cranberry Sauté #12WksWinterSquash

    November 10, 2014 by Ashley 3 Comments

    Pork Cutlets with Butternut Squash, Apple, and Cranberry Sauté

    I can't believe it's already been a year since we celebrated 12 Weeks of Winter Squash! I've made a lot of tasty, squash-filled dishes with this group, and am excited to join in on the fun again this year.

    I had some pork tenderloin in the freezer, and I turned to the latest issue of Cooking Light for inspiration.

    Pork Cutlets with Butternut Squash, Apple, and Cranberry Sauté

    This dish is spicy and comforting - perfect for the cool autumn weather. The combination of apples and squash with the tartness of dried cranberries makes for a perfect accompaniment. The pork was juicy and tender, and it reheated beautifully the next day, too - bonus!

    I served this with some steamed basmati rice, and it really hit the spot.

    Pork Cutlets with Butternut Squash, Apple, and Cranberry Sauté
    Cooking Light November 2014

    Serves 4 (serving size: 3 pork medallions, 2 tablespoons sauce, and 1 cup squash mixture)

    3 cups precut peeled butternut squash
    1 cup dried cranberries
    1 (1-pound) pork tenderloin, trimmed and cut into 12 thin medallions
    ¾ teaspoon kosher salt, divided
    ¼ teaspoon freshly ground black pepper
    2 tablespoons all-purpose flour
    1 tablespoon olive oil, divided
    1 cup unsalted chicken stock
    1 tablespoon unsalted butter
    1 cup chopped onion
    1 cup chopped peeled Granny Smith apple
    2 teaspoons sugar
    ¼ teaspoon ground red pepper
    2 tablespoons chopped fresh parsley

    1. Place squash and cranberries in a microwave-safe dish. Add water to a depth of ¼ inch; cover with plastic wrap. Microwave at HIGH 7 minutes; drain.

    2. While squash cooks, heat a nonstick skillet over medium-high heat. Sprinkle pork with ½ teaspoon salt and black pepper. Place flour in a shallow dish; dredge pork in flour. Add 1 ½ teaspoons oil to pan; swirl to coat. Add half of pork; cook 2 minutes per side. Transfer cooked pork to a platter. Repeat with remaining oil and pork.

    3. Add chicken stock to pan; cook until liquid is reduced by half, stirring occasionally.

    4. Melt butter in a skillet over medium-high heat. Add onion, apple, sugar, and red pepper to pan, and toss to coat; sauté 4 minutes. Add squash, cranberries, and remaining ¼ teaspoon salt; toss and remove from heat. Pour pan sauce over pork, and serve with squash mixture; garnish with chopped parsley.

    Calories 379
    Fat 9.4 g
    Satfat 3.2 g
    Monofat 4.2 g
    Polyfat 1.2 g
    Protein 27 g
    Carbohydrate 50 g
    Fiber 5 g
    Cholesterol 81 mg
    Iron 3 mg
    Sodium 461 mg
    Calcium 80 mg

    Big Flavors Rating: 4 Stars

    Interested in checking out what else we've been cooking up for this year's 12 Weeks of Winter Squash?


    Cauliflower "Caviar" with Frizzled Prosciutto

    November 9, 2014 by Ashley 1 Comment

    Cauliflower "Caviar" with Frizzled Prosciutto

    A while back, we had some friends over for a dinner party. I made some homemade bread and my grandpa's beef stew, but wanted to try out a new appetizer to pair with some of the delicious wine that Rodney Strong Vineyards sent over.

    Cauliflower "Caviar" with Frizzled Prosciutto

    I'm not a huge fan of endive typically, because it's very bitter. But the shape of the leaves is just so perfect for appetizers like this one, so I tried the recipe anyhow. And I'm glad I did!

    Nutty, roasted cauliflower is tossed with a mix of garlic, prosciutto and parsley and simply dressed with sherry vinegar for a warm, salty, tangy bite of food nestled inside an endive leaf.

    Cauliflower "Caviar" with Frizzled Prosciutto

    They were a bit tricky to keep from tipping over on the platter, but they were absolutely delicious. Our dinner guests loved them, and they disappeared in a flash!

    This is definitely a nice option for an impressive appetizer that is so much more than the sum of its parts. And the fact that you can serve it at room temperature is a nice bonus because it can be made in advance.

    Cauliflower "Caviar" with Frizzled Prosciutto

    This appetizer paired beautifully with the crisp Chardonnay. It was a wonderful way to start our meal!

    Cauliflower "Caviar" with Frizzled Prosciutto
    Cooking Light November 2010
    Mark Bittman

    Yield: 12 servings (serving size: 2 filled leaves)

    4 cups coarsely chopped cauliflower florets (about 2 pounds)
    5 teaspoons olive oil, divided
    ¾ teaspoon freshly ground black pepper
    ¼ teaspoon kosher salt
    4 ounces prosciutto, chopped
    1 tablespoon minced garlic
    1 tablespoon sherry vinegar
    ¼ cup chopped fresh parsley
    24 Belgian endive leaves (about 2 small heads)

    1. Preheat oven to 400°.

    2. Arrange cauliflower florets in a single layer in a 13 x 9-inch metal baking pan. Drizzle with 1 tablespoon olive oil; sprinkle with black pepper and kosher salt, tossing to combine. Bake at 400° for 40 minutes or until cauliflower is lightly browned.

    3. Heat remaining 2 teaspoons oil in a small skillet over medium heat. Add prosciutto to pan; sauté 10 minutes or until crisp, stirring occasionally. Add garlic to pan; sauté 1 minute. Drain on paper towels.

    4. Combine cauliflower mixture, prosciutto mixture, and vinegar in a large bowl; coarsely mash with a fork. Stir in chopped parsley. Spoon 2 tablespoons cauliflower mixture into each endive leaf. Serve warm or at room temperature.

    Big Flavors Rating: 5 Stars

    Everything White Bean Hummus

    November 8, 2014 by Ashley 3 Comments

    Everything White Bean Hummus

    Before I moved to New York, I hadn't heard of an everything bagel. But I've since learned to enjoy the delicious combination of seasonings that makes everything bagels so delicious.

    But bagels are really heavy, and I don't eat them too often. So when I came across this dip recipe topped with the same delicious seasonings, I was totally on board to dive in!

    Everything White Bean Hummus

    This white bean hummus is silky smooth, and it has plenty of delicious seasonings on top. Roasted garlic adds an extra layer of sweet, rich flavor.

    The only thing I changed when I made this recipe was to not add enough sesame oil because I ran out. It was still really tasty, and I imagine it would be even better with the full amount.

    Everything White Bean Hummus

    Everything White Bean Hummus
    How Sweet It Is

    YIELD: SERVES 2-4 AS A GENEROUS APPETIZER TOTAL TIME: 15 MINUTES

    3 cups cooked cannellini/great northern beans (or 2 cans, drained and rinsed)
    6 tablespoons olive oil + more for drizzling
    2 tablespoons toasted sesame oil
    1 whole head of roasted garlic
    ¼ teaspoon salt

    2 tablespoons dried minced onion
    2 tablespoons toasted sesame seeds
    1 tablespoon poppy seeds
    1 tablespoon dried minced garlic
    1 teaspoon flaked sea salt
    ¼ teaspoon black pepper
    crackers for serving

    In a small bowl, combine dried onion, sesame seeds, poppy seeds, garlic, sea salt and black pepper. Toss to mix.

    Add beans and roasted garlic to a food processor and pulse and blend until combined the beans begin to puree, about 2-3 minutes. With the processor still going, stream in olive oil and sesame oil, blending continuously for a few minutes (and scraping down the sides if needed) until as smooth as desired. Add salt and taste, adding more if desired but remember - all of the seasoning will go on top.

    Add hummus to a bowl and drizzle with extra olive oil. Pour everything seasoning overtop and serve immediately.

    P.S. it is essential that you like the "everything" seasoning to enjoy this!

    Big Flavors Rating: 4 Stars

    Pizza Rustica

    November 7, 2014 by Ashley Leave a Comment

    Pizza Rustica

    Years ago, Dino told me about one of his most special, traditional Italian holiday foods memories - Pizza Rustica. It's basically a stuffed pizza full of high quality meats and cheeses that was reserved for special occasions.

    It sounded incredibly rich and decadent, and I never thought it would be something I'd try to make at home... until I saw a recipe from Michael Lomonaco's mother in a cookbook.

    Pizza Rustica

    First things first - this dish takes a few hours to make from the time you start the dough to the time you're able to serve it. So plan accordingly.

    Also, don't forget to add the butter to the dough, remembering only after you've kneaded it by hand for 5 full minutes. Oops.

    (And yes, the dough felt MUCH better the second time around. I'm just glad I realized what I had done before I assembled the pizza and put it into the oven!)

    Pizza Rustica

    I used a 9-inch springform pan, and it was really tough to get the dough all the way up the sides to be able to seal the crust. I was definitely worried about it while it was baking, but it worked out just fine. Next time, I'd cut even less for the top crust so there would be more for the bottom.

    One other thing to note - the recipe instructs you to preheat the oven first - before the dough chills in the fridge for an hour. I waited until I was about to roll the dough to preheat.

    Pizza Rustica

    This pizza was a HUGE hit at the dinner table! My husband was in heaven! He had been raving about this dish for years, but had only had it once before now. My mom and aunt were in town, so they got to enjoy this decadent pizza, too.

    The sweetness of the crust goes so perfectly with all of the saltiness from the salami, prosciutto and pecorino Romano. A healthy amount of ricotta and mozzarella make it nice and creamy.

    Pizza Rustica

    This pizza takes a while to cool off, and you want it to cool off before you eat it so that the cheese has a chance to solidify, giving you these gorgeous, clean slices.

    This wasn't as much hands-on work as I thought it would be, so it's definitely something I'll do again sometime.

    Pizza Rustica
    Mom’s Secret Recipe File – Chris Styler
    Michael Lomonaco's mother

    Makes 8 to 10 servings

    2 cups all-purpose flour, plus more for kneading the dough
    ½ cup sugar
    ¼ pound (1 stick) sweet butter, cut into pieces
    ¼ cup cold water
    6 egg yolks
    1 teaspoon salt
    1 ¼ teaspoons ground black pepper
    1 pound fresh ricotta cheese, preferably made from sheep's milk
    8 ounces sliced Genoa salami, chopped
    8 ounces fresh mozzarella, diced into ¼-inch pieces
    4 ounces sliced prosciutto, coarsely chopped
    ¼ cup grated pecorino Romano cheese
    Olive oil

    1. Set a rack in the center of the oven and preheat the oven to 375°F. Combine the flour, sugar, butter, water, 3 egg yolks, salt, and ¼ teaspoon of pepper in the work bowl of a food processor. Process until they form a ball of dough. Remove the dough, place on a floured work surface, and knead fro 5 minutes, adding flour as necessary to prevent the dough from sticking to your hands and the work surface. Cover the ball of dough with plastic wrap and refrigerate until firm, at least 1 hour.

    2. In a bowl, stir together the ricotta, salami, mozzarella, prosciutto, Romano cheese, the remaining 3 egg yolks, and 1 teaspoon of pepper until well blended. Refrigerate while you prepare the pastry shell.

    3. Remove the dough from the refrigerator and cut one-third off to be used as the top crust. Roll the larger piece out on a floured work surface, to a 12-inch-wide circle. Brush the inside of a 10-inch springform pan with oil and transfer the circle of dough to the pan. Using your fingertips press the dough evenly into the bottom of the pan, making sure the dough has a flat bottom and is tucked into the seam of the pan. Pull the dough up the side to reach the top edge of the pan. Pour the filing into the dough and rap the pan sharply on the countertop once or twice to settle and distribute it evenly. (See Note.) Roll the remaining smaller piece of dough into a 10-inch circle and place this over the filling. Pinch the edges of the two pieces together to seal the edge completely. Cut a cross into the top crust so that the steam can escape during baking. Set the pan on a baking sheet and bake until the top is well browned, 45 to 55 minutes.

    4. Remove the pizza from the oven and cool for 10 minutes. Run a sharp knife around the edge to loosen the crust from the pan and open the springform pan. Cool completely before serving at room temperature.

    Note: Depending on the thickness of the ricotta, you may have to spread the filling into an even layer with a metal spatula.

    Big Flavors Rating: 5 Stars

    Coconut Cream Pie

    November 4, 2014 by Ashley 4 Comments

    Coconut Cream Pie

    The dessert for our Supper Club’s October gathering was something that I’ve always wanted to try to make at home. I have lots of childhood memories of eating some still frozen coconut cream pie with my grandpa. He always liked the the store-bought kind, and something about eating it still partially frozen was a thrill to him. And I was his partner in crime when it came to dessert time!

    This pie takes a bit of time to prepare, but it’s well worth it. A flaky crust is topped with coconut-infused pastry cream that is then topped with coconut-y whipped cream and a sprinkling of toasted coconut.

    Coconut Cream Pie

    I suggest using some flour and skipping the plastic wrap when rolling out the pie crust. I tried doing it as the recipe directed and ended up having to scrape a sticky mess off of the counter to start again. I also read some suggestions in the comments over on epicurious, and decided to swap out the whole milk for canned unsweetened coconut milk. It added even more delicious coconut flavor to this pie.

    This was a big hit with our Supper Club, and one that I plan to make again - only next time, I’ll pop it in the freezer for a bit to make the topping firm up a bit more and to pay homage to my grandpa.

    Coconut Cream Pie
    Bon Appétit September 2002

    Makes 8 servings

    Crust:
    1 ½ cups all purpose flour
    1 tablespoon sugar
    ½ teaspoon salt
    6 tablespoons chilled unsalted butter, cut into small pieces
    3 tablespoons chilled solid vegetable shortening, cut into small pieces
    4 tablespoons (or more) ice water

    Filling:
    ½ cup sugar
    2 large eggs
    1 large egg yolk
    3 tablespoons all purpose flour
    1 ½ cups whole milk (see note above)
    1 ½ cups sweetened flaked coconut
    1 teaspoon vanilla extract
    ⅛ teaspoon coconut extract

    Topping:
    ⅔ cup sweetened flaked coconut
    1 ¼ cups chilled whipping cream
    2 tablespoons sugar
    ⅛ teaspoon coconut extract

    For crust:
    Blend flour, sugar, and salt in processor. Add butter and shortening; using on/off turns, cut in until mixture resembles coarse meal. Drizzle 4 tablespoons ice water over mixture. Process just until moist clumps form, adding more ice water by teaspoonfuls if dough is dry. Gather dough into ball; flatten into disk. Wrap in plastic. Chill 1 hour.

    Roll out dough between 2 sheets of plastic wrap to 14-inch round. Transfer dough to 9-inch-diameter glass pie dish. Fold overhang under. Crimp edges decoratively. Pierce bottom of crust all over with fork. Freeze crust 15 minutes. (Can be made 1 day ahead. Keep frozen.)

    Preheat oven to 375°F. Line crust with aluminum foil. Fill with pie weights or dried beans. Bake 20 minutes. Remove weights and foil. Bake until golden and set, about 10 minutes. Cool. (Crust can be made 1 day ahead. Wrap tightly with plastic wrap. Let stand at room temperature.)

    For filling:
    Whisk ½ cup sugar, eggs, egg yolk, and flour in medium bowl. Bring milk and coconut to simmer in medium saucepan over medium heat. Gradually add hot milk mixture to egg mixture, whisking constantly. Return to same saucepan; cook until pastry cream thickens and boils, stirring constantly, about 4 minutes. Remove from heat. Mix in vanilla and coconut extracts. Transfer pastry cream to medium bowl. Press plastic wrap directly onto surface to prevent formation of skin. Chill until cold, at least 2 hours and up to 1 day. Transfer filling to crust. Cover; chill overnight.

    For topping:
    Toast coconut in heavy small skillet over medium heat until lightly browned, stirring occasionally, about 3 minutes. Cool completely.

    Using electric mixer, beat cream, sugar, and coconut extract in medium bowl until peaks form. Spread whipped cream all over top of filling. Sprinkle evenly with toasted coconut. (Can be prepared 4 hours ahead. Cover and refrigerate.) Serve cold.

    Big Flavors Rating: 4 Stars

    Classic B.L.T. Sandwiches with Tomato, Avocado & Cucumber Salad

    November 1, 2014 by Ashley Leave a Comment

    Classic B.L.T. Sandwiches with Tomato, Avocado & Cucumber Salad

    Pan-frying sourdough bread in rendered bacon fat takes this classic sandwich to the next level!

    We don’t go for B.L.T. sandwiches very often, but whenever we do, they’re always a hit. Especially this one, which was made with some beautiful, thick-cut bacon.

    Classic B.L.T. Sandwiches with Tomato, Avocado & Cucumber Salad

    The sandwich and salad were very good on their own, but I don’t think they worked too well together, because of the salty bacon and the tangy vinegar and mustard on the salad. It was just a bit too much. And I skipped seasoning the tomatoes on the sandwich with salt, because the bacon had plenty for the whole sandwich.

    ½ Pound Bacon
    2 Tablespoons Red Wine Vinegar
    1 Avocado
    ½ Head Baby Romaine Lettuce
    1 Kirby Cucumber
    1 Shallot
    1 Tomato
    1 Tablespoon Dijon Mustard
    4 Slices Sourdough Bread
    4 Frilled Sandwich Toothpicks
    2 Tablespoons Mayonnaise

    See Blue Apron for the full recipe.

    Sweet and Salty Pie Spiced Roasted Pumpkin Seeds

    October 31, 2014 by Ashley 1 Comment

    Sweet and Salty Pie Spiced Roasted Pumpkin Seeds

    A few weeks ago, we had one of my son's friends over for some pumpkin carving fun. It was adorable, and we managed to save 2 big pumpkins worth of seeds to roast!

    Sweet and Salty Pie Spiced Roasted Pumpkin Seeds

    Separating pumpkin seeds from the guts (for lack of a better word) is no easy task. I usually put it all in a big bowl full of water and use that to help me separate them.

    I read that boiling the seeds for 10 minutes in salted water helps them get crispier, so I tried that this time around.

    Sweet and Salty Pie Spiced Roasted Pumpkin Seeds

    After boiling the seeds I patted them dry on paper towels (which was super sticky and gross, but I knew they needed to be at least kind of dry to get them to roast properly). I put them on a baking sheet (and I really should have used two since I had so many seeds - the tray was very crowded!) and sprayed them with a little oil, sprinkled on 1 ½ teaspoons kosher salt, 2 teaspoons sugar, ¾ teaspoon cinnamon, ¼ teaspoon nutmeg and ¼ teaspoon cloves. I tossed them around a bit to coat all of the seeds and popped them into an oven that was preheated to 325°F.

    I roasted the seeds, tossing every 10 minutes, until they got nice and crispy. Again, since my pan was crowded, it took a lot longer than I was expecting, but it made for a great, salty-sweet snack! My son loved them!

    Sweet and Salty Pie Spiced Roasted Pumpkin Seeds

    Smoky Shrimp, Hominy and Tortilla Soup

    October 30, 2014 by Ashley 1 Comment

    Smoky Shrimp, Hominy and Tortilla Soup

    When I came across this soup recipe, I knew I needed to try it. I love hominy but have never used it with Mexican flavors. That plus the addition of shrimp and chipotle peppers really caught my attention.

    The soup is fairly easy to put together. And you can make it ahead of time and just bring it back up to a simmer and add the shrimp for a few minutes right before serving it.

    Smoky Shrimp, Hominy and Tortilla Soup

    This soup is light and refreshing, yet it packs a spicy punch! I liked the idea of adding tortilla strips to the top of the soup, but mine were so crunchy - almost stale in texture. Maybe I let them dry for too long? I'm not quite sure. Next time, I'd probably leave them off.

    Smoky Shrimp, Hominy and Tortilla Soup
    Bon Appétit November 2000

    Makes 10 servings

    4 5-inch-diameter corn tortillas, halved, cut into thin strips
    2 tablespoons olive oil
    1 cup finely chopped onion
    1 cup finely chopped carrot
    ½ cup finely chopped celery
    6 garlic cloves, minced
    ½ teaspoon dried oregano
    7 cups canned low-salt chicken broth
    2 15-ounce cans golden hominy, drained
    ⅓ cup canned crushed tomatoes with added purée
    2 teaspoons chopped canned chipotle chilies*
    1 pound uncooked small shrimp, peeled, deveined
    ½ cup chopped fresh cilantro
    Lime wedges

    Spread corn tortilla strips in single layer on paper towel. Let tortilla strips stand at room temperature overnight to dry.

    Heat olive oil in heavy large pot over medium heat. Add chopped onion, chopped carrot, chopped celery, minced garlic and dried oregano. Sauté until vegetables are crisp-tender, about 10 minutes. Add chicken broth, golden hominy, crushed tomatoes and chipotle chilies; bring to simmer. Reduce heat, cover and simmer 30 minutes. Season to taste with salt and pepper. (Soup can be prepared 3 days ahead. Cool slightly. Refrigerate soup uncovered until cold, then cover soup and refrigerate.)

    Bring soup to simmer over medium heat. Add shrimp and cook until opaque in center, stirring occasionally, about 3 minutes. Stir in chopped fresh cilantro. Divide soup among 10 soup bowls. Top soup with dried tortilla strips, dividing equally. Serve soup, passing lime wedges separately.

    *Chipotle chilies canned in a spicy tomato sauce, sometimes called adobo, are available at Latin American markets, specialty foods stores and some supermarkets

    Big Flavors Rating: 4 Stars

    Pineapple and Black Bean Salsa

    October 29, 2014 by Ashley 2 Comments

    Pineapple and Black Bean Salsa with tortilla chips.

    Sweet pineapple is tossed with spicy jalapeño peppers, black beans, red onion, cilantro and lime for a quick and refreshing salsa!

    We had some friends over for a Mexican-inspired dinner party, and I wanted to do a mix of recipes I had made before and a few new ones. I needed a quick and easy appetizer, and this pineapple and black bean salsa sure fit the bill!

    Pineapple and Black Bean Salsa

    I made the salsa early in the day and put it in the refrigerator to let the flavors meld until dinnertime. It was absolutely delicious! It's sweet and spicy and refreshing. It was a big hit with our dinner guests, too.

    In fact, it was so tasty that I made another batch a few days later and served it over the leftover pork from our Pork Asada Tacos with Tomatillo Salsa Verde. Delicious!

    Pineapple and Black Bean Salsa

    Pineapple and Black Bean Salsa
    Everyday Food March 2011

    Makes 4 cups

    1 can (15.5 ounces) black beans, rinsed and drained
    1 ½ cups chopped pineapple
    1 jalapeño, stemmed, seeded, and minced
    3 tablespoons finely chopped red onion
    ¼ cup chopped fresh cilantro
    1 tablespoon fresh lime juice
    Coarse salt

    In a medium bowl, combine black beans, pineapple, jalapeño, red onion, cilantro, and lime juice. Season with salt.

    Big Flavors Rating: 5 Stars

    Chicken & Snow Pea-Radish Sauté with Candied Pistachios

    October 28, 2014 by Ashley 1 Comment

    Chicken & Snow Pea-Radish Sauté with Candied Pistachios

    This was one of the more unique meals we've tried from Blue Apron so far. Sweet, crunchy pistachios give a wonderful bit of crunch to the tender chicken and herbed veggies.

    I wasn't expecting to be a big fan of the mix of vegetables in this dish, but I ended up really liking it. There was a nice variety of colors and textures, which made it all the more enjoyable to eat. I definitely found myself rationing the bits of candied pistachios toward the end so I could enjoy it with my final bites.

    Chicken & Snow Pea-Radish Sauté with Candied Pistachios

    I'm glad that Blue Apron has been using the Airline cut - a boneless, skin-on chicken breast with the drumette attached. It looks and feels a bit nicer than your standard chicken breast. And cooking them is a cinch!

    Just a note - the recipes from Blue Apron call for "1 bunch" of herbs, and that correlates to the size of the "bunch" they send if you're using their service (which I'm absolutely in love with!). I'd say their bunches are about 1-2 tablespoons.

    4 Ounces Baby Purple Potatoes
    3 Ounces Snow Peas
    3 Radishes
    1 ½ Tablespoons Roasted, Salted Pistachios
    2 Airline Chicken Breasts
    1 Bunch Tarragon
    1 Shallot
    1 Tablespoon Sugar
    1 Tablespoon Butter

    See Blue Apron for the full recipe.

    Seared Salmon & Tomato Chutney with Cranberry Bean & Spinach Stew

    October 27, 2014 by Ashley 2 Comments

    Seared Salmon & Tomato Chutney with Cranberry Bean & Spinach Stew

    Tender, pan-seared salmon is placed atop a coconut-y cranberry bean and spinach stew, then topped with a sweet-and-tangy tomato chutney.

    This was another winning meal from Blue Apron. This dish is bursting with comforting Indian-infused spices. My stew didn't get very thick, but it tasted great. I especially enjoyed the tomato chutney - it would be great paired with a variety of proteins. Yum!

    Seared Salmon & Tomato Chutney with Cranberry Bean & Spinach Stew

    Just a note – the recipes from Blue Apron call for “1 bunch” of herbs, and that correlates to the size of the “bunch” they send if you’re using their service (which I’m absolutely in love with!). I’d say their bunches are about 1-2 tablespoons.

    4 Ounces Fresh Cranberry Beans
    2 Skinless Salmon Fillets
    1 Ounce Spinach
    1 Bunch Cilantro
    1 Tomato
    1 Yellow Onion
    2 Tablespoons Ghee
    1 5.5-Ounce Can Light Coconut Milk
    1 Teaspoon Madras Curry Powder
    1 Tablespoon Tamarind Concentrate
    1 Teaspoon Chutney Spice Blend (Mustard Seeds, Cumin Seeds, Ground Cardamom, Chili Powder)

    See Blue Apron for the full recipe.

    Mom's Meatball Stroganoff

    October 25, 2014 by Ashley 2 Comments

    Mom's Meatball Stroganoff

    One of my favorite childhood food memories is of my aunt's beef stroganoff. She used to make it with beef straight from her farm - it was pure comfort food.

    So when she joined my mom for a road trip to come visit us last week, I knew I wanted to try to make some beef stroganoff for them. I found this recipe from Sara Moulton's mom in a cookbook and thought it sounded like a fun spin on the classic dish that I grew up with.

    Mom's Meatball Stroganoff

    Meatballs are browned and added to a creamy sherry infused mushroom sauce that is studded with fresh dill. I served it over extra wide egg noodles, and it was a huge hit at the dinner table!

    The meatballs were super tender, and the fresh dill really made it taste unique. I thought the thickening method for the sauce was interesting, too. You stir four into softened butter until it's smooth and then add that mixture, bit by bit, to the sauce. This is definitely a meal I'll be making again and again!


    Recap: Food Network NYC Wine & Food Festival Blue Moon Burger Bash + Giveaway {CLOSED}

    October 24, 2014 by Ashley 9 Comments

    Adam Richman, Josh Capon holding a sign.

    This post was created in partnership with JCPenney, who provided me with the opportunity to attend this event. As always, all opinions are 100% my own.

    Summer may officially be over, but grilling season was still in full swing on Friday night in the Big Apple. The 2014 Food Network New York City Wine & Food Festival's 7th Annual Blue Moon Burger Bash was hands down the most delicious place to be in all of Manhattan. The event was hosted by Rachael Ray and judged by Anne Burrell, Adam Richman, Nick Mangold and Andrew Zimmern.

    My husband and I enjoyed a night of delicious burgers, refreshing beer and wine, sensational live music and oodles of acclaimed chefs.

    Ludo Lefebvre et al. posing for a photo.
    I knew this night was gonna be great when it started out by meeting Chef Ludo!
    Robert Irvine and Ashley Covelli with a burger.
    I had to go back and high five Chef Robert Irvine after I tasted his amazing Bavarian Burger & dill potato salad.
    Alex Guarnaschelli and Ashley Covelli.
    Outfit of the evening and a damn good Parisian Santa Fe Burger from Chef Alex Guarnaschelli.
    Ashley and Dino Covelli at the Blue Moon Burger Bash.
    Dino Covelli, Marc Murphy, and Ashley Covelli.
    Meet & greet with Chef Marc Murphy, whose delicious LAMB-MARC burger won top honors from the judges.
    Ashley Covelli, Adam Richman, and Dino Covelli.
    To those who need proof that my hubby & Adam Richman are (handsome) doppelgängers - BOOM!

    When I first saw the map of burger tents, I knew that we needed some sort of game plan. There were 32 contenders, so realistically we wouldn't be able to taste them all. I decided that we had to try the Ramen Burger from RAMEN Co. (made with signature ramen noodle bun, prime ground chuck, Keizo's secret shoyu sauce, scallions and arugula). We beelined for their tent to grab a taste. Rachael Ray and her team tasted it right before we got to the front of the line, so there was a pretty big buzz right from the get go. I was glad that this burger lived up to the hype that had been surrounding it. The ramen noodle bun was such a fun way to sandwich the flavorful burger, and the sauce was outrageously good - no wonder it's a secret!

    We stopped by Hudson Malone to grab the El Burger next (served with Nana's potato latkes with DQ Au Poivre sauce). This burger was made from a dry-aged beef blend and sat on top of a big, juicy pickle. I love a good pickle, and this one complimented the burger so perfectly. The sauce that went with the latkes was really nice as well.

    The next burger we sampled was Robert Irvine's Bavarian Burger (Black Forest pork belly, caramelized onion and apple jam, Gruyère cheese, pickled red cabbage and spicy mustard dijonnaise on a Martin’s Famous Potato Roll). It was served with a delicious dill-studded potato salad. The entire plate knocked our socks off. The burger was tender and super flavorful. And the pork belly... just... wow. This one really got our attention, and we later ended up giving him our votes for the People's Choice Award.

    After grabbing The Red Burger from Rouge Tomate (housemade kimchi, avocado mayo, arugula, tomato and red onion on a Martin’s Famous Potato Roll), we realized that there was no way we were going to be able to keep eating one full sample each. We shared samples of a few other burgers while walking around the spacious rooftop soiree. We sampled the Dirty Burger from The Dirty Chef (coated with Dirty spice and finished with honey on a Martin’s Famous Potato Roll) and got to take home a sample of his "Dirty Dust" spice blend, The Burger from The Little Beet (cheddar, caramelized onions, cheesy potato crunch and special sauce served with super crispy and delicious truffle fries) was up next, followed by, The White Label Burger from Costata (dry-aged beef blend with bacon marmalade), and the Parisian Santa Fe Burger from Butter (Pat LaFrieda beef, melted Gruyère and roasted garlic fondue, potato skin chips and serrano chilies on a Martin’s Famous Potato Roll) which was absolutely delicious. The best part was eating it while Chef Alex Guarnaschelli was joking around with the crowd. She was absolutely hilarious!

    One of the coolest things at the event was the esurance SavorBands that we wore all evening. You just tapped them at each booth that you stopped by to keep track of what you sampled, and also got to use it to cast your vote for best burger. One of the times that Dino tapped his, he was notified that he won a meet & greet with Chef Marc Murphy! We hadn't tried his LAMB-MARC burger (spiced ground lamb burger with mint chimichurri on a Martin’s Famous Potato Roll)  yet, so when we met up with him he had his team send two out and he described them to us himself. They packed a ton of flavor - we really loved the chimichurri with the lamb. It was a bold burger, so it's no wonder it won top honors from the judges! He was cracking jokes with us, gave us the inside scoop on the logistics of the event, and was a pleasure to chat with!

    We did manage to sneak in a few desserts - cake pops from William Greenberg Desserts, and the most adorable dessert burger I've ever seen - the Mac Stac from ilili (sesame macaroon, with smoked chocolate-hazelnut ganache, served with waffle fries, pineapple mustard and hibiscus ketchup). I ended up grabbing a second one of those cuties, because they were ridiculously good.

    Samples of burgers to taste.
    Our first stop was the Ramen Burger from RAMEN Co. - it totally lived up to all of the hype!
    Slider with sauce alongside.
    The El Burger from Hudson Malone paired dry-aged beef with a big, juicy pickle. *Swoon*
    Tasting portions of burgers at an event in NYC.
    The Red Burger from Rouge Tomate with housemade kimchi and pickled veggies.
    Macaron shaped like a burger.
    ilili's Mac Stac was the most adorable dessert burger of the evening!
    Chef plating macarons shaped like burgers.
    "Mac Stac" assembly line at the ilili tent.

    In between rounds of burgers, we decided that we need a bit of respite from the swarms of people, so we headed over to the JCPenney lounge. They had a cozy, Halloween-themed display at the far end of the event, full of cozy couches, tricks and treats. All of my friends know that I'm a huge fan of Halloween fun, so when I saw the adorably spooky treats on display, I was like a kid in a candy shop! They did a lot of little things that really upped the specialness of their items - I loved the face decals on the candy jars, and the spiderweb over the cheese. Too cute!

    They also had a lot of appliances and dinnerware on display. It's all stuff you can buy over at JCPenney.com or in their stores. They have a huge selection of items from a slew of beloved national brands such as KitchenAid, Calphalon, Cuisinart, Cake Boss, Keurig, Pfaltzgraff and Rachael Ray. In fact, one of the most used tools in my kitchen arsenal has been this Rachael Ray 5-qt. Hard Anodized Covered Oval Sauté Pan. I've had it for yeeeeears now, and I favor it over all of my "regular" round skillets. I've been considering buying the 3-qt. Covered Oval Saucepan and/or 8-qt. Covered Stock Pot, too, because I love how un-crowded my stovetop is with an oval pan. And things like spaghetti fit in it lying down without sticking up out of the water. I also like to do things like caramelize onions in the pan, slide them over to one side and cook a nice piece of meat right there in the same pan while the onions stay warm. It's super handy.

    One of the other fun things at their display was the beautifully intricate papercut artwork from Mr. Chen. He wowed the crowd with his speedy and precise renderings of anything and everything that was requested of him! My family is going to be dressing up as penguins for Halloween this year (my toddler LOVES penguins!) so we asked if he would make a penguin for us. He snipped away for what seemed like no time at all, and revealed an adorable penguin family. It made for a really beautiful souvenir!

    Table display of Halloween candy.
    A fun way to display your spooktacular dessert spread!
    JCPenney Halloween living room setup.
    That settles it. I need a cauldron in my tiny kitchen!
    Cups, bowls, and plates on shelves.
    Loving the color combo of this dinnerware.
    Coffee cups and utensils on a table.
    Waiter - there's a rat in my coffee!
    Dome with fake cheese covered with a spiderweb underneath.
    A fun & spooky way to deter people from stealing my precious cheese!
    Kitchen appliances on a shelf labeled JCPenney.
    JCPenney carries a slew of beloved national brands such as KitchenAid, Calphalon, Cuisinart, Cake Boss, Keurig, Pfaltzgraff and Rachael Ray.
    Halloween candy displayed in glass jars with faces on them.
    The cutest candy dishes I've ever seen!
    A papercraft Halloween cake sitting on top of a table.
    I seriously need to step up my fondant game so I can make a cake like THIS!
    Papercraft Halloween cupcakes on a display.
    Adorable Halloween-inspired cupcake wrappers.
    A man in a hat cutting shapes in paper.
    Mr. Cheng was creating unique free-form papercuts for attendees all evening.
    Man showing off hand-cut penguin paper art.
    We told Mr. Cheng that our son loves penguins, and he cut this intricate design in about 2 minutes flat!

    We had an absolutely fantastic time. I was thrilled to be able to sample so many delicious burgers and meet so many culinary icons. The weather was beautiful, the music was great, and I got to enjoy a pretty sweet date night with my husband. What an amazing opportunity!

    Artist painting a beer-themed mural.
    An artist was painting the NYC skyline a la Blue Moon next to one of the beer stands.
    People painting a beer-themed mural.
    I got to add some paint to the Blue Moon masterpiece - I wonder how many people he got to help out?
    A group of people standing in front of a crowd.
    Rachael Ray taking the stage to announce the evening's winners.
    A group of people standing in front of a sign.
    Rachael Ray presenting Marc Murphy with the judges' award for best burger of the year.
    A group of people standing in front of a crowd.
    All of the evening's chefs and judges got on the stage for the esteemed People's Choice Award.
    Adam Richman, Josh Capon holding a sign.
    Adam Richman and People's Choice winner Josh Capon's celebrating Josh's winning Bash Burger.

    Do you want your own JCPenney burger package? To enter to win, leave a comment below describing your favorite burger. Winner will receive one Cooks Contact Grill ($40 value), one Charcoal Companion® Stuff-A-Burger® 2-Pc. Set ($50 value) and one Charcoal Companion® Deluxe Mini Burger Set ($50 value) from JCPenney. The contest will close on Friday, November 14, 2014 at 12 noon (Eastern Standard Time). One winner will be chosen via random.org and will be contacted via email to get mailing information. U.S. residents only. Good luck, everyone!

    UPDATE – The winner has been selected via random.org – CONGRATS to Lori!

    • « Previous Page
    • 1
    • …
    • 12
    • 13
    • 14
    • 15
    • 16
    • …
    • 35
    • Next Page »

    Hi, I'm Ashley and I’ve been writing about food & recipes here at Big Flavors from a Tiny Kitchen since 2006. I want to help you (yes, you!) gain confidence in the kitchen so you are excited to cook at home for yourself and your loved ones.

    More about me →

    Favorite Spring Recipes

    • Mayo-free Deviled Eggs
    • Middle Eastern Fattoush Salad with Homemade Pita Chips
    • Birthday Cake Confetti Pancakes with Sprinkles
    • Italian Cream Cheese and Ricotta Cheesecake
    • Garlicky Mushroom Ricotta Pizza with Wild Arugula + Aged Balsamic
    • Slow Cooker "Roasted" Beets
    • Honey Balsamic Roasted Carrots
    • Italian Ricotta Cookies
    • Rhubarb Custard Pie
    • Easy Instant Pot Herbed Potato Salad

    Mother's Day + Easter Brunch

    • Epic Brunch Board on a Budget
    • Baby Spinach and Cheddar Quiche Made with Fresh Spinach
    • Turkey Salad Tea Sandwiches with Dried Cherries
    • Great Grandma Maria Francesca Cardile's Italian Easter Cookies
    • Brie Waffle Bites
    • Challah French Toast
    • Creamsicle Smoothies
    • DM Bloody Mary
    • Turkey Scotch Eggs
    • The Herbalist

    Popular Now

    • Cast iron skillet full of chicken fajitas.
      Favorite Restaurant-Style Chicken Fajitas
    • Overhead view of spinach and cheddar quiche with forks.
      Baby Spinach and Cheddar Quiche Made with Fresh Spinach
    • Chicken and bell pepper stir-fry served over white rice.
      Chicken and Bell Pepper Stir-Fry
    • Serving dish of cooked shrimp garnished with chopped parsley.
      Quick and Easy Sautéed Shrimp
    • Overhead view of a dutch oven filled with sausages, peppers, and onions.
      Sausage and Peppers
    • Overhead view of assorted breakfast items displayed on a board.
      Epic Brunch Board on a Budget

    Footer

    ↑ back to top

    About

    • About Ashley
    • Press + Recognition
    • Events
    • Virtual Cooking Classes
    • Podcast
    • Contact
    • Privacy Policy

    Newsletter

    • Sign up to receive delicious recipes and exclusive content right to your inbox!

    As an Amazon Associate I earn from qualifying purchases at no added cost to you.

    ©2006–2026  BIG FLAVORS FROM A TINY KITCHEN LLC | ALL RIGHTS RESERVED

    *Third-party advertisers may collect or use non-personally identifiable information to serve you more relevant ads.