Big Flavors from a Tiny Kitchen

menu icon
go to homepage
  • Recipes
  • About
  • Events
  • Contact
  • Subscribe
    • Facebook
    • Instagram
    • Pinterest
  • subscribe
    search icon
    Homepage link
    • Recipes
    • About
    • Events
    • Contact
    • Subscribe
    • Facebook
    • Instagram
    • Pinterest
  • ×
    Home » Recipes

    Red Velvet Pancakes

    February 15, 2010 by Ashley 3 Comments

    Heart-shaped red velvet pancakes on a plate.

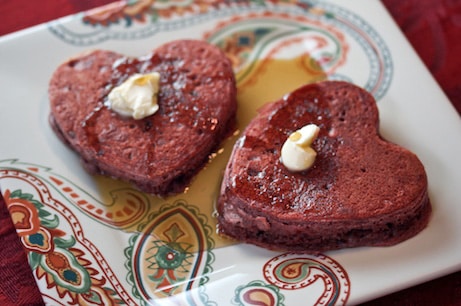
    Dino made our favorite buttermilk pancakes again, but this time he added 1 tablespoon of Dutch process cocoa powder and 10 drops of red food coloring to make these adorable, heart-shaped, red velvet pancakes.

    His mom gave us some heart-shaped pancake molds for Christmas, and it's the first time we've used them. The pancakes weren't just cute, they were light and fluffy, and delicious.

    Heart-shaped red velvet pancakes on a plate.

    Coriander Scented Untoasted Blend (Bin Bhuna Kua Garam Masala)

    February 11, 2010 by Ashley 5 Comments

    Whole spices in a spice grinder.

    I made this spice blend for a recipe tonight, and it smelled awesome! I love seeing how whole spices transform after you mix them together and blend them up.

    Whole spices in a spice grinder.

    Coriander Scented Untoasted Blend (Bin Bhuna Kua Garam Masala)

    Coriander Scented Untoasted Blend (Bin Bhuna Kua Garam Masala)
    660 Curries: The Gateway to Indian Cooking - Raghaven Iyer

    Makes ⅓ cup

    2 tablespoons coriander seeds
    1 teaspoon cumin seeds
    1 teaspoon black peppercorns
    ½ teaspoon whole cloves
    ½ teaspoon cardamom seeds from green or white pods
    2 dried bay leaves
    3 or 4 dried red Thai or cayenne chiles, to taste, stems removed; or 1 teaspoon cayenne (ground red pepper)

    1. Place all the ingredients in a spice grinder or coffee grinder, and grind until the texture resembles that of finely ground black pepper.

    2. Store the mixture in a tightly sealed container, away from excess light, heat, and humidity, for up to 2 months.

    Cumin-Scented Potatoes with Tomatoes (Ghurma Aloo)

    February 9, 2010 by Ashley Leave a Comment

    Bowl of curried potatoes over rice.

    This recipe is really warm and spicy. It was perfect for a cold night. I served it with Flaky Griddle-Cooked Breads (Malabar Parantha) as suggested in the book, on top of rice with some plain yogurt. The yogurt is really key here if you want to cool off your palette every once in a while, as this one is pretty spicy. The potatoes melt down a little and make it a very thick, tasty curry.

    Bowl of curried potatoes over rice.

    Cumin-Scented Potatoes with Tomatoes (Ghurma Aloo)
    660 Curries: The Gateway to Indian Cooking - Raghaven Iyer

    Serves 6

    1 ½ pounds russet or Yukon Gold potatoes, peeled, cut into ½-inch cubes, and submerged in a bowl of cold water to prevent browning
    2 tablespoons canola oil
    1 tablespoon cumin seeds
    1 small red onion, cut in half lengthwise and then cut into ½-inch cubes
    1 teaspoon ground turmeric
    2 teaspoons coarse kosher or sea salt
    1 teaspoon cayenne (ground red pepper)
    1 medium-size tomato, cored and cut into 1-inch cubes
    2 tablespoons finely chopped fresh cilantro leaves and tender stems

    1. Drain the potatoes and pat them dry.

    2. Heat the oil in a medium-size saucepan over medium-high heat. Add the cumin seeds and cook until they sizzle, turn reddish brown, and are fragrant, 5 to 10 seconds. Add the potatoes, onion, and turmeric, and stir-fry until the potatoes and onion are lightly browned around the edges, 4 to 6 minutes.

    3. Sprinkle in the salt and cayenne, and stir once or twice. Pour in 1 cup water and bring to a boil. Reduce the heat to medium-low, cover the pan, and cook, stirring occasionally, until the potatoes are almost fall-apart tender, 18 to 20 minutes.

    4. Stir in the tomato and cilantro, and cover the pan. Simmer, stirring occasionally, until the tomato is warmed through, about 2 minutes. Then serve.

    Tip: For a thicker sauce, coarsely mash some of the potato cubes.

    MacGourmet Rating: 4 Stars

    Supper Club: Divinity

    February 6, 2010 by Ashley Leave a Comment

    White divinity candies in gift wrap.

    Thankfully, the second recipe that I tried from this old cookbook was great! I figure the fact that one of my family members wrote "very good" in the margin was a good sign. I did a little reading online to make sure I knew what to look for with the sugar temperature. These little candies really are divine - they're sweet and fluffy and different from anything else I've tried. The recipe didn't give an amount for vanilla, so we used 1 teaspoon. I love knowing that I'm making something that my family before me enjoyed eating. I really hope I'll find some more gems in this cookbook!

    White divinity candies in gift wrap.

    White divinity candy with a bite taken out.

    Old cookbook opened to the candy section.

    Divinity
    The Star Cook Book
    Frances Rust

    Into ⅔ cup lukewarm water dissolve 3 cups granulated sugar. Add ⅔ cup white Karo syrup. Boil until it cracks in water. Pour over the well-beaten whites of 3 eggs. Add vanilla. Beat until it drops from spoon in lumps.

    MacGourmet Rating: 4 Stars

    Supper Club: Mississippi Hush Puppies

    February 6, 2010 by Ashley 5 Comments

    Close-up of a pile of hush puppies.

    Ever since we got a deep fryer, we've wanted to make hush puppies. This recipe is fantastic!

    We used beer and added a little cayenne, black pepper and garlic powder to the mix.

    They were light and fluffy and really flavorful inside. The peppers added a nice kick, and Dino made some maple butter to smear on them while we ate them.

    They were a big hit!

    Close-up of a pile of hush puppies.
    Hand holding a hush puppy with a bite taken out of it.
    Mississippi Hush Puppies
    Southern Living April 1997

    This is a favorite of the Catfish Institute in Belzoni, Mississippi. Substituting beer for milk makes these lighter and tangier.

    Yield: 1 ½ dozen

    1 cup self-rising cornmeal mix
    ½ cup self-rising flour
    1 tablespoon sugar
    1 large egg
    ½ cup milk or beer
    ½ cup diced onion
    ½ cup chopped green bell pepper
    1 jalapeño pepper, chopped
    Vegetable oil

    Combine first 3 ingredients in a large bowl, and make a well in center of mixture.

    Combine egg and next 4 ingredients, stirring well; add to dry ingredients, stirring just until moistened.

    Pour oil to a depth of 3 inches into a Dutch oven or large saucepan; heat to 375°.

    Drop batter by rounded tablespoonfuls into hot oil, and fry in batches 2 minutes on each side or until golden brown. Drain on paper towels; serve immediately.

    MacGourmet Rating: 5 Stars

    Supper Club: Mustard Slaw

    February 6, 2010 by Ashley Leave a Comment

    Bowl of mustard cole slaw.

    This month's Supper Club theme was Crockpot Cooking. Each couple had to make one dish with a slow cooker, and the other could accompany that dish or be something totally different. We decided to make pulled chicken sandwiches with mustard slaw on top. Dino found this slaw recipe and it was wonderful! My only note is that it made too much sauce - you could easily cut it in half (or double your veggies if you're making it for a huge crowd). The slaw was sweet and tangy, and full of veggie goodness. It rocked!

    Bowl of mustard cole slaw.

    Mustard Slaw
    About.com

    This delicious slaw recipe can be served as a side dish or on pulled pork sandwiches. You can add more or less cayenne to adjust the spiciness of this dish.

    Prep Time: 20 minutes
    Cook Time: 5 minutes

    1 green cabbage, shredded
    1 white onion, finely chopped
    1 ½ cups sugar
    1 bell pepper, finely chopped
    1 carrot, grated
    ¾ cup apple cider vinegar
    ½ cup ketchup
    ½ cup prepared mustard
    ½ cup sour cream
    ⅓ cup mayonnaise
    1 tablespoon salt
    ½ teaspoon cayenne pepper
    ¼ teaspoon black pepper, ground

    In a large mixing bowl combine cabbage, carrot, bell pepper, onion, and sugar. Set aside.

    In a medium saucepan mix together remaining ingredients. Bring mixture to a boil, remove from heat, and pour over vegetables. Allow slaw to chill before serving.

    MacGourmet Rating: 5 Stars

    Crudités with Asian-Style Dip

    February 5, 2010 by Ashley Leave a Comment

    Crudite with dip.

    This dip was really tasty! It was different from a lot of the other dips that I've had. I love raw veggies, and this was a fun way to add some Asian flair to them.

    Crudite with dip.

    Crudités with Asian-Style Dip
    Bon Appétit December 1998

    Yield: Makes 1 cup dip

    ½ cup mayonnaise
    ¼ cup sour cream
    2 tablespoons soy sauce
    2 tablespoons chopped fresh basil
    1 tablespoon oriental sesame oil
    1 tablespoon toasted sesame seeds
    1 tablespoon rice vinegar
    1 teaspoon minced peeled fresh ginger
    1 teaspoon sugar
    ½ teaspoon dry mustard
    ⅛ teaspoon cayenne pepper

    Assorted cut-up vegetables (such as carrots, red bell peppers, sugar snap peas, cucumbers and broccoli)

    Combine first 11 ingredients in small bowl; whisk to blend. Season dip with salt and pepper. (Can be prepared 1 day ahead. Cover and refrigerate.)

    Place bowl with dip in center of platter. Surround with assorted vegetables and serve.

    MacGourmet Rating: 4 Stars

    Chicken with Scallion-Lime Sauce and Sweet Carrot Rice

    February 3, 2010 by Ashley 7 Comments

    Sliced chicken over rice.

    This is the second recipe I've made from this cookbook this week, and it was great! The chicken was really moist and there was a ton of flavor from all of the parts of the dish. The rice is definitely something I'll make again on the side of other dishes. I can see it as a good way to use up a few extra carrots. We thought it was a nice, solid meal.

    Sliced chicken over rice.
    Chicken with Scallion-Lime Sauce and Sweet Carrot Rice
    Express Lane Meals - Rachael Ray

    4 Servings

    4 tablespoons EVOO (extra-virgin olive oil)
    3 large carrots, peeled and grated
    Salt and black pepper
    1 ½ cups white rice
    3 cups chicken stock
    1 teaspoon dried thyme, ⅓ palmful
    Zest and juice of 2 limes
    4 boneless, skinless chicken breasts
    3 large garlic cloves, chopped
    ½ teaspoon red pepper flakes (eyeball it)
    1 teaspoon ground coriander, ⅓ palmful
    3 bunches of scallions, about 15, roots trimmed, sliced
    ¼ cup fresh flat-leaf parsley, a generous handful, chopped
    2 tablespoons unsalted butter

    Heat a medium pot with a tight-fitting lid over medium-high heat. Add about 1 tablespoon of the EVOO, once around the pan. Add the grated carrots and a little salt and pepper and cook, stirring, for 1 minute. Add the rice and stir to coat in the oil and distribute the carrots. Add 2 ½ cups of the chicken stock. Bring the stock to a boil, cover the pot, and reduce the heat to a simmer. Cook for 15 to 18 minutes, until the rice is tender.

    Preheat a large skillet over medium-high heat. While the pan is heating up, combine 2 tablespoons of the EVOO, the thyme, lime zest, salt and pepper in a shallow dish. Add the chicken breasts and coat thoroughly in the mixture. Add the seasoned chicken to the skillet and cook for 5 to 6 minutes on each side, or until cooked through. Transfer the chicken to a plate and cover it loosely with aluminum foil. Return the skillet to the heat; add the remaining tablespoon of EVOO. Add the garlic, red pepper flakes, and coriander. Cook, stirring constantly, for about 1 minute, then add the scallions and cook for 1 minute, again stirring constantly. Add the lime juice and the remaining ½ cup of chicken stock and continue to cook for about 2 minutes. Turn the heat off and add the parsley and butter, stirring and shaking the pan until the butter is completely melted.

    To serve, slice the chicken on a slight angle. Divide the rice among 4 serving plates and top each pile of rice with a sliced chicken breast. Pour some scallion-lime sauce over each chicken breast.

    MacGourmet Rating: 4 Stars

    Cacio e Pepe (Cheese & Pepper Pasta) and Spinach with White Beans

    February 3, 2010 by Ashley Leave a Comment

    Pasta with white beans and spinach.

    This vegetarian dinner was surprisingly filling. We liked the combination of flavors, and the nutmeg definitely added something interesting to the dish, but over all it wasn't a huge winner. It was good, not great.

    Pasta with white beans and spinach.

    Cacio e Pepe (Cheese & Pepper Pasta) and Spinach with White Beans
    Express Lane Meals - Rachael Ray

    4 Servings

    Salt
    1 pound spaghetti
    3 tablespoons unsalted butter, cut into small pieces
    5 tablespoons EVOO (extra-virgin olive oil)
    2 teaspoons coarse black pepper
    1 cup grated Pecorino Romano cheese, 3 rounded handfuls
    1 10-ounce box chopped frozen spinach
    3 to 4 garlic cloves, chopped
    1 14-ounce can cannellini beans, rinsed and drained
    ¼ teaspoon freshly grated nutmeg

    Bring a large pot of water to a boil for the pasta and salt it. Add the pasta and cook to al dente. Heads up: you'll need to use a ladle of the cooking water (about ¼ cup) for the sauce right before you drain the pasta.

    Place a large skillet over low heat with the butter, 1 tablespoon of the EVOO, and pepper. Let it hang out until the pasta is done.

    When the pasta is ready, take a ladle of the starchy cooking water and add it to the butter-pepper mixture. Drain the pasta and toss it in the pan with the sauce. Turn off the heat. Add the cheese in small handfuls, then toss the pasta with tongs, until all the cheese is incorporated into the creamy sauce. Add another ladle of cooking water if needed, then season the pasta to taste with salt and drizzle with 2 tablespoons of the EVOO.

    While the pasta works, defrost the spinach in the microwave for 6 minutes on high. Place the spinach in a clean kitchen towel and wring the water out. Heat a small skillet over medium heat. Add the remaining 2 tablespoons of EVOO, twice around the pan, then the garlic. Cook the garlic for 2 minutes, and then add the beans. Add the spinach to the beans, breaking it up as you drop it into the pan. Season the spinach and beans with nutmeg, salt and pepper. Serve the spinach and beans alongside the hot pasta.

    MacGourmet Rating: 3 Stars

    Tuscan Steak and Beans

    February 1, 2010 by Ashley 2 Comments

    Sliced steak with white beans and tomatoes.

    This was a really solid recipe. The combination of beans, tomatoes, onions and rosemary in worked incredibly well together. The vinegar brought it all together and made it melt a little bit. I can see using this method with things like chicken or pork, too. I loved how the tomatoes cooked until they burst open a little bit. Dino doesn't usually care for rosemary too much, but he really enjoyed this one.

    Sliced steak with white beans and tomatoes.
    Tuscan Steak and Beans
    Good Housekeeping Rush Hour Dinners

    Total Time 20 minutes
    Makes 4 main-dish servings

    1 teaspoon olive oil
    2 boneless beef top loin (strip) or rib-eye steaks, ¾ inch thick (about 10 ounces each)
    ½ teaspoon salt
    ½ teaspoon coarsely ground black pepper
    1 medium onion, sliced
    ⅓ cup balsamic vinegar
    2 teaspoons chopped fresh rosemary
    1 pint grape or cherry tomatoes
    1 can (15 to 19 ounces) white kidney beans (cannellini), rinsed and drained
    fresh rosemary leaves

    1. In 10-inch skillet, heat oil over medium-high heat until very hot but not smoking. Sprinkle steaks with salt and pepper. Add steaks to skillet and cook 8 to 10 minutes, turning once, for medium-rare or until desired doneness. Transfer steaks to cutting board; keep warm.

    2. Reduce heat to medium. Add onion to drippings in skillet and cook, stirring, until browned and tender, about 5 minutes. Add vinegar, chopped rosemary, and 2 tablespoons water, stirring until browned bits are loosened from bottom of skillet. Stir in tomatoes and beans; cook, stirring occasionally, until heated through, about 2 minutes.

    3. Thinly slice steaks and serve with tomato-and-bean mixture. Garnish with rosemary leaves.

    Each serving: About 495 calories, 35 g protein, 29 g carbohydrate, 25 g total fat (10 g saturated), 7 g fiber, 76 mg cholesterol, 540 mg sodium.

    MacGourmet Rating: 4 Stars

    Mrs. Sigg's Snickerdoodles

    January 29, 2010 by Ashley 5 Comments

    Stack of snickerdoodle cookies topped with cinnamon sticks.

    This is the second time I've made this recipe, and this time they turned out even better because I used our new convection oven. They cooked perfectly - they were super light and fluffy and delicious. I think using Penzey's cinnamon really adds a lot to the flavor, too. Dino and I both brought some in to work and our coworkers all loved them. Success!

    Stack of snickerdoodle cookies topped with cinnamon sticks.

    Mrs. Sigg's Snickerdoodles
    allrecipes.com - Beth Sigworth

    "These wonderful cinnamon-sugar cookies became very popular with my friends at church. My pastor loves them! You will too! Crispy edges, and chewy centers; these cookies are a crowd pleaser for sure!"

    PREP TIME 20 Min
    COOK TIME 10 Min
    READY IN 1 Hr

    Original recipe yield 4 dozen

    ½ cup butter, softened
    ½ cup shortening
    1 ½ cups white sugar
    2 eggs
    2 teaspoons vanilla extract
    2 ¾ cups all-purpose flour
    2 teaspoons cream of tartar
    1 teaspoon baking soda
    ¼ teaspoon salt
    2 tablespoons white sugar
    2 teaspoons ground cinnamon

    1. Preheat oven to 400 degrees F (200 degrees C).
    2. Cream together butter, shortening, 1 ½ cups sugar, the eggs and the vanilla. Blend in the flour, cream of tartar, soda and salt. Shape dough by rounded spoonfuls into balls.
    3. Mix the 2 tablespoons sugar and the cinnamon. Roll balls of dough in mixture. Place 2 inches apart on ungreased baking sheets.
    4. Bake 8 to 10 minutes, or until set but not too hard. Remove immediately from baking sheets.

    MacGourmet Rating: 5 Stars

    Baked Potato Soup

    January 25, 2010 by Ashley 6 Comments

    A bowl of baked potato soup with bacon.

    I had baked a couple of potatoes at the end of last week for this soup, but I didn't get around to making it until tonight. It made it a lot easier to already have the potato part done. This is a really good, hearty, comfort food type of dish. I seasoned it with more salt and pepper at the end, and ate a nice big bowl. This would also be good with a dollop of sour cream on top. Yum!

     A bowl of baked potato soup with bacon.

    Spoonful of baked potato soup with bacon.
    Baked Potato Soup
    Allrecipes Kristi Teague

    "A good friend who runs a bed-and-breakfast game me this creamy potato soup recipe that's become a winter favorite,' recalls Kristi Teague of Southside, Tennessee. 'A dash of hot sauce a little basil give it special flavor."

    Prep Time: 10 Min
    Cook Time: 20 Min
    Ready In: 30 Min

    Yield 4 servings

    3 bacon strips, diced
    1 small onion, chopped
    1 clove garlic, minced
    3 tablespoons all-purpose flour
    1 teaspoon salt
    1 teaspoon dried basil
    ½ teaspoon pepper
    3 cups chicken broth
    2 large baked potatoes, peeled and cubed
    1 cup half-and-half cream
    ½ teaspoon hot pepper sauce
    Shredded Cheddar cheese
    Minced fresh parsley

    In a large saucepan, cook bacon until crisp. Drain, reserving 1 tablespoon drippings. Set bacon aside. Saute onion and garlic in the drippings until tender. Stir in flour, salt, basil and pepper; mix well. Gradually add broth. Bring to boil; boil and stir for 2 minutes. Add the potatoes, cream and hot pepper sauce; heat through but do not boil. Garnish with bacon, cheese and parsley.

    MacGourmet Rating: 4 Stars

    Aromatic Slow-Roasted Tomatoes

    January 24, 2010 by Ashley 3 Comments

    Oven-roasted tomatoes on a baking sheet.

    This recipe is super simple and completely delicious. It takes a long time to roast the tomatoes, but your patience will be rewarded with some delicious, sweet tomatoes. The flavor gets so rich - it's almost like a sun-dried tomato but nice and warm and plump. These are good straight out of the oven, or even drizzled with a little balsamic vinegar. In the magazine, it talks about pureeing them into a sauce, too. I'll definitely try that out sometime, but since I only made half a batch, I'll just stick to eating these straight up. Wow.

    Oven-roasted tomatoes on a baking sheet.
    Pile of oven-roasted tomatoes on a plate.

    Aromatic Slow-Roasted Tomatoes
    Cooking Light December 2009

    Slow roasting is one of the best uses for winter tomatoes because it intensifies their sweetness.

    Yield: 8 servings (serving size: 2 tomato halves)

    1 tablespoon sugar
    1 tablespoon extra-virgin olive oil
    ½ teaspoon salt
    ½ teaspoon dried basil
    ½ teaspoon dried oregano
    ¼ teaspoon freshly ground black pepper
    4 pounds plum tomatoes, halved lengthwise (about 16 medium)
    Cooking spray

    1. Preheat oven to 200°.

    2. Combine first 7 ingredients in a large bowl, tossing gently to coat. Arrange tomatoes, cut side up, on a baking sheet coated with cooking spray. Roast at 200° for 7 ½ hours.

    Nutritional Information
    Calories: 63
    Fat: 2.2g (sat 0.3g,mono 1.3g,poly 0.4g)
    Protein: 2g
    Carbohydrate: 10.6g
    Fiber: 2.8g
    Cholesterol: 0.0mg
    Iron: 0.7mg
    Sodium: 157mg
    Calcium: 26mg

    MacGourmet Rating: 5 Stars

    Mussels with Shallots, Garlic & White Wine over Linguine

    January 24, 2010 by Ashley 2 Comments

    Plate of mussels over linguine.

    I wanted to try cooking with mussels, since I've heard how easy it is. The only problem I ran into was that it was kind of tricky debearding them all. Other than that, it ended up being an elegant and tasty dinner.

    Plate of mussels over linguine.

    Mussels with Shallots, Garlic & White Wine over Linguine
    Ashley Covelli

    I melted about 5T of butter in a large skillet with the same amount of olive oil. I added in 3 chopped shallots and 5 cloves of chopped garlic and let it cook slowly. Once everything was nice and soft, I added about a cup and a half of white wine and let it reduce. Then, I slid in a bag of mussels that I picked over, rinsed and debearded. It didn't look like quite enough liquid for the amount of mussels I had, so I added about a cup of water. I covered the pan and let it steam until they all opened. I served it over some whole wheat linguine that was cooked to al dente and tossed with some olive oil. I sprinkled chopped parsley over the top and served it with some nice slices of bread - perfect for dunking into the garlicky broth.

    MacGourmet Rating: 4 Stars

    Mao Pao Tofu

    January 20, 2010 by Ashley 4 Comments

    Mao pao tofu over rice.

    This was a quick meal that turned out OK. I've had a lot of similar recipes that turned out better. I think this one would benefit from pressing the tofu for 30 minutes to an hour, and something else in the sauce...but I'm not sure what. It was good, but I won't be making it again.

    Mao pao tofu over rice.

    Mao Pao Tofu
    Cooking Light December 2009

    Yield: 4 servings (serving size: 1 ¼ cups tofu mixture and ½ cup rice)

    1 (3 ½-ounce) bag boil-in-bag rice
    2 tablespoons low-sodium soy sauce, divided
    2 tablespoons dry sherry, divided
    ½ pound lean ground pork
    1 tablespoon peanut oil
    1 (14-ounce) package extra-firm tofu, drained and cubed
    3 tablespoons chopped green onions
    1 tablespoon minced fresh ginger
    1 tablespoon chile paste with garlic
    2 teaspoons minced fresh garlic
    ¼ teaspoon salt
    1 cup fat-free, less-sodium chicken broth
    2 teaspoons cornstarch
    1 tablespoon water

    1. Cook rice according to directions.

    2. Combine 1 tablespoon soy sauce, 1 tablespoon sherry, and pork; set aside.

    3. Heat oil in a wok over high heat. Add tofu; stir-fry 3 minutes. Add pork mixture; stir-fry 3 minutes. Stir in onions and next 4 ingredients; stir-fry 30 seconds. Add 1 tablespoon soy sauce, 1 tablespoon sherry, and broth; cook 2 minutes. Combine cornstarch and water; stir with a whisk. Add to wok; cook 30 seconds or until slightly thick, stirring constantly. Serve over rice.

    Nutritional Information:
    Calories: 342
    Fat: 14.3g (sat 3.8g,mono 2.7g,poly 4.6g)
    Protein: 23.3g
    Carbohydrate: 27.8g
    Fiber: 0.3g
    Cholesterol: 43mg
    Iron:2.3mg
    Sodium:562mg
    Calcium:78mg

    MacGourmet Rating: 4 Stars

    Spike Mendelsohn's Toasted Marshmallow Milkshakes

    January 19, 2010 by Ashley 5 Comments

    Spike Mendelsohn’s Toasted Marshmallow Milkshakes

    This was an easy and impressive dessert. This drink tastes like a camping trip - toasted marshmallows are just awesome! And having them cold in a drink really makes it interesting. The only thing I'll change next time is to use less milk, because it made the milkshakes too runny. I think maybe half the amount of milk would have been better. I'll definitely tweak this one for parties in the future.

    Spike Mendelsohn's Toasted Marshmallow Milkshakes

    Spike Mendelsohn's Toasted Marshmallow Milkshakes
    Everyday with Rachael Ray February 2010

    Makes 4
    Prep 10 Min
    Cook 10 Min

    One 1-pound bag jumbo marshmallows*
    2 cups milk
    2 cups vanilla ice cream
    1 tablespoon sour cream

    1. Preheat the broiler. On a foil-lined baking sheet, place half of the marshmallows in a single layer; broil until charred, 3 minutes. Transfer to a plate to cool. Place the remaining marshmallows on the sheet and roast until just toasted, 2 minutes; let cool.

    2. In a blender, mix the milk, ice cream, sour cream and charred marshmallows. Serve topped with the toasted marshmallows.

    *Optional: use Gluten Free

    Big Flavors Rating: 4 Stars

    Chicken Cacciatora

    January 19, 2010 by Ashley 2 Comments

    Chicken cacciatora over couscous.

    I got this cookbook a while ago but haven't made anything from it until tonight. This meal totally hit the spot - great comfort food. I got to use my new 7 quart cast iron Dutch oven, and it worked out perfectly! The packages of chicken I got had a few extra pieces, so it took longer than 20 minutes of simmering for it to be cooked through. I served this on top of whole wheat couscous and it was wonderful!

    Chicken cacciatora over couscous.

    Chicken Cacciatora
    The Food of Italy: A Journey for Food Lovers - Sophie Braimbridge and Jo Glynn

    Just like the French Chasseur, Cacciatoria means 'hunter's style'. The dish is originally from central Italy, but like so much Italian fare, every region has put its own twist on the recipe. This one, with tomatoes, is probably the most widely traveled.

    3 tablespoons olive oil
    1 large onion, finely chopped
    3 garlic cloves, crushed
    1 celery stalk, finely chopped
    150 g (5 ½ oz) pancetta, finely chopped
    125 g (4 ½ oz) button mushrooms, thickly sliced
    4 chicken drumsticks
    4 chicken thighs
    80 ml (⅓ cup) dry vermouth or dry white wine
    2 x 400 g (14 oz) tins chopped tomatoes
    ¼ teaspoon brown sugar
    1 sprig of oregano, plus 4-5 sprigs to garnish
    1 sprig of rosemary
    1 bay leaf

    HEAT half the oil in a large casserole. Add the onion, garlic and celery and cook, stirring from time to time, over moderately low heat for 6-8 minutes until the onion is golden.

    ADD the pancetta and mushrooms, increase the heat and cook, stirring occasionally, for 4-5 minutes. Spoon onto a plate and set aside.

    ADD the remaining olive oil to the casserole and lightly brown the chicken pieces, a few at a time. Season them as they brown. Spoon off any excess fat and return all the pieces to the casserole. Add the vermouth, increase the heat and cook until the liquid has almost evaporated.

    ADD the tomatoes, sugar, oregano, rosemary, bay leaf and 80 ml (⅓ cup) cold water. Bring to the boil then stir in the reserved pancetta mixture. Cover and leave to simmer for 20 minutes, or until the chicken is tender but not falling off the bone.

    IF the liquid is too thin, remove the chicken from the casserole, increase the heat and boil until thickened. Discard the sprigs of herbs and taste for salt and pepper. Toss in the additional oregano sprigs and the dish is ready to serve.

    MacGourmet Rating: 4 Stars

    Shrimp with Garlic and Turmeric

    January 14, 2010 by Ashley 2 Comments

    Shrimp stir-fry over rice.

    I made yet another winner from this cookbook tonight! I followed one of the tips and substituted shrimp for salmon. It was really tasty and not nearly as spicy as it sounds like it will be. The coconut milk really tames the heat of the chiles. I'd make this again, and I'd love to try it with other seafood.

    Shrimp stir-fry over rice.

    Salmon with Garlic and Turmeric (Lasoon Aur Kaldi Waale Mucchi)
    660 Curries: The Gateway to Indian Cooking - Raghaven Iyer

    1 ½ teaspoons coarse kosher or sea salt
    1 teaspoon ground turmeric
    6 medium-size cloves garlic, finely chopped
    1 pound boneless, skinless salmon fillet
    2 tablespoons canola oil
    ½ cup unsweetened coconut milk
    ½ teaspoon black peppercorns, coarsely crushed
    2 fresh green Thai, cayenne, or serrano chiles, stems removed, cut in half lengthwise (do not remove the seeds)

    1. Mix the salt, turmeric, and garlic together in a small bowl. Sprinkle this rub over the top of the salmon fillet, and rub it in. Refrigerate the fish, covered, for at least 30 minutes or as long as overnight, to allow the flavors to permeate the flesh.

    2. Heat the oil in a large skillet over medium heat. Add the salmon, spice-covered side down, and sear it for about 2 minutes (this will brown the fish and the garlic in the rub, and also cook the turmeric). Turn the fillet over and sear the underside until browned, about 2 minutes.

    3. Measure out the coconut milk in a measuring cup, and add the peppercorns and the chiles. Lift the fillet with a spatula and tilt the skillet slightly to allow the spiced coconut milk to run under it and release the browned bits of garlic, spice, and fish. Reduce the heat to medium-low, cover the skillet, and braise the salmon, spooning the sauce over it occasionally, until the flesh is barely starting to flake, 3 to 5 minutes.

    4. Transfer the fish to a platter, pour the curry over it, and serve.

    Tips: Shrimp or scallops make an excellent alternative to the salmon, as does any firm-fleshed fish like cod, bass, or catfish. Farm-raised tilapia is also a palatable option.

    The Two sources of heat in this curry, chiles and peppercorns, should not deter you from trying this recipe - they exude a hushed presence in the unsweetened coconut milk. The fresh chiles are slit open to reveal the vein that harbors the potent capsaicin, but since they are not chopped, they will generate less heat.

    MacGourmet Rating: 4 Stars

    Kumato Caprese Salad with Fig Balsamic

    January 13, 2010 by Ashley 1 Comment

    Caprese salad on a plate.

    I found these at the store and couldn't resist buying them. They're brown tomatoes, and I thought they'd be good for a Caprese salad. I used fresh mozzarella, basil, some really good extra virgin olive oil, fig balsamic, fleur de sal and freshly cracked black pepper. It was the perfect start to a meal. The only negative was that brown tomatoes don't photograph too well - they look like they're supposed to be red - ha!

    Package of kumato tomatoes.

    Caprese salad on a plate.

    Panko-Crusted Chicken with Mustard-Maple Pan Sauce

    January 12, 2010 by Ashley 4 Comments

    Plate of crusted chicken with beans and rice.

    This is another recipe that I found on the epicurious iPod app. It's a really tasty combination of ingredients. The sauce is sweet and tangy, and the chicken is moist and crunchy. The parsley gives it a nice bit of freshness. It was a really satisfying weeknight meal. I served it with black beans and rice.

     Plate of crusted chicken with beans and rice.

    Panko-Crusted Chicken with Mustard-Maple Pan Sauce
    The Bon Appétit Test Kitchen October 2009

    2 8-ounce skinless boneless chicken breast halves, cut crosswise in half
    1 large egg
    1 tablespoon finely chopped fresh Italian parsley
    2 teaspoons plus 2 tablespoons Dijon mustard
    1 cup panko (Japanese breadcrumbs)
    2 tablespoons olive oil
    1 cup low-salt chicken broth
    3 tablespoons pure maple syrup
    2 tablespoons plus 1 teaspoon coarse-grained mustard
    1 tablespoon chilled unsalted butter

    Using meat mallet or rolling pin, pound chicken in resealable plastic bag to ⅓-to
    ½-inch thickness. Whisk egg, parsley, and 2 teaspoons Dijon mustard in large bowl.
    Place chicken in egg mixture; turn to coat. Sprinkle chicken with salt and pepper. Dip
    each chicken piece in panko; turn to coat. Heat oil in large nonstick skillet over
    medium-high heat. Add chicken; cook until brown and cooked through, about 4 minutes per side.

    Meanwhile, whisk broth, syrup, coarse-grained mustard, and remaining 2 tablespoons Dijon mustard in glass measuring cup. Transfer chicken to plates. Add broth mixture to skillet; boil until reduced to ¾ cup, stirring occasionally, about 4 minutes. Add butter; whisk until melted. Spoon sauce alongside chicken.

    MacGourmet Rating: 4 Stars

    Magic Cookie Bars

    January 11, 2010 by Ashley 2 Comments

    Magic cookie bar squares in a pile.

    I have seen this recipe floating around for years now, but when a friend brought some in to work for me before Christmas, I decided that I needed to make these. They're possibly the easiest cookie recipe I've ever made, but they're kind of tricky to cut because they're so sticky. I had to let them cool overnight in order for them to be firm enough to cut into squares. They're fantastic, and will definitely cure your sugar cravings! This is definitely an easy and impressive recipe!

    Hand holding a magic cookie bar.

    Magic cookie bar squares in a pile.


    Magic Cookie Bars
    Eagle Brand

    This bar cookie is an old fashioned favorite. Chocolate chips, nuts and coconut are set in a caramelized layer on top of a graham cracker crust.

    Yield 36 bars

    ½ cup butter or margarine, melted
    1 ½ cups graham cracker crumbs
    1 (14 ounce) can EAGLE BRAND® Sweetened Condensed Milk
    2 cups semisweet chocolate morsels
    1 ⅓ cups flaked coconut
    1 cup chopped nuts

    1. Heat oven to 350 degrees F (325 degrees for glass dish). Coat 13x9-inch baking pan with no-stick cooking spray.
    2. Combine graham cracker crumbs and butter. Press into bottom of prepared pan. Pour sweetened condensed milk evenly over crumb mixture. Layer evenly with chocolate chips, coconut and nuts. Press down firmly with a fork.
    3. Bake 25 minutes or until lightly browned. Cool. Cut into bars or diamonds. Store covered at room temperature.

    Variations
    7-Layer Magic Cookie Bars: Substitute 1 cup (6-ounces) butterscotch flavored chips for 1 cup semi-sweet chocolate chips and proceed as directed above.

    Peanut butter flavored chips or white chocolate chips may be substituted for butterscotch flavored chips.

    Magic Peanut Cookie Bars: Substitute 2 cups (about ¾ pound) chocolate-covered peanuts for semi-sweet chocolate chips and chopped nuts.

    Magic Rainbow Cookie Bars: Substitute 2 cups plain candy-coated chocolate candies for semi-sweet chocolate chips.

    Nutritional Information
    Amount Per Serving Calories: 167 | Total Fat: 9.8g | Cholesterol: 11mg

    MacGourmet Rating: 5 Stars

    Pea and Parmesan Wonton Ravioli

    January 9, 2010 by Ashley 1 Comment

    Ravioli filled with peas and parmesan in a bowl.

    My kitchen is finally back in proper working order. We still have to have the walls finished up, paint and do the backsplash - but the functional stuff is finally done (we got plumbing hooked up to the sink and dishwasher today). I'm so excited! So my first "real" meal was this lovely ravioli recipe. It only took a few ingredients (I only had to buy 2 things!) and it was really delicious. I'd love to try using this filling with homemade pasta dough sometime. It was the perfect balance of sweet and savory - yum! This is another winner that I got from the epicurious iPod app. I'll definitely make it again!

    Ravioli filled with peas and parmesan in a bowl.

    Pea and Parmesan Wonton Ravioli
    Gourmet May 2009

    2 ⅔ cups frozen peas (¾ pound)
    ⅓ cup grated parmigiano-reggiano plus additional for serving
    2 teaspoons chopped mint
    About 64 dumpling or wonton wrappers
    ¾ stick unsalted butter, melted

    Cook peas in boiling salted water until just tender, 3 to
    4 minutes. Drain and cool, then purée in a food processor. Stir in cheese, mint, and ½ teaspoon each of salt and pepper.

    Put a rounded teaspoon filling in center of a wrapper. Lightly brush edge of wrapper with water, then place a second wrapper on top and seal, pressing out any trapped air. Repeat with remaining wrappers and filling, keeping ravioli covered as you work.

    Boil ravioli in 2 batches in a pasta pot of salted boiling water until tender, 2 to 3 minutes per batch, removing with a slotted spoon. Drizzle with butter and sprinkle with cheese and pepper.

    MacGourmet Rating: 5 Stars

    Strip Steaks with Parmesan Herb Butter

    January 7, 2010 by Ashley 5 Comments

    Steak with compound butter on a plate.

    This is my last night without plumbing in the kitchen, so I went for an easy main course to go with the leftover pasta and spinach from a few nights ago. I seasoned some strip steaks with salt and pepper and pan fried them and then topped them with a fantastic Parmesan herb butter. It melted down into the steaks and made them simply divine!

    Steak with compound butter on a plate.

    Parmesan Herb Butter
    Ashley Covelli

    4-5 tablespoons butter, softened
    2 green onions, finely chopped
    2 tablespoons flat leaf parsley, finely chopped
    2 tablespoons finely grated Parmesan cheese
    (amounts are approximate)

    Mix all ingredients together in a small bowl. Use as a topping for steak, chicken, etc. while the meat is still nice and hot. Enjoy!

    MacGourmet Rating: 5 Stars

    Quick Soulful Seasoned Pork Chops

    January 5, 2010 by Ashley 1 Comment

    I made another easy main course tonight in my kinda-kitchen. I bought some nice bone-in pork chops, patted them dry, sprinkled them with some of Sylvia's Soulful Seasoned Salt and pan fried them, covering and turning the heat down after flipping. They were moist and tasty, and super fast!

    Close-up of pork chops on a plate.

    Milanese Fettuccini Alfredo

    January 5, 2010 by Ashley 2 Comments

    Fettuccine alfredo in a bowl.

    I saw this recipe on an episode of 30-Minute Meals that was sitting on my DVR and immediately wanted to make it. It's simple enough that I could make it in my half setup kitchen. It looked decadent and delicious on her show, but it didn't turn out to be anything special. I wouldn't bother wasting a few pinches of saffron in this dish. The color is pretty, but it's not worth it. It was good as a side with the veal scallopini that I made tonight, but only because we haven't had much home cooked food lately. I won't bother to make this one again.

    Fettuccine alfredo in a bowl.

    Milanese Fettuccini Alfredo
    30-Minute Meals - Rachael Ray

    Serves 6

    ½ teaspoon saffron threads (2 pinches)
    1-1 ½ cups chicken stock
    Salt
    1 pound fettuccini
    6 tablespoons butter, cut into pats
    8 ounces finely grated Parmigiano Reggiano cheese (2 ½-3 cups loosely packed)

    Bring a large pot of water to a boil over medium heat.

    Pre-heat the oven to warm, about 200°F. Put a large serving bowl or a platter, for the pasta, into the oven to warm.

    In a small pot over low heat, add the saffron threads and the stock. Let steep until ready to use.

    When the water boils, season with salt, add the pasta and cook to al dente. Just before draining, add a ladle of the starchy pasta water to the pot with the saffron stock. Drain the pasta.

    Remove the bowl or platter from the oven and scatter with the butter pats. Add the pasta and pour in the saffron liquid. Sprinkle with half of the cheese and toss for 1 minute. Add more cheese and continue to toss for another 1-2 minutes. Keep tossing until the pasta is evenly coated and the cheese has melted into the saffron broth, forming a creamy, lightly golden sauce. Serve immediately.

    MacGourmet Rating: 3 Stars

    Temporary Kitchen Setup & Veal Scallopini

    January 5, 2010 by Ashley 1 Comment

    Cooked pork chop on a plate.

    So this is what we were able to rig in the kitchen until we have a countertop and plumbing - Dino put one of the shelves for the bottom cabinets up on top so I have a "counter" to put my new butcher block on. I was able to make a simple, homemade dinner and I was super excited! I've missed cooking so much! I don't like having to wash dishes in a room other than the kitchen, but after this week, that will finally be over...YAY!

    Temporary Kitchen

    Special shoutout to my mom for getting me the standing spoon rest that I wanted for Christmas. It's so great - I had the pasta spoon and my spoonula in there at the same time.

    Stovetop with cooking utensils.

    I bought some beautiful veal scallopini from the store and fried them up simply with some salt and pepper and a Penzeys spice blend called Mural of Flavor, which has shallots, onion, garlic, thyme, rosemary, basil, coriander, lemon peel, citric acid, black pepper, chives, green peppercorns, dill weed, and orange peel. It was simple and delicious, and didn't make much of a mess in the quasi-kitchen.

    Cooked pork chop on a plate.

    Supper Club: Caramelized Onion, Asian Pear and Goat Cheese Pizza with Thyme

    January 2, 2010 by Ashley 3 Comments

    Pizza topped with caramelized onions, pear, and goat cheese.

    When we first thought of doing a pizza event, I wanted to do a fig and pear pizza with goat cheese. Unfortunately, I couldn't find figs, so I ended up going this route, and it just proves that simple recipes can really knock your socks off! This was truly awesome! Thanks again to Michael for making the fantastic pizza dough!

    Pizza topped with caramelized onions, pear, and goat cheese.

    Caramelized Onion, Asian Pear and Goat Cheese Pizza with Thyme
    Ashley Covelli

    4 yellow onions, sliced thin
    salt and pepper
    olive oil
    a sprinkle of sugar
    3 small Asian pears, sliced
    2-3 ounces goat cheese, softened
    4 sprigs fresh thyme

    Heat a skillet over medium heat and coat with oil. Add onions and cook slowly to caramelize. Season with salt and pepper and a sprinkle of sugar after 10 minutes. Add half of the thyme leaves. Keep stirring until the onions get a nice rich caramel color.

    Prepare pizza dough and spread onions on top, drizzling more olive oil on top. Bake for 5 minutes and then add pears on top. Bake until the crust is golden. Add chunks of softened goat cheese and sprinkle with more fresh thyme. Add a final drizzle of olive oil and enjoy!

    MacGourmet Rating: 5 Stars

    Supper Club: Jerk Chicken Pizza

    January 2, 2010 by Ashley Leave a Comment

    Jerk chicken pizza on a cutting board.

    This is the pizza that Dino made for our supper club - spicy and delicious! This doesn't make a super pretty pizza, but a little freshly chopped green onion on the top fixed that right up!

    Jerk chicken pizza on a cutting board.

    Jerk Chicken Spice Blend
    Adapted from Suite101.com

    1 Tbl. ground allspice
    1 Tbl. ground thyme
    1 ½ tsp. cayenne pepper
    1 ½ tsp. ground black pepper
    1 ½ tsp. ground sage
    ¾ tsp. ground nutmeg
    ¾ tsp. ground cinnamon
    ¾ tsp. minced ginger
    2 Tbls. fresh garlic (crushed)
    1 Tbls. brown sugar or molasses
    ¼ C. Soy sauce
    ¼ C. dark rum (optional, but encouraged)
    ¾ C. white vinegar
    ½ C. orange juice
    Juice of 1 lime
    2 Scotch bonnet peppers (I used 1 seeded jalapeno and 1 seeded cherry pepper)
    3 green onions, diced
    1 C. white onion, diced

    1. Put all the ingredients in a blender and whiz until smooth.
    2. Place chicken in a large freezer bag and pour in spice blend. Place in a bowl to make sure there isn't any leakage and refrigerate for at least 4 hours, but up to a day is preferable.
    3. Preheat oven to 350 degrees or grill. If using an oven, place chicken skin side up on a roasting pan and roast until cooked through (about 45 minutes) flipping once halfway through the process. If using a grill, place chicken skin-side down and grill until skin becomes crisp. Flip and finishing cooking thoroughly. Don't be afraid to blacken the chicken with this recipe.

    Notes
    I split the marinade into two parts- one half was used to marinate the chicken overnight. I took the other half and added a small can of tomato paste to make a pizza sauce to spread on the dough. If I were to ever try this again I would probably leave out the tomato paste as it seemed to add more acidity to the jerk sauce which was already quite acidic from the vinegar, orange juice and peppers.

    Prosciutto Wrapped Melon

    December 25, 2009 by Ashley 2 Comments

    Cantaloupe wrapped with prosciutto.

    Cantaloupe wrapped with prosciutto.

    One of the tastiest and easiest appetizers ever is to take some slices of cantaloupe and wrap some thin sliced prosciutto around them. This is best in the summertime when melons are at their peak, but I thought it would be something nice for Christmas.

    Beef Chuck Eye Steaks Roasted with Root Veggies and Red Wine

    November 30, 2009 by Ashley 9 Comments

    Beef roast with vegetables and gravy.

    This is the last meal I made before we had people come in to start remodeling our kitchen. I'm posting it waaaay late but backdating it so it shows up on the right day 🙂

    Beef roast with vegetables and gravy.

    I got some gorgeous beef chuck eye steaks at the farmers market, and I bought some beautiful root veggies and brussels sprouts to go with them. I patted the steaks dry and dipped them in flour, shaking off the excess. I seasoned them up with salt and pepper and lightly browned them on both sides in a roasting pan in a few tablespoons of olive oil on the stovetop. I then threw in a few chopped cloves of garlic until it was really fragrant and added some beautiful multi-colored carrots (even purple!), golden beets, brussels sprouts, shallots and sweet potatoes. I cut everything into big chunks, leaving the carrots whole since they were pretty small.

    I poured in about a cup of red wine and ½ cup of water, seasoned with salt and pepper and put everything into a 350°F oven for an hour. The end result was a super tender steak with perfectly roasted vegetables and a nicely reduced red wine sauce to go on top. This was simple and delicious and I can't wait to do it again!

    Thanksgiving: Butternut Squash Casserole

    November 26, 2009 by Ashley 2 Comments

    Butternut squash casserole in a baking dish.

    My mom has been making this for years! The squash is nice and smooth, and the crunchy topping is perfect. This packs a lot of flavor and makes a ton!

    Butternut squash casserole in a baking dish.

    This recipe was a huge hit with my in-laws and friends this Thanksgiving. My mom has been making this for years, and when I was little I couldn't stand it.

    Last year, I decided that I wanted to try to make it myself and see if I liked it now that I'm all grown up, and I have to say WOW! It's awesome!

    The squash is nice and smooth, and the crunchy topping is perfect. This packs a lot of flavor and makes a ton!

    Collage of Thanksgiving recipe images with text that reads, "Thanksgiving Central".

    Thanksgiving prep doesn't have to be stressful! Grab our favorite Turkey Day recipes, tips, and more all in one spot.

    Thanksgiving Central has recipes categorized by course, ideas for using leftovers, and more. Check it out here! 🦃

    Thanksgiving: Yams

    November 26, 2009 by Ashley 4 Comments

    Candied yams on a plate.

    Since I moved to New York, I don't always get to spend the holidays with my side of the family. I like bringing side dishes that my mom and grandma used to make so that it still feels like the holiday meals that I'm use to. This is the yam recipe that my mom makes. It's decadent and delicious and VERY easy.

    Candied yams on a plate.

    Yams
    Mom

    1 large can yams
    ½ stick butter
    brown sugar
    nutmeg

    Melt butter. Add brown sugar until thick. Sprinkle with nutmeg. Add yams (drain most of juice). Stir to coat & heat through.

    MacGourmet Rating: 5 Stars

    Pork Chops with Spiced Apple Cider and Bourbon Reduction

    November 21, 2009 by Ashley 2 Comments

    Pork chop with sauce on a plate.

    We got a gallon of apple cider at the grocery store, and I wanted to use it to make a sauce to go with some pork chops. This is what I came up with. It turned out really good! The pork was incredibly moist, and the sauce was very flavorful. Next time, I won't bother with the flour because it was a little soggy, but otherwise it was wonderful.

    Pork chop with sauce on a plate.

    Pork Chops with Spiced Apple Cider and Bourbon Reduction
    Ashley Covelli

    For Sauce:

    1 cup apple cider
    ½ cup bourbon
    4 black peppercorns
    1 Turkish bay leaf
    1 cinnamon stick
    1 teaspoon rubbed sage
    2 cloves
    1 dried chile arbol, torn into 3 pieces
    kosher salt

    Bring ingredients to a simmer in a saucepan and allow to reduce, stirring occasionally. Before it gets too thick, strain out the large pieces of spice and pour liquid back into the pan. Allow to thicken to desired consistency.

    For Pork Chops:

    2 center cut pork chops
    flour for dredging
    salt and pepper, to taste
    vegetable or canola oil

    Pat chops dry with paper towels. Season with salt and pepper and dust with flower, shaking off excess. Heat a cast iron skillet on the stovetop and add oil, swirling to coat the bottom of the pan. Sear pork chops on both sides until nice and brown, and then slide into the oven to finish the cooking (my oven was at 400°F because I had something else in there).

    Serve pork chops with glaze drizzled over top. Enjoy!

    MacGourmet Rating: 4 Stars

    Jaden's Steamy Kitchen - Book Signing in NYC!

    October 25, 2009 by Ashley 6 Comments

    Jaden's Steamy Kitchen - Book Signing in NYC!

    Remember all of those awesome recipes I had been testing for an upcoming cookbook a while back? Well, the book is finally out, and I got to meet the Steamy Jaden Hair at her first ever book signing in NYC!

    Jaden's Steamy Kitchen - Book Signing in NYC!

    I've been following her blog for a few years now, and this kitchen maestro totally kicked butt! She was really down to earth and she told some great stories about how she got started in the kitchen.

    I'm excited to finally try out more of the recipes from her book!

    Since Dino has witnessed some of her amazing recipes come out of our own kitchen, he was actually willing to go down to New York City on his day off ::gasp:: to be there with me.

    It's a good thing he went to, because he won MacSpeech Dictate in one of her giveaways.

    We also met a few other for bloggers, including Deb & Alex from Smitten Kitchen (with their absolutely adorable little baby!), and Chelsea from Chelsea's Chew & Run Fun who has a great new food/fitness blog.

    It was a beautiful day in the city, and it was great to meet such fun foodies in person.

    Jaden's Steamy Kitchen - Book Signing

    Jaden's Steamy Kitchen - Book Signing

    Jaden's Steamy Kitchen - Book Signing

    Jaden's Steamy Kitchen - Book Signing

    Jaden's Steamy Kitchen - Book Signing

    Jaden's Steamy Kitchen - Book Signing

    Roasted White Asparagus, New Potatoes and Brussels Sprouts with Dijon Vinaigrette

    August 28, 2009 by Ashley 3 Comments

    Roasted White Asparagus, New Potatoes and Brussels Sprouts with Dijon Vinaigrette

    I wanted to try another new ingredient, so I got some white asparagus from the store. I decided to roast it up with some other veggies for a nice side dish.

    I added brussels sprouts and a package of red, white and purple new potatoes. The label on the bag of potatoes made me laugh - it said A Delightful Rainbow of Tiny Potatoes - ha!

    How could you not want to buy that? Anyway, I roasted the veggies in 3 stages, and it turned out really tasty!

    Dino and I were really surprised at how different white asparagus tastes from the "regular" green kind. Yum!

    Roasted White Asparagus, New Potatoes and Brussels Sprouts with Dijon Vinaigrette

    If you're looking for some more ways to use asparagus, one of my favorites is to roast it in the oven tossed with a little olive oil and our favorite homemade grill seasoning blend. This recipe for rosemary roasted asparagus + tomatoes with toasted sunflower seeds is another great option! We also enjoy this baked asparagus with balsamic butter sauce.

    Check out my latest posts...

    • Jar of homemade Italian seasoning blend.
      Italian Seasoning Blend
    • Bowl of tzatziki with olive oil drizzled over the top.
      Easy Homemade Tzatziki
    • Turkey sausage patties and a jar of breakfast sausage seasoning.
      Turkey Sausage Patties

    Grilled Ribeye with Cherry Balsamic Chanterelle Sauce

    August 17, 2009 by Ashley 2 Comments

    Grilled ribeye topped with chanterelle mushroom sauce.

    My father-in-law gave us a bunch of beautiful chanterelle mushrooms from a friend of his, and I was really excited to use them. I decided to splurge on some really nice steaks from Whole Foods and went to town concocting a sauce that showed off their flavor. I used thyme from my garden, and a really great balsamic vinegar from O&Co. This turned out to be an outstanding combination - the meat was super juicy, and the sweet balsamic was the perfect accent to the mushrooms and herbs.

    Again, I made this on the fly, so the amounts might not be right on. I'll just have to try it out again soon! If anyone else gives it a shot, let me know what you think! It certainly got an enthusiastic high-five in my house!

    Grilled ribeye topped with chanterelle mushroom sauce.
    Grilled Ribeye with Cherry Balsamic Chanterelle Sauce
    Ashley Covelli

    2 thick cut boneless ribeye steaks
    1 cup chanterelle mushrooms, roughly chopped
    2 shallots, minced
    2 cloves garlic, minced
    4 sprigs fresh thyme, leaves stripped
    4 tablespoons cherry balsamic vinegar, (recommended brand: O&Co.)
    extra virgin olive oil
    salt and fresh ground pepper, to taste
    1 tablespoon butter

    Let the steaks sit on the counter for a while to take the chill off. Preheat a cast iron grill pan on the stove. Preheat the broiler to 500°F.

    Pat the steaks dry. Drizzle with oil and season with salt and pepper. Sear 3-5 minutes per side on the grill pan, and transfer to the oven for an additional 3-5 minutes, depending on thickness, until it reaches your desired doneness. Let stand 10 minutes before serving.

    Meanwhile, sauté mushrooms, shallots, garlic in oil in a small skillet. Add in thyme leaves and season with salt and pepper. When veggies are softened, add vinegar and let reduce for a few minutes. Add butter and remove from heat.

    Serve mushrooms over top of steaks and enjoy!

    MacGourmet Rating: 5 Stars

    Great Time-Saving Tip for Halving Grape Tomatoes, Grapes, etc.

    August 6, 2009 by Ashley 6 Comments

    Slicing tomatoes using plastic lids as a guide.

    I made this recipe again and thought I'd share a really great time saving tip with you all. I saw this on an episode of 30-Minute Meals once, and before Rachael showed the tip (she got it from a friend of hers), she said that your jaw was going to drop when you saw how much time you'll save. I figured she was exaggerating, but honestly - my jaw did drop!

    I've used this method for grapes, small tomatoes (grape or cherry), and I'm sure it would work for other things as well. I'm going to post a visual step-by-step which I think is pretty self explanatory. You just save 2 of the tops from deli containers and use them to slice a bunch of items all at once. No more cutting one by one, letting them roll all over the counter!

    Tip for Halving Grape Tomatoes, Grapes

    Tip for Halving Grape Tomatoes, Grapes

    Tip for Halving Grape Tomatoes, Grapes

    Tip for Halving Grape Tomatoes, Grapes

    Tip for Halving Grape Tomatoes, Grapes

    BigFlavorsXSi08062009-132

    Tip for Halving Grape Tomatoes, Grapes

    Slicing tomatoes using plastic lids as a guide.

    Big Flavors Turns 3! Let's Celebrate with Banana Crumb Muffins

    August 3, 2009 by Ashley 10 Comments

    Text that reads, "Big Flavors Third Blogiversary".

    Big Flavors From A Tiny Kitchen just celebrated its third birthday on August 1st! This blog has grown a lot since its original home over on livejournal - and I've also grown a lot. I'm much more comfortable in my (still tiny) kitchen, and I'm willing to try so many more new and exciting techniques, ingredients and cuisines. Thank you so so much to all of my readers, lurkers, family and friends for all of your support. Your encouragement (and willingness to eat leftovers) really helps me keep going even when life gets exhausting.

    I wanted to bake something to celebrate, but I had to put it off for a few days - I was away at a lovely spa resort in upstate New York. What a wonderful (and MUCH needed) trip! So when I got back home, I had to figure out just what to bake.

    These muffins turned out fabulous! I saw it on allrecipes with a 4.8 star average, with well over 4,000 reviews! I got to try out my new silicone muffin liners finally, and they were a cinch to use. These muffins actually reminded me of the Banana Coffee Cake that I made a few weeks back (it was only missing the chocolate chips and nuts). They were pretty simple to put together, and they look and taste really impressive. My batter made enough for 11 muffins instead of 10 - so that justifies me eating 2 for dessert, right?

    Banana crumb muffins on mini cake stands.

    Banana Crumb Muffins
    Allrecipes - Lisa Kreft

    "The crumb topping is what makes these banana muffins stand apart from the ordinary. They're scrumptious!"

    PREP TIME 15 Min
    COOK TIME 20 Min
    READY IN 35 Min
    Original recipe yield 10 muffins

    1 ½ cups all-purpose flour
    1 teaspoon baking soda
    1 teaspoon baking powder
    ½ teaspoon salt
    3 bananas, mashed
    ¾ cup white sugar
    1 egg, lightly beaten
    ⅓ cup butter, melted
    ⅓ cup packed brown sugar
    2 tablespoons all-purpose flour
    ⅛ teaspoon ground cinnamon
    1 tablespoon butter

    1. Preheat oven to 375 degrees F (190 degrees C). Lightly grease 10 muffin cups, or line with muffin papers.
    2. In a large bowl, mix together 1 ½ cups flour, baking soda, baking powder and salt. In another bowl, beat together bananas, sugar, egg and melted butter. Stir the banana mixture into the flour mixture just until moistened. Spoon batter into prepared muffin cups.
    3. In a small bowl, mix together brown sugar, 2 tablespoons flour and cinnamon. Cut in 1 tablespoon butter until mixture resembles coarse cornmeal. Sprinkle topping over muffins.
    4. Bake in preheated oven for 18 to 20 minutes, until a toothpick inserted into center of a muffin comes out clean.

    MacGourmet Rating: 5 Stars

    Garlicky Spaghetti with Beans and Greens

    July 27, 2009 by Ashley 1 Comment

    A bowl of pasta with greens and tomatoes.

    This was hands down one of the best new recipes I've made in a long time. WOW! It has a lot of my favorite ingredients - pasta, tomatoes, beans and garlic. I couldn't find arugula, so I ended up getting a mixed bag of greens, and I wasn't sure if I'd enjoy them warm. It ended up being fantastic - the tomatoes get just soft enough to melt in your mouth while still having some texture to them, and it has the perfect amount of garlic. I substituted bucatini for the spaghetti. The beans add a great textural contrast to the tomatoes, and the lemon juice is really key in bringing it all together. This dish is just wonderful, and I highly recommend it. My tiny kitchen got insanely hot while I was boiling the pasta for this dish, but it was most definitely worth it!

    A bowl of pasta with greens and tomatoes.

    Garlicky Spaghetti with Beans and Greens
    Cooking Light August 2009

    Canned beans are a great pantry staple with lots of protein and fiber. To help reduce sodium in regular canned beans, we rinse and drain them.

    6 servings (serving size: about 1 ⅓ cups)
    8 ounces uncooked spaghetti
    ¾ teaspoon kosher salt, divided
    3 tablespoons extra-virgin olive oil
    2 tablespoons minced fresh garlic
    ½ teaspoon crushed red pepper
    2 cups grape tomatoes, halved
    1 (16-ounce) can cannellini beans or other white beans, rinsed and drained
    5 ounces arugula leaves
    2 tablespoons fresh lemon juice
    ½ cup (2 ounces) grated Parmesan cheese

    1. Cook pasta according to package directions, omitting salt and fat. Drain pasta in a colander over a bowl, reserving ½ cup pasta water. Place pasta in a small bowl. Add ¼ teaspoon salt, tossing gently. Set aside, and keep warm.

    2. Return pan to medium heat. Add oil, garlic, and pepper; cook 2 minutes or until garlic is lightly browned, stirring occasionally. Stir in remaining ½ teaspoon salt, tomatoes, and beans; cook 2 minutes. Add pasta; cook 4 minutes, stirring frequently. Add reserved pasta water and arugula, tossing gently to combine. Remove from heat. Stir in lemon juice and cheese. Serve immediately.

    Nutritional notes:
    Calories: 290
    Fat: 10.5g (sat 2.7g,mono 5.8g,poly 1.3g)
    Protein: 11.3g
    Carbohydrate: 38.1g
    Fiber: 3.7g
    Cholesterol: 8mg
    Iron: 2.4mg
    Sodium: 469mg
    Calcium: 173mg

    MacGourmet Rating: 5 Stars

    Rocco Dispirito's Sausage and Peppers

    July 19, 2009 by Ashley 1 Comment

    Sausage and peppers in a skillet.

    Classic, aromatic Italian comfort food.

    Note: This post was originally published before we created our family favorite Sausage and Peppers recipe - I highly recommend giving that one a try if you're seeking out the best sausage & peppers recipe we've tried. You can even pizza-fy it if you follow my recipe for Spicy Italian Sausage and Peppers Pizza!

    This post may contain affiliate links.

    We were driving to a birthday party when I saw a sign for a pork store, and Dino remembered that our friends' father owned it. We had never been there before, so we stopped on the way back.

    Sausage and peppers in a skillet.

    They had a ton of homemade sausages, so we bought a sampling of them to make sausage and peppers with the next day. We used a combination of hot sausage, onion and pepper sausage, spiced sausage with mozzarella and regular sausage.

    Dino cooked this up in the cast iron skillet with a few modifications - he omitted the ancho chile and canned tomatoes, and didn't pre-roast the peppers.

    This is a classic Italian dish that tasted very authentic. Along with a big piece of bread, any New Yorker knows how to enjoy a meal like this.

    Looking for more Italian recipes? Check out these our favorites:

    • Sausage and Peppers
    • Garlicky Mushroom Ricotta Pizza with Wild Arugula + Aged Balsamic
    • Skillet Garlic Parmesan Bread
    • Orange Scented Cannoli Dip
    • Pork Scallopini with White Bean-Tomato Salad
    • Ravioli Lasagna
    • Antipasto Pasta Salad
    • Farmer Fettuccine with Kale Pesto + Roasted Maitake Mushrooms
    • Ricotta Cookies
    • Italian Cream Cheese and Ricotta Cheesecake
    • « Previous Page
    • 1
    • …
    • 32
    • 33
    • 34
    • 35
    • Next Page »

    Hi, I'm Ashley and I’ve been writing about food & recipes here at Big Flavors from a Tiny Kitchen since 2006. I want to help you (yes, you!) gain confidence in the kitchen so you are excited to cook at home for yourself and your loved ones.

    More about me →

    Favorite Spring Recipes

    • Mayo-free Deviled Eggs
    • Middle Eastern Fattoush Salad with Homemade Pita Chips
    • Birthday Cake Confetti Pancakes with Sprinkles
    • Italian Cream Cheese and Ricotta Cheesecake
    • Garlicky Mushroom Ricotta Pizza with Wild Arugula + Aged Balsamic
    • Slow Cooker "Roasted" Beets
    • Honey Balsamic Roasted Carrots
    • Italian Ricotta Cookies
    • Rhubarb Custard Pie
    • Easy Instant Pot Herbed Potato Salad

    Mother's Day + Easter Brunch

    • Epic Brunch Board on a Budget
    • Baby Spinach and Cheddar Quiche Made with Fresh Spinach
    • Turkey Salad Tea Sandwiches with Dried Cherries
    • Great Grandma Maria Francesca Cardile's Italian Easter Cookies
    • Brie Waffle Bites
    • Challah French Toast
    • Creamsicle Smoothies
    • DM Bloody Mary
    • Turkey Scotch Eggs
    • The Herbalist

    Popular Now

    • Cast iron skillet full of chicken fajitas.
      Favorite Restaurant-Style Chicken Fajitas
    • Overhead view of spinach and cheddar quiche with forks.
      Baby Spinach and Cheddar Quiche Made with Fresh Spinach
    • Chicken and bell pepper stir-fry served over white rice.
      Chicken and Bell Pepper Stir-Fry
    • Serving dish of cooked shrimp garnished with chopped parsley.
      Quick and Easy Sautéed Shrimp
    • Overhead view of a dutch oven filled with sausages, peppers, and onions.
      Sausage and Peppers
    • Overhead view of assorted breakfast items displayed on a board.
      Epic Brunch Board on a Budget

    Footer

    ↑ back to top

    About

    • About Ashley
    • Press + Recognition
    • Events
    • Virtual Cooking Classes
    • Podcast
    • Contact
    • Privacy Policy

    Newsletter

    • Sign up to receive delicious recipes and exclusive content right to your inbox!

    As an Amazon Associate I earn from qualifying purchases at no added cost to you.

    ©2006–2026  BIG FLAVORS FROM A TINY KITCHEN LLC | ALL RIGHTS RESERVED

    *Third-party advertisers may collect or use non-personally identifiable information to serve you more relevant ads.