Big Flavors from a Tiny Kitchen

menu icon
go to homepage
  • Recipes
  • About
  • Events
  • Contact
  • Subscribe
    • Facebook
    • Instagram
    • Pinterest
  • subscribe
    search icon
    Homepage link
    • Recipes
    • About
    • Events
    • Contact
    • Subscribe
    • Facebook
    • Instagram
    • Pinterest
  • ×
    Home » Recipes

    Cinco de Mayo: Mexican Tinga

    May 5, 2010 by Ashley 1 Comment

    Chicken taco with guacamole and tortila chips.

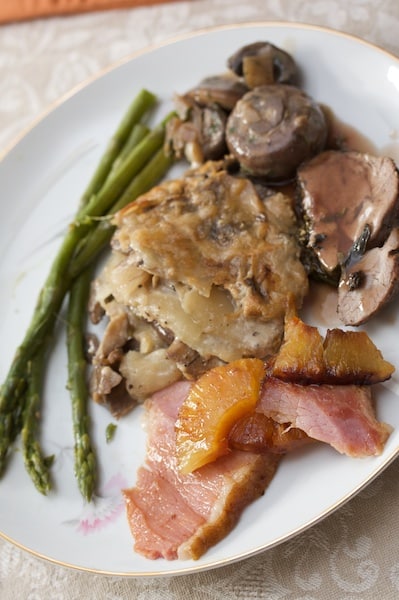
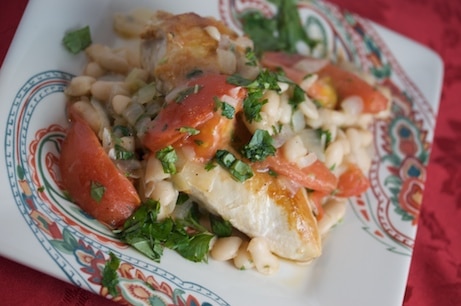
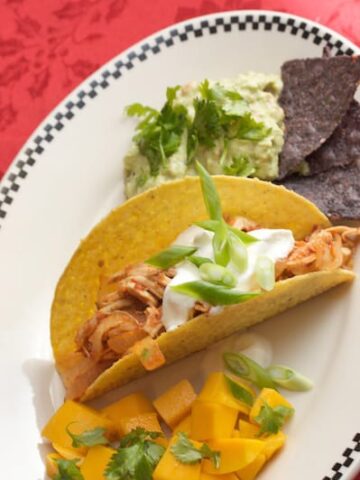
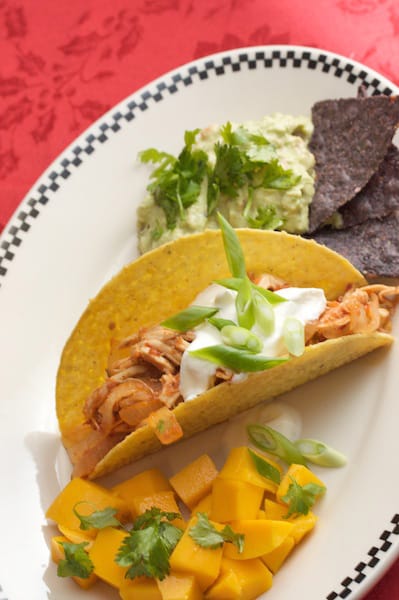
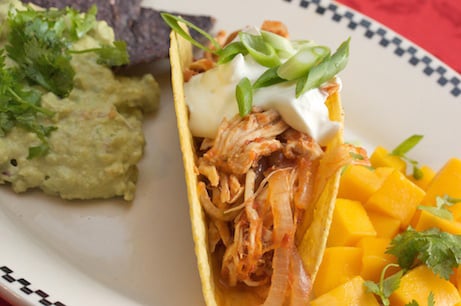
    This year for Cinco de Mayo, I wanted to make something fairly easy. I read through some of the comments on this recipe, and decided to simmer the sauce with a cinnamon stick in it, which added really nice flavor to the chicken. The other major change was that I used 3 chipotles from the can - a lot of comments said that a whole can made it way too spicy. The store was out of tostadas, so we used taco shells. We had some deliciously ripe mangoes on the side, as well as some homemade guacamole and of course, margaritas. It was a great dinner!

    Chicken taco with guacamole and tortila chips.

    Chicken taco with guacamole and tortila chips.

    Mexican Tinga
    Allrecipes.com - Fredda O.

    "This is an authentic Mexican favorite! Shredded chicken and onions simmered in a thick chipotle sauce served on crunchy tostadas."

    Prep Time: 10 Min
    Cook Time: 25 Min
    Ready In: 35 Min

    2 tablespoons olive oil
    1 large onion, cut into rings
    1 (15 ounce) can stewed tomatoes
    1 (7 ounce) can chipotle peppers in adobo sauce, or to taste
    2 pounds shredded cooked chicken meat
    16 tostada shells
    ½ cup sour cream

    1. Heat olive oil in a saucepan over medium heat. Add the onions; cook and stir until softened and translucent, about 5 minutes. Meanwhile, puree the tomatoes with chipotle peppers and adobo sauce to taste. Pour into the onions, and add chicken. Cover, and simmer for 20 minutes.

    2. To serve, mound the chicken onto tostada shells, and garnish with a dollop of sour cream.

    Amount Per Serving
    Calories: 402
    Total Fat: 20g
    Cholesterol: 91mg

    Vegetable Torte

    May 2, 2010 by Ashley 1 Comment

    This recipe is from a cookbook that I bought at a wholesale club a while ago. The photography is beautiful, and it's full of recipes that I want to try. I haven't cooked from it in a while, so I decided to try two different dishes from it in one day. This torte was fantastic! I shouldn't have picked the hottest day of the year to make it (over 90°F at the beginning of May? REALLY!?) but it was so tasty that it was worth it. This is hearty from the mixture of vegetables, and the texture is smooth and decadent. I can't see how this would only serve 4 people though - I'd say 6. It's kind of like a quiche, and the mixture of cheeses was beautifully silky. This dish is sure to impress, and my Italian in-laws loved it!

    Overhead view of a vegetable torte.

    Close-up of a slice of vegetable torte.

    Vegetable Torte
    The Food of Italy: A Journey for Food Lovers - Sophie Braimbridge and Jo Glynn

    Serves 4

    150g (5 ½ oz) asparagus
    4 tablespoons olive oil
    1 onion, chopped
    1 zucchini (courgette), halved lengthways and finely sliced
    2 large garlic cloves, crushed
    100g (3 ½ oz) spinach, stalks removed if necessary
    1 tablespoon chopped basil
    75g (¾ cup) grated Parmesan cheese
    250g (1 cup) ricotta cheese
    250g (9 oz) mascarpone cheese
    4 eggs

    WASH the asparagus and remove the woody ends (hold each spear at both ends and bend it gently - it will snap at its natural breaking point). Remove the spear tips of the asparagus and slice the remaining stems. Bring a small saucepan of salted water to a boil and cook the asparagus stems for about 2 minutes. Add the tips and cook for 1 minute. Drain the asparagus and set aside.

    PREHEAT the oven to 180°C (375°F/Gas 4). Heat the olive oil in a saucepan and cook the onion until soft. Increase the heat and add the zucchini. Cook until the zucchini is soft and golden brown, stirring occasionally. Add the garlic and cook for 1 minute more. Finally, add the spinach and mix briefly until just wilted.

    REMOVE the pan from the heat, add the asparagus and the basil, season with salt and pepper and set aside to cool

    GREASE a 20 cm (8 inch) springform tin with butter and dust with about 1 tablespoon of the Parmesan. Mix together the ricotta, mascarpone, eggs and 50 g (½ cup) of the Parmesan and add it to the cooled vegetables. Mix well and taste for seasoning.

    SPOON the mixture into the tin and scatter with the remaining Parmesan. Place in the oven, on a tray to catch any drips, and cook for about 30 minutes. The top should be light golden brown and the mixture still wobble slightly in the centre. Leave to cool for 30 minutes, then chill in the fridge for about 3 hours, until the torte has set. Serve with a simple rocket (arugula) or mixed leaf salad.

    MacGourmet Rating: 5 Stars

    Tamarind-Glazed Turkey Burgers

    April 22, 2010 by Ashley Leave a Comment

    Turkey burger with salad.

    These burgers are really different from any other burgers we've had. I cut the recipe in half, and it made the burgers too airy, and we lost some of the meat into the grill. But they were really tasty, and the glaze was sweet and delicious. I didn't have any big tomatoes, so I used some grape tomatoes, and I served it with a pea shoot salad.

    Turkey burger with salad.

    Tamarind-Glazed Turkey Burgers
    Bon Appétit July 2006

    As culinary director for Balducci's, Katy Sparks brought take-out food to a whole new level. Instead of the typical fried chicken and heavy potato salad, the market offers horseradish-crusted salmon and grilled fingerling potatoes with lemon. In this recipe she's taken the often-bland turkey burger to a higher plane, with the addition of tamarind.

    Makes 8

    Glaze

    2 tablespoons canola oil
    1 tablespoon minced peeled fresh ginger
    ½ cup tamarind concentrate*
    ½ cup honey
    ¼ cup water
    2 tablespoons fresh lime juice

    Burgers

    ½ cup mayonnaise
    1 tablespoon minced peeled fresh ginger
    2 teaspoons salt
    1 red jalapeño chile with seeds, minced
    1 teaspoon ground black pepper
    ½ cup chopped green onions
    2 ½ pounds ground natural turkey

    8 4-inch-diameter rolls (such as potato or kaiser), split horizontally
    8 large thin red onion slices
    8 large ⅓-inch-thick tomato slices
    8 lettuce leaves

    For glaze:
    Heat oil in heavy medium saucepan over medium-high heat. Add ginger and sauté 2 minutes. Add tamarind concentrate, honey, and water and bring to boil. Reduce heat; simmer until thick enough to coat spoon and reduced to 1 ¼ cups, stirring often, about 8 minutes. Cool completely (volume will reduce as glaze cools); mix in lime juice.

    Do ahead: Can be made 2 days ahead. Cover and chill.

    For burgers:
    Stir mayonnaise, ginger, salt, jalapeño, black pepper, and 4 teaspoons glaze in large bowl to blend; mix in green onions. Add ground turkey; blend gently (do not pack tightly). Shape mixture into eight ½-inch-thick patties. Arrange patties on small baking sheet.

    Do ahead: Can be made 8 hours ahead. Cover and chill.

    Prepare barbecue (medium heat). Grill rolls, cut side down, until golden, about 2 minutes; transfer to work surface. Grill burgers until cooked through and thermometer inserted into center registers 160°F, about 8 minutes per side. Brush each burger with glaze. Place 1 burger, glazed side down, on each roll bottom; brush each burger with more glaze. Top each with onion, tomato, lettuce, and roll top. Serve, passing remaining glaze separately.

    *Sometimes labeled tamarind paste, tamarind concentrate is a dark, seedless paste with a tart-sweet flavor. It's available at Middle Eastern and Indian markets, and at some Asian markets.

    Test-kitchen tip: Combine and shape the turkey mixture gently to ensure turkey burgers. Meat that is overworked becomes too compact and results in dry burgers.

    MacGourmet Rating: 4 Stars

    Butterscotch Haystacks

    April 19, 2010 by Ashley 5 Comments

    Platter of no-bake butterscotch haystacks.

    Butterscotch haystacks are an easy 4 ingredient no-bake dessert that come together in under 10 minutes. This recipe uses chow mein noodles and peanut butter for a sweet-and-salty treat that's always a hit at parties.

    Platter of no-bake butterscotch haystacks.

    I've been enjoying this recipe since I was a kid. It's one of those ones that always showed up at holiday gatherings and family get-togethers and disappeared much too quickly (just like deviled eggs and puppy chow!).

    A quick mix of melty peanut butter and butterscotch act as the glue that holds crunchy chow mein noodles and peanuts together in these snackable little clusters.

    Hand holding a clustered no-bake butterscotch haystack.

    I think my family actually called them peanut butter haystacks, but the butterscotch flavor definitely feels more prominent than the peanut butter. Both of those ingredients add to the hay-like color of the final product.

    [feast_advanced_jump_to]

    🧡 Why we love this recipe

    • No bake desserts always come in handy!
    • This is a 4 ingredient dessert that comes together in just minutes.
    • They're fun to make with kids.
    • You can easily scale this recipe up to make more (and trust me, you'll probably want to make more!).
    Ingredients ready to make no-bake butterscotch haystacks.

    📝 Ingredients

    Here's everything you need to make these butterscotch haystacks (see recipe card below for ingredient amounts and full directions):

    • Butterscotch chips (also called butterscotch morsels) - you can find these in the baking aisle by the chocolate chips
    • Peanut butter - we're using creamy peanut butter here, and its a great use for my homemade peanut butter recipe
    • Chow mein noodles - you can find these at the grocery store near the Asian condiments and noodles
    • Salted peanuts
    Adding peanut butter to a mixing bowl.
    Stirring together peanut butter and butterscotch chips in a mixing bowl.
    Stirring together peanut butter and butterscotch chips in a mixing bowl.

    ✅ How to make this recipe

    1. Line a baking sheet with a silicone baking mat, parchment paper, or wax paper.
    2. Melt the butterscotch chips and peanut butter together until smooth.
    3. Stir in the chow mein noodles and peanuts.
    4. Drop the mixture by forkfuls onto the prepared baking sheet and let sit or chill until solidified.

    See recipe card below for full instructions.

    Adding chow mein noodles to a bowl of melted butterscotch chips and peanut butter.
    Adding peanuts to a bowl of chow mein noodles, melted butterscotch chips, and peanut butter.

    📌 Tips

    You can melt the butterscotch chips and peanut butter together in the microwave or in a double boiler on the stovetop.

    My preferred method is the microwave. I heat it in 30-second increments, stirring after each increment, until everything is nice and melted and smooth.

    Stirring together the ingredients for butterscotch haystacks in a mixing bowl.
    Stirring together the ingredients for butterscotch haystacks in a mixing bowl.
    A bowl of no-bake butterscotch haystack mix, ready to shape.

    Stir everything together gently, but thoroughly. You want all of the dry bits to be coated in that butterscotch and peanut butter mixture. This is what acts as the "glue" to help hold these little clusters together.

    I like using 2 forks to help grab little piles of chow mein noodles. They're called "haystacks" because they look like piles of hay and they aren't supposed to be perfect. Lean into the imperfect and inconsistent quality!

    You can make them smaller or larger, as desired. I find that I get about a dozen haystacks from a single instance of this recipe.

    Two forks placing butterscotch haystack mixture onto a lined sheet pan.
    Clusters of butterscotch haystacks on a parchment-lined sheet pan with a bowl in the background.

    These clusters will firm up at room temperature after sitting for a while, but I like to pop them in the fridge (or even the freezer) to make the process go more quickly. Once they're firm, they're fine to store at room temperature, as long as it's not really hot where you're storing them.

    This last tip is going to sound a little weird, but hear me out. The first time I made this recipe for a game day party, I decided to cover the trays lightly with plastic wrap and set them outside to chill and firm up. It was February, so it was nice and cold out.

    Butterscotch haystacks laid out on a platter with a sheet pan alongside.

    What I didn't realize was that squirrels are not deterred by things like a flimsy layer of cling wrap. So when I went out to gather my haystack clusters, I saw that squirrels had eaten the peanuts out of every.single.cluster.

    Luckily they're easy to put together and I had enough of the ingredients left to make another batch. But trust me, this is a mistake that I've never made since.

    Hand holding a clustered no-bake butterscotch haystack.
    Hand holding a clustered no-bake butterscotch haystack.

    Some people call these little no-bake desserts cookies, some call them candies. Whatever you call them, they're DELICIOUS.

    When I made these most recently (and decided to shoot new photos so spruce up this post from 15 years ago!), my son said they were the best dessert he's ever eaten.

    I hope you enjoy these as much as my family does!

    🍽️ Still hungry? You may also like...

    Looking for other favorite party desserts? Try these:

    • Overhead view of bowls of Puppy Chow (AKA Muddy Buddies)
      Puppy Chow (AKA Muddy Buddies)
    • Pretzels with white chocolate and green candies pressed on top.
      Leprechaun Hugs (Pretzel Hugs)
    • Peanut butter cookies cooling on a baking sheet
      Classic Peanut Butter Cookies
    • Homemade tiramisu in a serving dish with plates and forks for serving.
      Best Classic Italian Tiramisu

    Doing some online shopping? Check out my Amazon shop page for recommendations!

    Eggs, Hashbrowns and a Farmers' Market Treat

    April 17, 2010 by Ashley 4 Comments

    Eggs, toast, and hashbrowns on a plate.

    Dino made another awesome breakfast today - scrambled eggs and the most amazing hash browns fried up in the cast iron skillet. And my contribution was a great find from the Farmers' Market this morning...roasted garlic and duck fat ciabatta. WOAH.

    Eggs, toast, and hashbrowns on a plate.

    Emily's Famous Hash Browns
    Allrecipes - your mom

    "Good old fashioned restaurant-style hash browns. Perfect with hot pepper sauce and ketchup!"

    Prep Time: 20 Min
    Cook Time: 15 Min
    Ready In: 35 Min

    Original Recipe Yield 4 servings

    2 medium russet potatoes, shredded
    ½ medium onion, finely chopped
    ¼ cup all-purpose flour
    1 egg
    1 cup oil for frying, or as needed
    salt and pepper to taste

    1. Rinse shredded potatoes until water is clear, then drain and squeeze dry. Place shreds in a bowl, and mix in the onion, flour and egg until evenly distributed.
    2. Heat about ¼ inch of oil in a large heavy skillet over medium-high heat. When oil is sizzling hot, place potatoes into the pan in a ½ inch thick layer. Cover the whole bottom of the pan, or make separate piles like pancakes. Cook until nicely browned on the bottom, then flip over and brown on the other side. It should take at least 5 minutes per side. If you are cooking them in one big piece, it can be cut into quarters for easier flipping.
    3. Remove from pan, and drain on paper towels. Season with salt and pepper and serve immediately.

    Amount Per Serving Calories: 183 | Total Fat: 6.9g | Cholesterol: 53mg

    MacGourmet Rating: 5 stars

    After Eight Dessert Shooter

    April 11, 2010 by Ashley Leave a Comment

    Double shot glasses with green cocktail inside.

    Dino wanted to make grasshoppers, but we didn't have all of the ingredients, so we looked up this recipe. It was good but not my favorite.

    Double shot glasses with green cocktail inside.
    After Eight (Dessert Shooter)
    Bar None Drinks - Uncle Dave

    ⅓ oz. Bailey's Irish Cream
    ⅓ oz. Green Creme de Menthe
    ⅓ oz. Kahlua

    Layer in a shot glass.

    MacGourmet Rating: 3 Stars

    Ham and Poached Eggs on Whole Wheat Italian Toast

    April 11, 2010 by Ashley 4 Comments

    Poached eggs on ham and toast.

    Poached eggs on ham and toast.

    Dino made a beautiful breakfast today using one of our favorite kitchen gadgets - PoachPods®. I used to hate cleaning up after he made poached eggs, because the thin pieces of egg whites in the pot were really difficult to clean up, and they'd get stuck in the drain of the sink. So we picked these up on a whim about a year ago and he's been using them ever since.

    Walnut Brittle with Rose Water

    April 10, 2010 by Ashley 2 Comments

    Walnut brittle on a plate.

    I wanted to make an Armenian dessert to go with the Pork Kebabs, so I found one in the book that I had all of the ingredients on hand. One major change that I made was to pour it out onto a silpat on a cookie sheet. I'd highly recommend doing it this way, because I'm not sure how a piece of foil could contain all of that molten hot sugar. This turned out really tasty, but definitely be careful eating this stuff, because It's kind of thick and could hurt your teeth. Toasting the walnuts really makes the flavor pop, and the small amount of rosewater permeates the whole batch. Yum!

    A piece of walnut brittle.

    Walnut brittle on a plate.

    Walnut brittle on a baking sheet.
    Walnut Brittle with Rose Water
    The Armenian Table - Victoria Jenanyan Wise

    Makes about 1 ¾ pounds

    Butter, for greasing the foil
    Olive or vegetable oil, for toasting the nuts
    2 cups coarsely chopped walnuts
    2 cups sugar
    1 cup natural raw honey
    2 tablespoons butter, cut up
    ¼ cup water
    ½ teaspoon rose water
    ½ teaspoon baking soda

    Lightly grease a 24-inch length of extra-wide, heavy-duty aluminum foil with butter. Lightly grease a large sauté pan with about 1 teaspoon of oil and heat over medium-high heat. Add the walnuts and cook, stirring often, until lightly toasted, about 3 minutes. Set aside.

    Combine the sugar, honey,butter, and water in a 6-quart microwave bowl and microwave uncovered on high for 3 minutes, until the butter melts. Stir to mix and continue microwaving on high for 5 to 6 minutes, until bubbling briskly and almost to the top of the bowl and starting to turn golden. Stir in the walnuts and microwave for 5 minutes more, until the hard-crack stage. Remove and whisk in the rose water and baking soda, stirring until the bubbling stops. Immediately, and very carefully, pour the candy onto the foil. Set aside to cool and harden for at least 1 hour.

    MacGourmet Rating: 4 Stars

    Pork Shish Kebab in Pomegranate, Sumac, and Black Pepper Marinade

    April 10, 2010 by Ashley 2 Comments

    Pork Shish Kebab in Pomegranate, Sumac, and Black Pepper Marinade

    I picked up an Armenian cookbook from the library because I wanted to try cooking a type of food I've never made before. It was gorgeous outside, too, so I picked something that we could make on the grill. This recipe was very tasty and much different from anything we've had before. Make sure you don't marinate the pork for longer than an hour, because the book says the marinade will overwhelm the pork. We had the rest of the Farro, Avocado, Cucumber, and Cherry Tomato Salad that I made a few days ago, and also the Whole Tomatoes in Wine. It was a really good meal.

    Pork Shish Kebab in Pomegranate, Sumac, and Black Pepper Marinade

    Pork Shish Kebab in Pomegranate, Sumac, and Black Pepper Marinade
    The Armenian Table - Victoria Jenanyan Wise

    Serves 4 to 6

    Marinade
    4 tablespoons pomegranate molasses
    4 tablespoons white wine
    1 clove garlic, minced or pressed
    ¼ teaspoon cracked black peppercorns
    ¼ teaspoon kosher salt
    ½ teaspoon ground sumac
    1 tablespoon extra virgin olive oil

    1 ½ pounds boneless country-style pork ribs, cut into 1 ½- to 2-inch cubes

    Combine the ingredients for the marinade in a dish large enough to hold the pork cubes in one packed layer. Add the cubes and toss to coat. Set aside in the refrigerator to marinate for 45 minutes to 1 hour.

    Prepare a medium-hot charcoal fire or preheat a gas grill to medium high. String the pork onto skewers, reserving the marinade. Grill the kebabs over indirect heat, covered, for 20 to 30 minutes, turning 3 or 4 times, until nicely charred on the outside and no longer pink in the center. Transfer to a serving platter and let sit for 5 minutes for the juices to settle.

    While the kebabs rest, reduce the marinade in a small saucepan over medium-high heat until thick and bubbly, 2 to 3 minutes. Serve the kebabs with the reduced marinade on the side.

    MacGourmet Rating: 4 Stars

    Whole Tomatoes in Wine

    April 10, 2010 by Ashley 3 Comments

    Tomato cooked in aluminum foil.

    Dino got a grilling cookbook from his mom for Christmas, and we were surprised to see how many of the recipes in it looked great! We wanted a side to make on the grill while the kebabs were cooking, so we picked this one. It couldn't be easier, and the end result is wonderful! I could see preparing tomatoes like this and then pureéing them into a sauce for pasta, too. The wine flavor is great, and the flesh of each tomato is lusciously soft and sweet. Dino doesn't usually like tomatoes on their own, but he really enjoyed these!

    Tomato cooked in aluminum foil.
    Whole Tomatoes in Wine
    The Book of Grilling & Barbecuing - Cecilia Norman

    8 medium-size firm tomatoes
    2 tablespoons plus 2 teaspoons dry red wine
    Salt and freshly ground black pepper to taste
    Green leaf lettuce leaves or watercress

    Cup each tomato in a double thickness of foil, but do not completely enclose.

    Pour 1 teaspoon of wine over each tomato. Season with salt and pepper. Securely mold foil around tomatoes to prevent juices from escaping.

    Cook foil packets on side of a rack over medium coals about 10 to 15 minutes. Unwrap and transfer to serving plates, spooning wine flavored juices over tomatoes. Serve on lettuce leaves. Makes 8 servings.

    Note: These tomatoes are particularly delicious as an accompaniment to barbecued steaks or burgers which can be cooked at the same time.

    MacGourmet Rating: 4 Stars

    Tuna Noodle Casserole from Scratch

    April 8, 2010 by Ashley 2 Comments

    Tuna noodle casserole in a dish.

    Growing up, I never ate seafood. My mom didn't like it, so she never made it. I thought I didn't like it until I started to try new things once I moved east. Canned tuna is something that I'm still not crazy about, but for some reason, I was craving tuna noodle casserole. I've never had it before... I just wanted to try it. So I found this recipe - one that didn't call for a can of soup, and made this for dinner. It was really tasty! I used whole wheat breadcrumbs on top and threw a little parsley on for a bit of freshness on top. It was a big hit!

    Tuna noodle casserole in a dish.
    Tuna Noodle Casserole from Scratch
    Allrecipes MVANWINKLE

    "No canned soup mix in this recipe! Mushrooms, onions, celery, and peas all go into this comfort casserole."

    Prep Time: 30 Min
    Cook Time: 45 Min
    Ready In: 1 Hr 15 Min

    ½ cup butter, divided
    1 (8 ounce) package uncooked medium egg noodles
    ½ medium onion, finely chopped
    1 stalk celery, finely chopped
    1 clove garlic, minced
    8 ounces button mushrooms, sliced
    ¼ cup all-purpose flour
    2 cups milk
    salt and pepper to taste
    2 (6 ounce) cans tuna, drained and flaked
    1 cup frozen peas, thawed
    3 tablespoons bread crumbs
    2 tablespoons butter, melted
    1 cup shredded Cheddar cheese

    1. Preheat oven to 375 degrees F (190 degrees C). Butter a medium baking dish with 1 tablespoon butter.
    2. Bring a large pot of lightly salted water to a boil. Add egg noodles, cook for 8 to 10 minutes, until al dente, and drain.
    3. Melt 1 tablespoon butter in a skillet over medium-low heat. Stir in the onion, celery, and garlic, and cook 5 minutes, until tender. Increase heat to medium-high, and mix in mushrooms. Continue to cook and stir 5 minutes, or until most of the liquid has evaporated.
    4. Melt 4 tablespoons butter in a medium saucepan, and whisk in flour until smooth. Gradually whisk in milk, and continue cooking 5 minutes, until sauce is smooth and slightly thickened. Season with salt and pepper. Stir in tuna, peas, mushroom mixture, and cooked noodles. Transfer to the baking dish. Melt remaining 2 tablespoons butter in a small bowl, mix with bread crumbs, and sprinkle over the casserole. Top with cheese.
    5. Bake 25 minutes in the preheated oven, or until bubbly and lightly browned.

    Nutritional Information:
    Amount Per Serving Calories: 562 | Total Fat: 31.3g | Cholesterol: 125mg

    MacGourmet Rating: 4 Stars

    Grilled Nutella and Banana Sandwich

    April 5, 2010 by Ashley 9 Comments

    Grilled Nutella and banana sandwich with powdered sugar.

    I was in the mood for a chocolatey banana dessert, so I made this. AWESOME!

    Grilled Nutella and banana sandwich with powdered sugar. Bite taken out of a grilled Nutella and banana sandwich.

    Easter Dinner Photos

    April 4, 2010 by Ashley 1 Comment

    Cake on a table with candlesticks.

    A plate of Easter food.

    Easter dinner table.

    Roast leg of lamb slices on a serving platter.

    Cake on a table with candlesticks.

    Potato & Shiitake Mushroom Gratin

    April 4, 2010 by Ashley Leave a Comment

    Casserole dish with potato and mushroom gratin.

    We were asked to bring a side dish to this year's Easter dinner, so I decided to try this recipe out. I cut it in half, and it made a lot! I sliced the potatoes with a mandolin which saved a ton of time. It's pretty time consuming, but the resulting gratin is rich and flavorful.

    Casserole dish with potato and mushroom gratin.

    Potato & Shiitake Mushroom Gratin
    Bon Appétit December 1997

    Serves 12

    Potato gratin is, of course, the traditional side dish with roast beef, and this version is just right for a special occasion. Adding flavor are typical steak house ingredients, like mushrooms, garlic and herbs. Place a baking sheet in the oven on the rack below the gratin to catch any liquids that may bubble over.

    6 tablespoons (¾ stick) butter
    1 ½ pounds button mushrooms, coarsely chopped
    1 ½ pounds fresh shiitake mushrooms, stemmed, caps coarsely chopped
    3 tablespoons minced garlic
    2 teaspoons dried thyme
    1 teaspoon dried rosemary leaves, finely crushed
    2 cups canned low-salt chicken broth
    3 pounds Yukon Gold or russet potatoes, peeled, cut into ⅛-inch-thick slices
    2 cups freshly grated Parmesan cheese (about 5 ½ ounces)
    2 cups half and half
    2 cups whipping cream
    1 ¼ teaspoons salt
    1 teaspoon black pepper

    Melt butter in large pot over high heat. Add all mushrooms and sauté until liquid evaporates, about 10 minutes. Add garlic, thyme and rosemary; sauté 1 minute. Add chicken broth and simmer until liquid evaporates, stirring often, about 18 minutes. Season with salt and pepper. Cool.

    Position 1 rack in middle of oven and another rack in bottom third of oven; preheat to 375°F. Butter 13 x 9 x 2-inch glass baking dish. Arrange ⅓ of potatoes in dish, overlapping slightly. Top with half of mushroom mixture. Sprinkle ⅓ of cheese over. Repeat layering ⅓ of potatoes, remaining mushroom mixture and ⅓ of cheese. Arrange remaining potatoes atop cheese. Whisk half and half, cream, salt and pepper in large bowl to blend; pour over potatoes. Cover loosely with foil.

    Place baking sheet on bottom rack in oven. Place baking dish on middle rack in oven and bake until potatoes are tender and liquid thickens, about 1 hour 15 minutes. Uncover. Using metal spatula, press on potatoes to submerge. Sprinkle remaining cheese over potatoes; bake until cheese melts and gratin is golden at edges, about 15 minutes longer. Let stand 10 minutes.

    MacGourmet Rating: 4 Stars

    Marinated Chicken with an Onion-Pepper-Almond Sauce (Chicken Tikka Masala)

    March 31, 2010 by Ashley 1 Comment

    Chicken tikka masala over rice with naan.

    This dish doesn't taste like the Chicken Tikka Masala you get in Indian restaurants. The complexity of the sauce really impressed us - it was sweet, slightly spicy, nutty...really lovely around the tender chicken pieces. I served this with some of the Malabar Parantha that I made and froze a while back. They reheated wonderfully! As with almost all Indian and Middle Eastern dishes, I ate this with a big scoop of plain yogurt on the side. It was a great meal!

    Chicken tikka masala over rice with naan.

    Marinated Chicken with an Onion-Pepper-Almond Sauce (Chicken Tikka Masala)
    660 Curries: The Gateway to Indian Cooking - Raghaven Iyer

    Serves 4

    For the chicken tikkas:
    Bamboo or metal skewers
    ½ cup plain yogurt
    2 tablespoons Ginger Paste (page 15)
    2 tablespoons Garlic Paste (page 15)
    2 tablespoons finely chopped fresh cilantro leaves and tender stems
    2 teaspoons coriander seeds, ground
    1 teaspoon cumin seeds, ground
    2 teaspoons Kashmiri chiles; or ½ teaspoon cayenne (ground red pepper) mixed with 1 ½ teaspoons sweet paprika
    1 ½ teaspoons coarse kosher or sea salt
    ½ teaspoon Punjabi garam masala (page 25)
    ½ teaspoon ground turmeric
    1 ½ pounds boneless, skinless chicken breasts, cut lengthwise into 1-inch-wide strips

    For the sauce:
    2 tablespoons Ghee (page 21) or canola oil
    1 small red onion, coarsely chopped
    1 small red bell pepper, stemmed, seeded, and cut into ½-inch pieces
    ¼ cup slivered blanched almonds
    ¼ cup golden raisins
    1 cup diced tomatoes, fresh or canned (no need to drain)
    ¼ cup heavy (whipping) cream or half-and-half
    ½ teaspoon coarse kosher or sea salt
    ¼ teaspoon cayenne (ground red pepper)
    ¼ teaspoon Punjabi garam masala (page 25)
    Vegetable cooking spray
    2 tablespoons finely chopped cilantro leaves and tender stems for garnishing

    1. If you are using bamboo skewers, place them in a flat dish filled with water and let them soak for an hour.

    2. While the skewers are soaking, make the marinade: Combine the yogurt, Ginger Paste, Garlic Paste, cilantro, coriander, cumin, Kashmiri chiles, salt, garam masala, and turmeric in a small bowl. Whisk to blend.

    3. Put the chicken strips in a large bowl and pour this full-flavored, red-hot-looking marinade over them. Toss to thoroughly coat the meat. Refrigerate, covered, for at least 30 minutes or up to 6 hours.

    4. When you are ready to cook the chicken, make the sauce: Heat the ghee in a small saucepan over medium-high heat. Add the onion, bell pepper, almonds, and raising, and cook, stirring frequently, until the vegetables soften and then acquire honey-brown patches, 10 to 12 minutes. The nuts and raisins will turn reddish brown, and a thin film of brown will coat the bottom of the pan. (Forcing the vegetables into a small pan allows them to sweat a little, creating moisture that prevents burning.)

    5. Stir the tomatoes into the pan and scrape the bottom to deglaze it. Pour this chunky sauce into a blender jar, and add the cream, salt, cayenne, and garam masala. Puree, scraping the inside of the jar as needed, to make a thick, nutty-gritty, reddish-brown sauce.

    6. Pour the sauce into a medium-size saucepan and simmer it over low heat, stirring it occasionally, while you grill the chicken.

    7. Preheat a gas or charcoal grill, or the broiler, to high.

    8. While the grill is heating, thread the chicken strips, covered with the marinade, onto the skewers, accordion-style. If you are grilling, lightly spray the grill grate with cooking spray. Grill the chicken, covered, turning the skewers occasionally, until the pieces are light brown, the insides are no longer pink, and the juices run clear, 6 to 8 minutes. If you are broiling, position the oven rack so the top of the chicken will be 2 to 3 inches from the heat. Lightly spray the rack of a broiler pan with cooking spray, place the skewers on the rack, and broil, turning the skewers occasionally, until the chicken is light brown, the meat is no longer pink inside, and the juices run clear, 6 to 8 minutes.

    9. Slide the chicken off the skewers into the sauce. Stir once or twice to make sure the sauce drenches the tender, juicy meat, and then serve, sprinkled with the cilantro.

    Ginger Paste:

    Makes about 1 ¼ cups

    8 ounces coarsely chopped fresh ginger

    Pour ½ cup water into a blender jar, and then add the ginger. (Adding the water first will ensure a smoother grind.) Puree, scraping the inside of the jar as needed, until it forms a smooth, light brown paste. Store the paste in a tightly sealed container in the refrigerator for up to 1 week. (I often divide the paste into smaller containers and freeze them for up to 1 month. Another option is to place 1-tablespoon portions in ice cube trays and freeze them; once they are frozen, pop them out and transfer them to freezer-safe self-sealed bags.)

    Garlic Paste:

    50 medium-size to large cloves garlic, peeled

    Pour ½ cup water into a blender jar, and then add the garlic. (Adding the water first will ensure a smoother grind.) Puree, scraping the inside of the jar as needed until it forms a smooth paste. Store the paste in a tightly sealed container in the refrigerator for up to 1 week. (I often divide the paste into smaller containers and freeze them for up to 1 month. Another option is to place 1-tablespoon portions in ice cube trays and freeze them; once they are frozen, pop them out and transfer them to freezer-safe self-sealed bags.)

    MacGourmet Rating: 5 Stars

    Punjabi-Style Warming Spice Blend (Punjabi Garam Masala)

    March 31, 2010 by Ashley 1 Comment

    Whole spices in a spice grinder.

    I made this spice blend to go use in the recipe I made tonight. It smelled fantastic! The only change I made was to use white cardamom pods instead of black since that's what I had in the kitchen.

    Whole spices in a spice grinder.

    Punjabi-Style Warming Spice Blend (Punjabi Garam Masala)

    Punjabi-Style Warming Spice Blend (Punjabi Garam Masala)
    660 Curries: The Gateway to Indian Cooking - Raghaven Iyer

    Makes about ¼ cup

    1 tablespoon coriander seeds
    1 teaspoon cumin seeds
    1 teaspoon whole cloves
    ½ teaspoon black peppercorns
    ½ teaspoon cardamom seeds from black pods
    3 cinnamon sticks (each 3 inches long), broken into smaller pieces
    3 fresh or dried bay leaves

    1. Preheat a small skillet over medium-high heat. Add all the spices and the bay leaves, and toast, shaking the skillet every few seconds, until the coriander and cumin turn reddish brown, the cloves, peppercorns, and cardamom turn ash-black, the cinnamon and bay leaves appear brittle and crinkly, and the mixture is highly fragrant, 1 to 2 minutes.

    2. Immediately transfer the nutty-smelling spices to a plate to cool. (The longer they sit in the hot skillet, the more likely it is that they will burn, making them bitter and unpalatable.) Once they are cool to the touch, place them in a spice grinder or coffee grinder, and grind until the texture resembles that of finely ground black pepper. (If you don't allow the spices to cool, the ground blend will acquire unwanted moisture from the heat, making the final blend slightly "cakey.") The ground blend will be reddish brown and the aroma will be sweet and complex, very different from that of the pre-toasted and post-toasted whole spices.

    3. Store in a tightly sealed container, away from excess light, heat, and humidity, for up to 2 months. (In my opinion, refrigerating the blend adversely affects its flavor.)

    Smothered Pork Chops

    March 30, 2010 by Ashley 3 Comments

    A plate of smothered pork chops with couscous.

    I love my cast iron skillet. Add some pork chops and gravy and it's even better. This recipe is great comfort food. I served it with a side of couscous mixed with currants and chickpeas. The only change I'd make next time would be to cut the flour/spice mixture at least in half, as you end up wasting quite a bit of it - it's not like you can save it after you dip raw pork chops in it. Other than that, it was a great meal for a rainy day.

    A plate of smothered pork chops with couscous.
    Smothered Pork Chops
    Food 911 - Tyler Florence

    Cook Time:16 minLevel: EasyYield: 4 servings

    1 cup all-purpose flour
    2 tablespoons onion powder
    2 tablespoons garlic powder
    1 teaspoon cayenne
    1 teaspoon salt
    ½ teaspoon freshly ground black pepper
    4 pork chops, ¾-inch thick, bone-in
    ¼ cup olive oil
    1 cup chicken broth
    ½ cup buttermilk
    Chopped fresh flat-leaf parsley, for garnish

    Put the flour in a shallow platter and add the onion powder, garlic powder, cayenne, salt, and pepper; mix with a fork to distribute evenly. Pat the pork chops dry with paper towels to remove any moisture and then dredge them in the seasoned flour; shaking off the excess.

    Heat a large saute pan or cast iron skillet over medium heat and coat with the oil. When the oil is nice and hot, lay the pork chops in the pan in a single layer and fry for 3 minutes on each side until golden brown. Remove the pork chops from the pan and add a little sprinkle of seasoned flour to the pan drippings. Mix the flour into the fat to dissolve and then pour in the chicken broth in. Let the liquid cook down for 5 minutes to reduce and thicken slightly. Stir in the buttermilk to make a creamy gravy and return the pork chops to the pan, covering them with the sauce. Simmer for 5 minutes until the pork is cooked through. Season with salt and pepper and garnish with chopped parsley before serving.

    MacGourmet Rating: 4 Stars

    Flank Steak with Cilantro-Almond Pesto

    March 29, 2010 by Ashley 2 Comments

    Sliced flank steak with cilantro pesto.

    This was an easy weeknight dinner. The pesto (that's more like a chimichurri in my opinion) is nice and garlicky with a bit of heat from the pepper. The yogurt cools it off and makes it nice and smooth. You don't really taste the almonds in this. I can definitely see using some of the leftover pesto for sandwiches, as suggested. The only change I made was to season the steak with salt and pepper and drizzle it with olive oil before grilling. I used my cast iron grill pan. Simple and tasty.

    Sliced flank steak with cilantro pesto.
    Flank Steak with Cilantro-Almond Pesto
    Cooking Light May 2002

    Ground almonds thicken this lively herb sauce. The pesto is also good as a spread for burgers and sandwiches, or as a pizza sauce. Most of the fat here is monounsaturated.

    Yield: 4 servings (serving size: 3 ounces steak and about 1 tablespoon pesto)

    ¾ cup fresh cilantro
    2 tablespoons slivered almonds, toasted
    1 tablespoon chopped seeded jalapeño pepper
    ⅛ teaspoon salt
    ⅛ teaspoon black pepper
    1 garlic clove, chopped
    3 tablespoons plain fat-free yogurt
    1 ½ teaspoons fresh lime juice
    1 (1-pound) flank steak, trimmed
    Cilantro sprigs (optional)

    Preparation
    Prepare grill.

    Combine first 6 ingredients in a blender; process until finely chopped (about 15 seconds). Add yogurt and juice; process until smooth.

    Grill steak 6 minutes on each side or until desired degree of doneness. Cut steak diagonally across grain into thin slices. Serve steak with pesto. Garnish with cilantro sprigs, if desired.

    Nutritional Information
    Calories: 209 (47% from fat)
    Fat: 10.8g (sat 3.9g,mono 4.9g,poly 0.8g)
    Protein: 24.6g
    Carbohydrate: 2.4g
    Fiber: 0.6g
    Cholesterol: 57mg
    Iron: 2.5mg
    Sodium: 152mg
    Calcium: 36mg

    MacGourmet Rating: 4 Stars

    Pomme Frites with Dipping Sauces

    March 28, 2010 by Ashley 1 Comment

    Pomme Frites with Dipping Sauces

    What's the perfect thing to snack on during a lazy Sunday? These fantastic fries! Dino has been wanting to make them in the deep fryer, and he finally did it. WOW. They rocked!

    He made 2 different dipping sauces, and they were out of this world! Super crispy on the outside and tender on the inside - the perfect texture. The sauces were both great, and yes, I did dip some fries in both sauces. Yum!!

    Pomme Frites with Dipping Sauces

    Mocha Chocolate Chip Muffins

    March 28, 2010 by Ashley 1 Comment

    Close-up of mocha chocolate chip muffins.

    I came across this recipe and needed to make it as soon as possible. I mean, look...you can justify it as breakfast because it's a muffin and there's coffee in there, right? These muffins rock! I used bittersweet chips in mine, and it worked out great - not too sweet. They're really dense, delicious muffins.

    Close-up of mocha chocolate chip muffins.

    Mocha Chocolate Chip Muffins
    Baking Bites

    2 cups all purpose flour
    1 cup + 2 tablespoon sugar
    2 teaspoon baking powder
    ½ teaspoon salt
    ½ cup butter
    2 tablespoon cocoa powder
    1 tablespoon instant espresso
    2 large eggs
    ⅔ cup milk (any kind)
    1 teaspoon vanilla extract
    1 ¼ cups milk chocolate chips

    Preheat oven to 375F. Line a 12 cup muffin tin with paper liners.
    In a large bowl, whisk together flour, sugar, baking powder, and salt.
    Place butter in a small, microwave-safe bowl and melt. Stir cocoa power and espresso powder into melted butter while warm. Allow to cool for 1-2 minutes. In another small bowl, whisk together eggs, milk and vanilla.
    Add butter mixture and egg mixture to the dry ingredients and stir until well-combined. Batter will be thick. Stir in chocolate chips.
    Divide batter evenly between prepared muffin cups. Cups will be heaping with batter.
    Bake for 19-22 minutes, until a toothpick inserted into the center of a muffin comes out clean.
    Cool muffins completely on a wire rack.

    Makes 12

    MacGourmet Rating: 4 Stars

    Red-Pepper Lemon Chicken

    March 27, 2010 by Ashley Leave a Comment

    Chicken and lemon over white beans.

    This was a really tasty dinner. The warm bean salad underneath the chicken packed a lot of flavor. The chicken was really moist and the lemon really brightened the dish up. It made a really comforting meal.

    Chicken and lemon over white beans.

    Red-pepper Lemon Chicken
    Sunset February 2008

    Prep and Cook Time: about 30 minutes.

    Yield: Makes 4 servings

    2 tablespoons olive oil
    4 boned skinned chicken breast halves (8 oz. each)
    2 large shallots, minced
    3 garlic cloves, minced
    ½ cup reduced-sodium chicken stock
    1 jar (7 oz.) roasted red peppers, drained and sliced
    1 can (15 oz.) cannellini beans, rinsed and drained
    About ½ tsp. salt
    About ¼ tsp. freshly ground black pepper
    ½ teaspoon red pepper flakes
    1 tablespoon lemon juice
    Shredded zest of 1 lemon
    ¼ cup freshly and finely shredded parmesan

    1. Preheat oven to 375°. Heat olive oil in a large, heavy ovenproof frying pan (not nonstick) over high heat until oil is hot but not smoking. Add chicken breasts, top side down, and cook until golden, 2 to 3 minutes. Turn chicken over.

    2. Add shallots and garlic to pan with chicken, stirring occasionally so garlic doesn't burn, until shallots are soft and translucent, 3 to 4 minutes. Add chicken stock, roasted red peppers, cannellini beans, ½ tsp. salt, ¼ tsp. pepper, and red pepper flakes and cook until mixture begins to boil, about 1 minute.

    3. Cover pan and put in oven. Bake 14 to 16 minutes, or until chicken is just cooked through (cut to check). Transfer chicken to a plate.

    4. Season roasted red pepper-cannelini bean-stock mixture with salt and pepper to taste and stir in lemon juice and zest. Divide vegetables among 4 rimmed plates or shallow pasta bowls, top each with a piece of chicken, and spoon sauce over all. Garnish with parmesan.

    MacGourmet Rating: 4 Stars

    Wasabi and Panko-Crusted Pork with Gingered Soy Sauce

    March 23, 2010 by Ashley 3 Comments

    Breaded pork chops with rice.

    This pork dish was really tasty, but I have to once again complain about recipes that ruin panko. Panko is super crunchy and delicious. Why would you instruct someone to ruin that fabulousness by spooning a sauce over it? Crunchy turns soggy and it's just a mess. Now a dipping sauce, yes. This sauce is delicious, but it should be thickened and served on the side so you don't compromise the integrity of the panko. This has been a public service announcement. We now return to your regularly scheduled meal.

    Breaded pork chops with rice.
    Wasabi and Panko-Crusted Pork with Gingered Soy Sauce
    Cooking Light March 2006

    Panko are coarse white breadcrumbs used in this quick and easy interpretation of the Japanese dish tonkatsu. Look for panko and wasabi paste in the ethnic-foods section of the supermarket. Substitute chicken broth if you don't have sake or sherry on hand. Serve with rice and steamed snow peas and carrots for a complete meal.

    Yield: 4 servings (serving size: 1 pork chop and about 1 tablespoon sauce)

    ⅔ cup panko (Japanese breadcrumbs)
    1 large egg white, lightly beaten
    4 (4-ounce) boneless center-cut loin pork chops (about ½ inch thick)
    1 teaspoon peanut oil
    Cooking spray
    ⅛ teaspoon salt
    1 tablespoon bottled ground fresh ginger (such as Spice World)
    ⅓ cup fat-free, less-sodium chicken broth
    2 tablespoons sake or dry sherry
    2 tablespoons low-sodium soy sauce
    2 teaspoons sugar
    1 teaspoon wasabi paste
    ⅓ cup thinly sliced green onions

    Place panko in a shallow dish. Place egg white in another shallow dish. Dip pork in egg white; dredge in panko.

    Heat peanut oil in a large nonstick skillet coated with cooking spray over medium-high heat; add pork. Cook for 4 minutes on each side or until done. Remove pork from pan; sprinkle with salt.

    Reduce heat to medium. Add ginger to pan; cook 30 seconds, stirring constantly. Combine broth and the next 4 ingredients (through wasabi) in a small bowl, stirring well with a whisk. Add broth mixture to pan, scraping pan to loosen browned bits. Stir in green onions. Spoon sauce over pork.
    Nutritional Information

    Calories: 215 (28% from fat)
    Fat: 6.8g (sat 2.1g,mono 2.9g,poly 0.8g)
    Protein: 24.5g
    Carbohydrate: 10.8g
    Fiber: 0.9g
    Cholesterol: 65mg
    Iron: 1.1mg
    Sodium: 454mg
    Calcium: 15mg

    MacGourmet Rating: 4 Stars

    Shepherd's Pie

    March 17, 2010 by Ashley 2 Comments

    Shepherd's pie in a baking dish.

    This year, I decided to try making Shepherd's Pie for St. Patrick's Day. It turned out really good! I used ground beef, and a mix of potatoes and parsnips for the top. The topping wasn't firm enough to hold a crosshatch pattern, so I didn't bother. This didn't look too pretty, and it was so hot that the steam wasn't letting my camera focus too well. It was hearty and comforting meal, and the two of us almost finished the entire pan!

    Shepherd\'s pie in a baking dish.

    Shepherd\'s pie in a bowl.
    Shepherd's Pie
    Cookie October 2007

    yield: Makes 6 servings
    active time: 30 minutes
    total time: 1 hour

    Beloved by the British, this rich, protein-filled dish is traditionally made with a mashed-potato crust. For a sweeter one, use a blend of potatoes, parsnips, and carrots.

    1 tablespoon vegetable oil
    1 large onion, peeled and chopped
    1 large carrot, peeled and chopped
    1 pound ground lamb (or substitute half with another ground meat)
    1 cup beef or chicken broth
    1 tablespoon tomato paste
    1 teaspoon chopped fresh or dry rosemary
    1 tablespoon chopped Italian parsley
    1 cup frozen peas
    2 pounds russet potatoes, peeled and cut into chunks
    6 tablespoons unsalted butter
    ½ cup milk (any fat content)
    Kosher salt to taste

    1. Preheat oven to 375°F.

    2. In a large sauté pan over medium-high heat, heat the oil, then add the onion, carrot, and meat. Cook until browned, 8 to 10 minutes.

    3. Drain the fat and add the broth, tomato paste, and herbs. Simmer until the juices thicken, about 10 minutes, then add the peas.

    4. Pour the mixture into a 1 ½-quart baking dish; set aside.

    5. Meanwhile, bring the potatoes to a boil in salted water. Cook until tender, about 20 minutes; drain.

    6. Mash the potatoes with the butter, milk, and salt.

    7. Spread them over the meat mixture, then crosshatch the top with a fork.

    8. Bake until golden, 30 to 35 minutes.

    Tip • Instead of using a baking dish for the Shepherd's Pie, keep the filling in the (ovenproof) sauté pan in which you cook it, top with the crust, and bake it all in the oven for a skillet version that won't dirty another dish.

    MacGourmet Rating: 4 Stars

    Pepperoni and Meatball Pizza

    March 16, 2010 by Ashley 3 Comments

    Pepperoni and meatball pizza on a baking sheet.

    Dino used the leftovers from the Spaghetti and Meatballs that I made Sunday night to make a pizza with a pre-made crust that we had in the freezer. He added some garlic powder to the sauce and topped it with basil leaves, fresh mozzarella, cut up meatballs, and sliced pepperoni. It was fantastic!

    Pepperoni and meatball pizza on a baking sheet.

    Crispy Tofu Pad Thai

    March 15, 2010 by Ashley 3 Comments

    Crispy tofu pad Thai in a bowl.

    I finally wrote up the changes that I make to this recipe. It's our favorite Pad Thai, and wonderfully spicy and refreshing. I couldn't find bean sprouts this time around, but I highly recommend them as it takes this dish over the top.

    Crispy tofu pad Thai in a bowl.

    Crepe Making Tutorial

    March 13, 2010 by Ashley Leave a Comment

    Spraying oil into a small skillet.

    Here's a step-by-step pictorial guide to how Dino made fantastic crepes for breakfast.

    Spraying oil into a small skillet. A person spreading oil in a skillet with a paper towel. Pouring crepe batter into a small skillet. Pouring crepe batter into a skillet.Crepes cooking on the stovetop. Crepes cooking on the stovetop.Crepes cooking on the stovetop.Crepe on a plate topped with sour cream. Crepe with sour cream on a plate.Crepe with sour cream abd blueberry jam on a plate.Rolling a crepe. Pile of rolled crepes dusted with powdered sugar.

    Szechuan-Style Tofu with Peanuts

    March 13, 2010 by Ashley 2 Comments

    Tofu and veggies over rice.

    This spicy tofu dish was a great way to end the week. I wasn't able to find black bean sauce that had garlic, so I added a minced clove into the sauce. There's a generous amount of sambal oelek, so it's nice and spicy. It's not quite a vegetarian dish because of the chicken broth, but I'm sure you could substitute vegetable stock instead. I ended up broiling the tofu for a few extra minutes to get it nice and golden brown, and I really liked the texture that way.

    Tofu and veggies over rice.
    Szechuan-Style Tofu with Peanuts
    Cooking Light March 2010

    Yield: 4 servings (serving size: ¾ cup rice, about ¾ cup tofu mixture, and 1 tablespoon peanuts)

    2 (3 ½-ounce) bags boil-in-bag jasmine rice
    1 (14-ounce) package water-packed firm tofu, drained and cut into 1-inch pieces
    Cooking spray
    ½ cup fat-free, less-sodium chicken broth
    1 tablespoon sambal oelek (ground fresh chile paste)
    1 tablespoon less-sodium soy sauce
    1 teaspoon cornstarch
    2 teaspoons black bean garlic sauce
    1 tablespoon canola oil
    ¼ teaspoon salt
    1 (8-ounce) package presliced mushrooms
    ½ cup matchstick-cut carrots
    1 tablespoon bottled ground fresh ginger (such as Spice World)
    ½ cup chopped green onions
    ¼ cu unsalted dry-roasted peanuts, chopped

    1. Preheat broiler.

    2. Cook rice according to package directions, omitting salt and fat.

    3. Arrange tofu in a single layer on a foil-lined jelly-roll pan coated with cooking spray; broil 14 minutes or until golden.

    4. While tofu cooks, combine broth and next 4 ingredients (through black bean sauce), stirring with a whisk; set aside.

    5. Heat oil in a large nonstick skillet over medium-high heat. Add salt and mushrooms; sauté 4 minutes or until mushrooms begin to release liquid, stirring occasionally. Stir in carrots and ginger; cook 1 minute. Add broth mixture; cook 30 seconds or until sauce begins to thicken. Remove from heat; stir in tofu and onions. Serve over rice; sprinkle with peanuts.

    Calories: 389
    Fat: 14.3g (sat 2.1g,mono 5.5g,poly 6.2g)
    Protein: 17.2g
    Carbohydrate: 51.6g
    Fiber: 2.4g
    Cholesterol: 0.0mg
    Iron: 4mg
    Sodium: 619mg
    Calcium: 92mg

    MacGourmet Rating: 4 Stars

    Farfalle with Lamb Ragù, Ricotta, and Mint

    March 8, 2010 by Ashley Leave a Comment

    Farfalle with Lamb Ragù, Ricotta, and Mint

    I have been wanting to make this recipe since I got the March issue of Cooking Light in the mail. It took me a while to find ground lamb, but I finally did and all I can say is WOW. This one is a real winner. Very different from "regular" pasta sauces. I served it with some garlic bread - I just mashed a lot of garlic powder and some dried parsley into butter, spread it on a loaf of French bread that I cut in half lengthwise, and baked it at 450°F until it was nice and golden brown. It was a fantastic meal!

    Farfalle with Lamb Ragù, Ricotta, and Mint

    Farfalle with Lamb Ragù, Ricotta, and Mint
    Cooking Light March 2010

    A classic flavor combination, lamb and mint meet bow-tie pasta for a hearty weeknight meal.

    Prep Time: 40 minutes
    Yield: 4 servings

    4 teaspoons extra-virgin olive oil, divided
    8 ounces lean ground lamb
    ¾ teaspoon kosher salt, divided
    ½ cup finely chopped onion
    ¼ cup finely chopped carrot
    1 teaspoon minced fresh rosemary
    2 garlic cloves, minced
    ½ cup dry white wine
    ⅛ teaspoon freshly ground black pepper
    1 ½ cups canned crushed tomatoes, undrained
    ½ cup fat-free, less-sodium chicken broth
    8 ounces uncooked farfalle (bow-tie pasta)
    ½ cup part-skim ricotta cheese
    ¼ cup small fresh mint leaves

    1. Heat 1 teaspoon oil in a large skillet over medium-high heat. Add lamb; cook 5 minutes, stirring to crumble. Remove lamb from pan with a slotted spoon; sprinkle with ¼ teaspoon salt. Discard drippings from pan. Reduce heat to medium-low. Add 2 teaspoons oil, onion, and carrot; cook 5 minutes or until tender, stirring occasionally. Add rosemary and garlic; cook 1 minute, stirring constantly.

    2. Return lamb to pan; add wine. Increase heat to medium-high; cook for 3 minutes or until liquid almost evaporates. Add remaining ½ teaspoon salt and pepper. Stir in tomatoes and broth; bring to a simmer. Partially cover and simmer 10 minutes, stirring occasionally.

    3. While sauce simmers, cook pasta according to package directions. Drain; return pasta to pan. Stir in 1 cup sauce and remaining 1 teaspoon oil. Spoon 1 cup pasta mixture onto each of 4 plates; top each serving with ¾ cup remaining sauce, 2 tablespoons ricotta, and 1 tablespoon mint.

    Calories: 464
    Fat: 16.9g (sat 5.9g,mono 7.6g,poly 1.5g)
    Protein: 23.9g
    Carbohydrate: 54.7g
    Fiber: 4.5g
    Cholesterol: 51mg
    Iron: 4.8mg
    Sodium: 629mg
    Calcium: 157mg

    MacGourmet Rating: 5 Stars

    Snowy Day Burgers

    March 7, 2010 by Ashley Leave a Comment

    A close-up of a burger.

    It finally got warm here in New York, so even though there was still big piles of snow on the ground from our recent blizzard, I thought it would be the perfect day to break out the grill. Dino agreed to make some burgers, and they turned out fantastic, as always! We didn't wanna make a big mess in the kitchen, so we bought macaroni salad and potato salad from the store, and it was a perfect meal. We're totally ready for BBQ season!

    A close-up of a burger.

    Snowy Day Burgers
    Dino Covelli

    2 ¼ lb. ground sirloin (we used 87/13)
    2 pinches Kosher salt
    ½ t ground white pepper
    generous amount of freshly ground black pepper
    4 drops liquid smoke
    dash of hot sauce
    ½ t dried minced onion
    ¾ t onion powder
    ½ t smoked paprika
    1 T ketchup
    1 egg
    ⅛ t ground coriander
    1 t dried marjoram

    Mix ingredients in a large bowl with your hands, being careful not to overwork. Form into patties and grill. Serve with toppings of your choice and enjoy!

    MacGourmet Rating: 5 Stars

    Supper Club: Chipotle-White Cheddar Mashed Potatoes

    March 7, 2010 by Ashley 1 Comment

    Bowl of mashed potatoes.

    The other recipe we made for pepper night was a spiced up version of mashed potatoes. We made a few changes - we didn't peel the potatoes, and we upped the chipotle powder to about 4 teaspoons. Since we were going for a pepper theme, we wanted it to stand out. These were really good, but we think the addition of some garlic would have made them perfect.

    Bowl of mashed potatoes.
    Chipotle-White Cheddar Mashed Potatoes
    Bon Appétit November 2006

    yield: Makes 6 servings

    Perfect Mashed Potatoes (recipe follows)

    1 cup grated white cheddar cheese
    1 to 2 teaspoons of pureed chipotle chiles in adobo.*

    *Available at some supermarkets and at Latin markets.

    Prepare perfect mashed potatoes . Mash in grated white cheddar cheese and pureed chipotle chiles. Season with salt.

    Perfect Mashed Potatoes
    Bon Appétit November 2006

    yield: Makes 6 servings

    2 pounds Yukon Gold or russet potatoes (unpeeled)

    ½ cup whole milk
    ¼ cup (½ stick) butter

    Place potatoes in large saucepan; cover with cold water. Bring to boil, reduce heat to medium, and simmer until tender, about 20 minutes. Drain well; cool slightly. Peel and mash potatoes; place in large saucepan. Over medium heat, dry out potatoes for 2 minutes, stirring occasionally.

    Meanwhile, heat milk in small saucepan until warm. Stir butter into potatoes. Add warm milk and stir until completely absorbed. Season with salt.

    MacGourmet Rating: 4 Stars

    Goat Cheese with Thyme, Peppercorns, and Lemon Oil

    March 4, 2010 by Ashley Leave a Comment

    Plate of goat cheese with herbs and lemon with bread alongside.

    This was a great and easy appetizer. I recently got a stash of peppercorns from Penzey's in Grand Central Station, and was glad to finally make a mélange with them in my pepper grinder. The spiciness works really well with the lemon, and if you use a really good oil, it won't disappoint!

    Plate of goat cheese with herbs and lemon with bread alongside.
    Goat Cheese with Thyme, Peppercorns, and Lemon Oil
    Bon Appétit July 2007

    1 (5.5-ounce) log soft mild goat cheese
    1 teaspoon pink peppercorns or peppercorn mélange, cracked
    1 tablespoon fresh thyme leaves
    3 tablespoons extra-virgin olive oil
    1 teaspoon grated lemon peel
    ½ small garlic clove, pressed (optional)
    Sliced baguette (toasted, if desired)

    Place cheese on plate; using plastic wrap as aid, shape into 5-inch round. Sprinkle with salt, peppercorns, and thyme, and press into cheese. Mix olive oil, lemon peel, and garlic, if desired, in small bowl. Pour over cheese. Serve with baguette.

    MacGourmet Rating: 4 Stars

    Bloody Mary Shrimp

    March 4, 2010 by Ashley 2 Comments

    Shrimp in appetizer spoons.

    Tonight was the first time we had a "real" dinner party at our house (other than our Supper Club) since we started the kitchen remodel (which is almost finished, I swear!). I decided that I wanted to make my good ol' standby Balsamic Marinated Pork Tenderloin for the main course, but definitely wanted to try a few new appetizers. I was instantly intrigued when I saw this recipe on the Epicurious iPod app. It turned out phenomenal! I made the sauce last night, so the prep today wasn't too bad. I used some of the Five-Chile Vodka that I infused a little over 2 years ago. It gave the sauce a nice kick, along with the horseradish. This one was a real stand out dish, and I'll most definitely be making it again!

    Shrimp in appetizer spoons.

    Bloody Mary Shrimp
    Gourmet December 2007

    For shrimp
    1 pound medium shrimp in shell, peeled and deveined
    1 ½ cups thinly sliced celery (3 to 4 ribs)
    1 cup thinly sliced scallions (about 6)

    For sauce
    ½ cup ketchup
    ¼ cup vodka (preferably Absolut Peppar)
    ¼ cup fresh lemon juice
    2 tablespoons bottled horseradish (not drained), or to taste
    1 teaspoon Worcestershire sauce
    1 teaspoon Tabasco

    Equipment: Chinese soupspoons
    Garnish: diced avocado (optional)

    Prepare shrimp: Bring a large saucepan of salted water (2 tablespoons salt for 2 quarts water) to a boil. Add shrimp, then remove from heat and let stand in water until cooked through, about 5 minutes. Drain in a colander and cool to room temperature, about 30 minutes. Cut shrimp into thirds and transfer to a large bowl with celery and scallions.

    Make sauce: Whisk together all sauce ingredients, ¼ teaspoon pepper, and ¾ teaspoon salt, or to taste.
    Just before serving, stir sauce into shrimp mixture. Spoon 2 shrimp pieces with vegetables and sauce into each soupspoon and arrange spoons on a platter.

    Cooks' notes:
    · Shrimp can be cooked and tossed with vegetables 4 hours ahead, then chilled in a sealed bag. Bring to room temperature, about 30 minutes, before tossing with sauce.
    · Sauce can be made 1 day ahead and chilled, covered.

    MacGourmet Rating: 5 Stars

    Bacon and Butternut Pasta with Spinach Salad

    February 28, 2010 by Ashley 4 Comments

    A plate of pasta with squash and bacon.

    Tonight's dinner was completely addictive! We had to make ourselves stop eating it so there would be leftovers to enjoy for lunch this week. The blue cheese melts down into the pasta and acts as the perfect counterpart to the sweetness of the butternut squash. I love that Cooking Light offers recipes like this that pack a ton of flavor, but are still healthy and fresh. The salad went perfectly with it, too. We really loved the tangy vinaigrette. I'll definitely be making this meal again!

    A plate of pasta with squash and bacon.
    Bacon and Butternut Pasta
    Cooking Light March 2010

    Yield: 4 servings (serving size: 1 cup)

    3 ¼ teaspoons salt, divided
    8 ounces uncooked fettuccine
    2 bacon slices
    2 tablespoons butter
    3 cups (½-inch) cubed peeled butternut squash
    2 garlic cloves, minced
    ½ cup (2 ounces) crumbled blue cheese
    ½ cup sliced green onions

    1. Bring 3 quarts water and 1 tablespoon salt to a boil in a large saucepan. Add pasta; cook for 8 minutes. Drain in a colander over a bowl, and reserve ⅓ cup cooking liquid.

    2. Cook bacon in a large skillet over medium heat until crisp. Remove bacon from pan, reserving 2 teaspoons drippings in pan. Crumble bacon; set aside. Add butter to drippings in pan; cook 30 seconds or until butter melts. Increase heat to medium-high. Add squash; sauté 7 minutes or until almost tender. Add garlic; cook 1 minute, stirring constantly. Stir in remaining ¼ teaspoon salt, pasta, reserved cooking liquid, and cheese; cook 2 minutes or until pasta is al dente, stirring frequently. Sprinkle with bacon and onions.

    Calories: 385
    Fat: 14.1g (sat 7.8g,mono 4.1g,poly 0.8g)
    Protein: 13.1g
    Carbohydrate: 53.4g
    Fiber: 4.7g
    Cholesterol: 31mg
    Iron: 2.7mg
    Sodium: 701mg
    Calcium: 135mg

    For the spinach salad:

    Combine 1 ½ tablespoons lemon juice, 1 tablespoon olive oil, 1 ½ teaspoons honey, 1 teaspoon Dijon mustard, ¼ teaspoon salt, and ¼ teaspoon pepper; whisk. Toss with 5 cups fresh spinach. Top with 1 cored and thinly sliced Braeburn apple.

    MacGourmet Rating: 5 Stars

    Maple-Mustard Pork Chops with Winter Squash Puree

    February 27, 2010 by Ashley 6 Comments

    Pork chop with squash puree.

    This was in a section of Ellie Krieger's recipes in the latest issue of Cooking Light (and the cover recipe). It's a classic combination - pork, maple and Dijon - that we always love. The pork was incredibly moist, and the squash puree was vibrant with a hint of citrus from the orange zest. It was a really nice meal. This was another recipe that we would give 4 ½ stars if we gave out ½ stars, but since we don't, it's getting a 4. It's a pretty easy recipe to put together, and it was definitely a hit!

    Pork chop with squash puree.
    Maple-Mustard Pork Chops with Winter Squash Puree
    Cooking Light March 2010

    4 (6-ounce) bone-in center-cut pork chops
    ½ teaspoon salt, divided
    ¼ teaspoon freshly ground black pepper
    Cooking spray
    1 tablespoon butter
    2 tablespoons finely chopped shallots
    ¼ cup fat-free, less-sodium chicken broth
    2 tablespoons Dijon mustard
    2 tablespoons maple syrup
    2 tablespoons chopped fresh flat-leaf parsley

    1. Sprinkle both sides of pork with ¼ teaspoon salt and pepper.

    2. Heat a large skillet over medium-high heat. Coat pan with cooking spray. Add pork to pan; cook 3 minutes on each side or until cooked through, but with a slight blush in the center. Remove from pan; keep warm.

    3. Return pan to medium-high heat. Add butter to pan, swirling pan to coat. Add shallots; sauté 3 minutes or until tender and translucent. Add broth; bring to a boil, and cook 1 minute. Stir in mustard, syrup, and remaining ¼ teaspoon salt; cook 1 minute or until slightly thick. Return pork to pan. Cook pork 1 minute on each side or until thoroughly heated (be careful not to overcook pork). Serve pork with sauce. Garnish each serving with 1 ½ teaspoons parsley.

    Yield: 4 servings (serving size: 1 pork chop and 1 tablespoon sauce)

    CALORIES 283 ; FAT 15.1g (sat 6.3g,mono 6.2g,poly 1g); CHOLESTEROL 84mg; CALCIUM 44mg; CARBOHYDRATE 8.2g; SODIUM 456mg; PROTEIN 27.1g; FIBER 0.3g; IRON 1.1mg

    Quick Winter Squash Puree

    This easy side comes together quickly with convenient frozen winter squash. Pair with Maple-Mustard Pork Chops or roast chicken for a simple, colorful, nutrient-rich dish.

    Yield: 4 servings (serving size: ¾ cup)

    ⅓ cup fat-free, less-sodium chicken broth
    2 (12-ounce) packages frozen cooked butternut squash
    1 tablespoon butter
    ½ teaspoon grated orange rind
    1 ½ teaspoons maple syrup
    ¼ teaspoon salt
    ¼ teaspoon freshly ground black pepper

    1. Place broth and squash in a large saucepan over medium heat. Cover and cook 15 minutes or until thoroughly heated, stirring occasionally. Add butter and remaining ingredients; stir until combined.

    Calories: 100
    Fat: 3g (sat 1.8g,mono 0.8g,poly 0.2g)
    Protein: 2.4g
    Carbohydrate: 19g
    Fiber: 4.9g
    Cholesterol: 8mg
    Iron: 1mg
    Sodium: 204mg
    Calcium: 37mg

    Big Flavors Rating: 4 Stars

    Marinade for Steak, Mushroom, Onion & Pea Stir-Fry

    February 26, 2010 by Ashley 3 Comments

    Steak and veggie stir-fry over rice.

    I found some flank steak in the freezer, so I decided to throw together a marinade and use what we had in the house to make a stir-fry for dinner. I sliced the steak thinly against the grain and let it marinate in the fridge for about an hour and a half, I stir-fried the steak with some peas, yellow onion, garlic and mushrooms and topped it with some chopped green onions, peanuts and a drizzle of tamari. It turned out pretty tasty!

    Steak and veggie stir-fry over rice.
    Marinade
    2t grated fresh ginger
    3T rice vinegar
    3T soy sauce
    1T Sambal Oelek
    1t sesame oil

    Thai-Style Grilled Beef in Broth with a Lot o'Noodles (MYOTO)

    February 19, 2010 by Ashley 4 Comments

    Steak and noodle soup.

    I've been wanting to try one of Rachael Ray's MYOTO (Make Your Own Take Out) recipes for a while now. I love the idea of having food like that but homemade. This was really good with one caveat - it NEEDS a drizzle of soy sauce at the end. It really boosts the flavor. I'd probably use rice noodles next time, too. Something like bean sprouts or peanuts on top would add some nice texture, too. I couldn't find shell steaks, so I used a flank steak, and I broiled it (I didn't have enough room for a soup pot, a pasta pot AND a grill pan on my stove. Needless to say, this was a meal that made us really glad we finally got a dishwasher!

    Steak and noodle soup.

    Thai-Style Grilled Beef in Broth with a Lot o'Noodles (MYOTO)
    Express Lane Meals - Rachael Ray

    Thai-style food made with ingredients available in any grocery store. If you're not into beef, try it with pork or chicken, instead.

    4 Servings

    Salt
    ½ pound thin pasta, such as vermicelli*
    3 inch piece fresh ginger, peeled and grated
    2 tablespoons Worcestershire sauce
    4 tablespoons vegetable oil
    4 ½ inch thick shell steaks
    1 teaspoon ground coriander
    ½ teaspoon ground cumin
    1 large onion, thinly sliced
    1 medium carrot, peeled and grated
    2 celery ribs, thinly sliced
    1 jalapeño or serrano pepper, seeded and finely chopped
    12 shiitake mushrooms, stems removed and discarded, caps thinly sliced
    Black pepper
    5 cups chicken stock
    ¼ cup fresh cilantro leaves, chopped, a generous handful
    ¾ cups basil, chopped, about 15 leaves
    Juice of 1 lime

    Preheat an outdoor grill or grill pan over high heat.

    Bring a large pot of water with a tight-fitting lid to a boil over high heat to cook the pasta. Once it comes to a boil, add some salt and the pasta. Cook the pasta according to the package directions until it is al dente, drain, and run it under cold water to rinse off some of the starch. Let the noodles sit in the colander for a few minutes to dry off.

    While the water is coming up to a boil, in a shallow dish combine half of the ginger, the Worcestershire sauce, 2 tablespoons of the vegetable oil, and the hot sauce. Add the shell steaks and let them marinate while you get everything else working.

    Preheat a soup pot over medium-high heat with the remaining 2 tablespoons of vegetable oil, twice around the pan. Add the coriander and cumin and toast them for about 30 seconds, stirring constantly. Add the onions, garlic, carrots, celery, the remaining ginger, the jalapeño or serrano pepper, shiitake mushrooms, salt and a little pepper; cook, stirring every now and then, for 3 to 4 minutes. Add the chicken stock and bring it up to a bubble; reduce the heat and then let it simmer for 10 to 15 minutes.

    While the broth is cooking away, get the steaks cooking. Season the steaks with a little salt, transfer them to the hot grill, and cook on each side for about 2 minutes. Remove them from the grill and let them rest for a few minutes. Thinly slice the steaks on a sharp angle (this is always easier to do when you are using a sharp knife). Cut the thin slices in half.

    Once the broth is simmering, add the cooked drained noodles, the cilantro, and basil. Reheat the noodles, 1 minute. Add the lime juice to the pot and then taste for seasoning; add salt and pepper accordingly. To serve, use kitchen tongs to transfer 4 servings of the noodles and veggies to soup bowls. Top each noodle pile with some of the grilled sliced steak, then ladle some of the broth over the top.

    *Optional: use Gluten Free

    MacGourmet Rating: 4 Stars

    Pan-Fried Chicken Breasts with Warm Bean Salad

    February 17, 2010 by Ashley Leave a Comment

    Chicken with warm bean salad on a plate.

    This is the second time I've made this recipe and it was just as simple and delicious the second time around. It's a great comfort food dish. This time, I served baked potatoes on the side for a super satisfying meal.

    Chicken with warm bean salad on a plate.

    Close-up of chicken with beans and tomatoes on a fork.
    Pan-Fried Chicken Breasts with Warm Bean Salad
    jamieoliver.com - hoppershaun

    SERVES 2

    2 chicken breasts
    3 tablespoons olive oil
    half an onion, chopped
    2 cloves of garlic, chopped
    2 tomatoes, cut into wedges
    1 can of cannellini beans, drained
    1 tablespoon chopped coriander
    1 tablespoon chopped basil
    good squeeze of lemon juice
    salt and black pepper

    1. Heat 1 tablespoon of olive oil in a frying or griddle pan over a medium heat. Add the chicken breasts and cook for about 8 minutes each side, or until cooked through.
    2. Meanwhile make the warm bean salad. Gently cook the onion and garlic in 2 tablespoon of olive oil until the onion has softened. Add the tomatoes and cannellini beans and season with salt and pepper. Cook until warmed through and then add the chopped herbs and lemon juice. Mix well and serve alongside the chicken breasts.

    MacGourmet Rating: 5 Stars

    Crunchy Buttermilk-Coconut Chicken Fingers

    February 16, 2010 by Ashley 4 Comments

    Close-up of coconut chicken fingers.

    This is the second time I've made these chicken fingers, and they were even better than I remembered them being. This time, I bought precut chicken tenders, and it worked out well, but they took longer to cook. This recipe is incredibly flavorful, moist and delicious!
     Close-up of coconut chicken fingers.
    Crunchy Buttermilk-Coconut Chicken Fingers
    Cooking Light April 2008

    These crispy chicken fingers appeal to kids, so serve them with ketchup for dipping. Grown-ups will enjoy them atop a salad.

    1 lb. skinless, boneless chicken breasts
    1 ½ cups fat-free buttermilk
    ½ cup all-purpose flour (about 2 ¼ ounces)
    1 large egg, lightly beaten
    1 large egg white, lightly beaten
    ¾ cup crushed cornflakes
    ¾ cup flaked sweetened coconut, chopped
    1 teaspoon garlic powder
    ¾ teaspoon salt
    ½ teaspoon curry powder
    ¼ teaspoon ground red pepper
    Cooking spray

    1. Cut chicken into 20 (¼-inch-thick) strips. Combine chicken and buttermilk in a shallow dish; cover and chill 1 hour. Drain chicken, discarding liquid. Combine chicken and flour in a medium bowl, tossing to coat.

    2. Preheat oven to 475°. Place baking sheet in oven.

    3. Combine egg and egg white in a small bowl. Combine crushed cornflakes and next 5 ingredients (through ground red pepper) in a shallow dish.

    4. Working with 1 chicken strip at a time, dip into egg mixture; dredge in cornflake mixture. Repeat procedure with remaining chicken, egg mixture, and cornflake mixture. Arrange chicken in a single layer on preheated baking sheet coated with cooking spray. Lightly coat chicken with cooking spray. Bake at 475° for 6 minutes or until done. Serve immediately.

    Yield 4 servings (serving size: 5 chicken fingers)

    Nutritional notes:
    CALORIES 346(19% from fat); FAT 7.4g (sat 4.8g,mono 1g,poly 0.6g); PROTEIN 35g; CHOLESTEROL 120mg; CALCIUM 139mg; SODIUM 767mg; FIBER 1.7g; IRON 4.2mg; CARBOHYDRATE 33.8g

    MacGourmet Rating: 5 Stars

    Creamed Parsley

    February 15, 2010 by Ashley 1 Comment

    A bowl of creamed parsley.

    This recipe sounded really interesting to me, so I decided that if my grocery store had enough bunches of parsley, it was a sign that I should try it out. I'm glad I did! It's different than creamed spinach, and the garlic, ginger, shallot and orange zest really add a nice subtle flavor to the background of this dish. Me, Dino and his dad all really liked it, but his mom wasn't crazy about it. She thought it was a little too "grassy". I think you have to really like the flavor of fresh parsley to appreciate this one. The only change I made was to add a few more spoons of crème fraîche and some more cream at the end, because it wasn't really coating it well enough. This is a really interesting meal accompaniment!

    A bowl of creamed parsley.
    Creamed Parsley
    Gourmet September 2008

    yield: Makes 4 servings
    active time: 40 min
    total time: 45 min

    In this unusual side dish from Spring restaurant, often under appreciated parsley gets the creamed-spinach treatment—and a little help from aromatic orange zest, mint, and fresh ginger.

    12 cups packed flat-leaf parsley sprigs (2- to 3-inch sprigs from about six 2-ounces bunches), tough stems discarded
    ½ medium shallot, finely chopped
    1 tablespoon salted butter
    1 unpeeled small garlic clove, lightly smashed
    5 thin slices peeled ginger (from a ½-inch-diameter piece)
    ¼ cup heavy cream
    3 tablespoons crème fraîche
    2 (3-inch-long) strips of orange zest
    1 mint sprig

    print a shopping list for this recipe
    Preparation

    Blanch parsley in a large pot of boiling salted water (2 tablespoons salt for 4 quarts water) 20 seconds. Transfer parsley to an ice bath to stop cooking. Spin dry and blot with paper towels.

    Cook shallot in butter with garlic and ginger in a heavy medium skillet over medium heat, stirring occasionally, until softened, 3 to 4 minutes.

    Add cream, crème fraîche, and orange zest to skillet and simmer, stirring occasionally, 4 minutes. Add mint and remove from heat. Let stand, uncovered, 2 minutes. Discard garlic, ginger, zest, and mint.

    Return sauce to a simmer and add parsley, separating gently with a fork. Season with salt and pepper and simmer, tossing gently, until just heated through, about 2 minutes.

    MacGourmet Rating: 4 Stars

    Caramelized Cumin-Roasted Carrots

    February 15, 2010 by Ashley 9 Comments

    Baking dish of roasted carrots.


    Aromatic cumin seeds add Indian flair to this simple side dish.

    This year for Easter, I remembered a super simple side dish that I hadn't made in yeeeeears. This recipe is very basic, but it packs a ton of flavor.

    It went beautifully with the lamb that my father-in-law made (plus all of the other dishes we both contributed!).

    Caramelized Cumin-Roasted Carrots

    This is perfect side dish for any roasted meat or Indian-inspired dinner. Absolutely delicious!

    • « Previous Page
    • 1
    • …
    • 31
    • 32
    • 33
    • 34
    • 35
    • Next Page »

    Hi, I'm Ashley and I’ve been writing about food & recipes here at Big Flavors from a Tiny Kitchen since 2006. I want to help you (yes, you!) gain confidence in the kitchen so you are excited to cook at home for yourself and your loved ones.

    More about me →

    Favorite Spring Recipes

    • Mayo-free Deviled Eggs
    • Middle Eastern Fattoush Salad with Homemade Pita Chips
    • Birthday Cake Confetti Pancakes with Sprinkles
    • Italian Cream Cheese and Ricotta Cheesecake
    • Garlicky Mushroom Ricotta Pizza with Wild Arugula + Aged Balsamic
    • Slow Cooker "Roasted" Beets
    • Honey Balsamic Roasted Carrots
    • Italian Ricotta Cookies
    • Rhubarb Custard Pie
    • Easy Instant Pot Herbed Potato Salad

    Mother's Day + Easter Brunch

    • Epic Brunch Board on a Budget
    • Baby Spinach and Cheddar Quiche Made with Fresh Spinach
    • Turkey Salad Tea Sandwiches with Dried Cherries
    • Great Grandma Maria Francesca Cardile's Italian Easter Cookies
    • Brie Waffle Bites
    • Challah French Toast
    • Creamsicle Smoothies
    • DM Bloody Mary
    • Turkey Scotch Eggs
    • The Herbalist

    Popular Now

    • Cast iron skillet full of chicken fajitas.
      Favorite Restaurant-Style Chicken Fajitas
    • Overhead view of spinach and cheddar quiche with forks.
      Baby Spinach and Cheddar Quiche Made with Fresh Spinach
    • Chicken and bell pepper stir-fry served over white rice.
      Chicken and Bell Pepper Stir-Fry
    • Serving dish of cooked shrimp garnished with chopped parsley.
      Quick and Easy Sautéed Shrimp
    • Overhead view of a dutch oven filled with sausages, peppers, and onions.
      Sausage and Peppers
    • Overhead view of assorted breakfast items displayed on a board.
      Epic Brunch Board on a Budget

    Footer

    ↑ back to top

    About

    • About Ashley
    • Press + Recognition
    • Events
    • Virtual Cooking Classes
    • Podcast
    • Contact
    • Privacy Policy

    Newsletter

    • Sign up to receive delicious recipes and exclusive content right to your inbox!

    As an Amazon Associate I earn from qualifying purchases at no added cost to you.

    ©2006–2026  BIG FLAVORS FROM A TINY KITCHEN LLC | ALL RIGHTS RESERVED

    *Third-party advertisers may collect or use non-personally identifiable information to serve you more relevant ads.