
This post may contain affiliate links, which won’t change your price but will share some commission.
If your family likes yogurt as much as mine does, this homemade Instant Pot yogurt recipe will be a total game-changer! There are a few important steps to yogurt-making success, and this post will walk you through exactly how to achieve it.
It doesn't take long to get into the swing of making homemade yogurt. You'll be thrilled with how much money you'll save vs. buying regular or Greek yogurt from the store!

Yogurt is one of my very favorite ingredients. It's super versatile and can be used in both sweet and savory preparations. I love eating it plain, lightly sweetened, as the base of a parfait, or blended into smoothies.
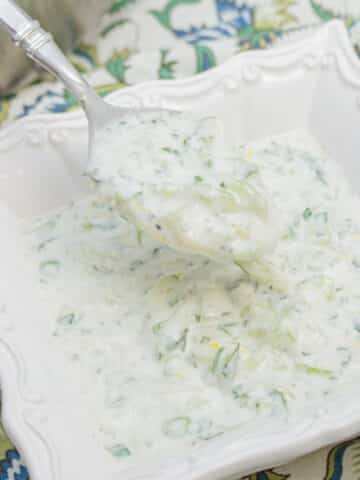
I use homemade yogurt in lots of recipes here on Big Flavors like these stuffed peppadews, our very favorite deviled eggs without mayo, these quick & easy samoa cereal bowls, and this party favorite buffalo chickpea dip. It's also the key part of Persian mast-o-khiar and Indian raita.
Jump to:

🧡 Why we love this recipe
- You have control over the quality of ingredients.
- An entire gallon of yogurt only requires a gallon of milk and a little bit of yogurt from your last batch (or from the store if it's your first time) and a few hours of mostly unattended time.
- If you use or enjoy yogurt often, making your own is much more budget-friendly than buying it from the store.
- It's easy to make thicker, Greek-style yogurt once your Instant Pot yogurt is ready.
📝 Ingredients and supplies
Here's everything you need to make your own homemade Instant Pot yogurt (see recipe card below for ingredient amounts and full directions):
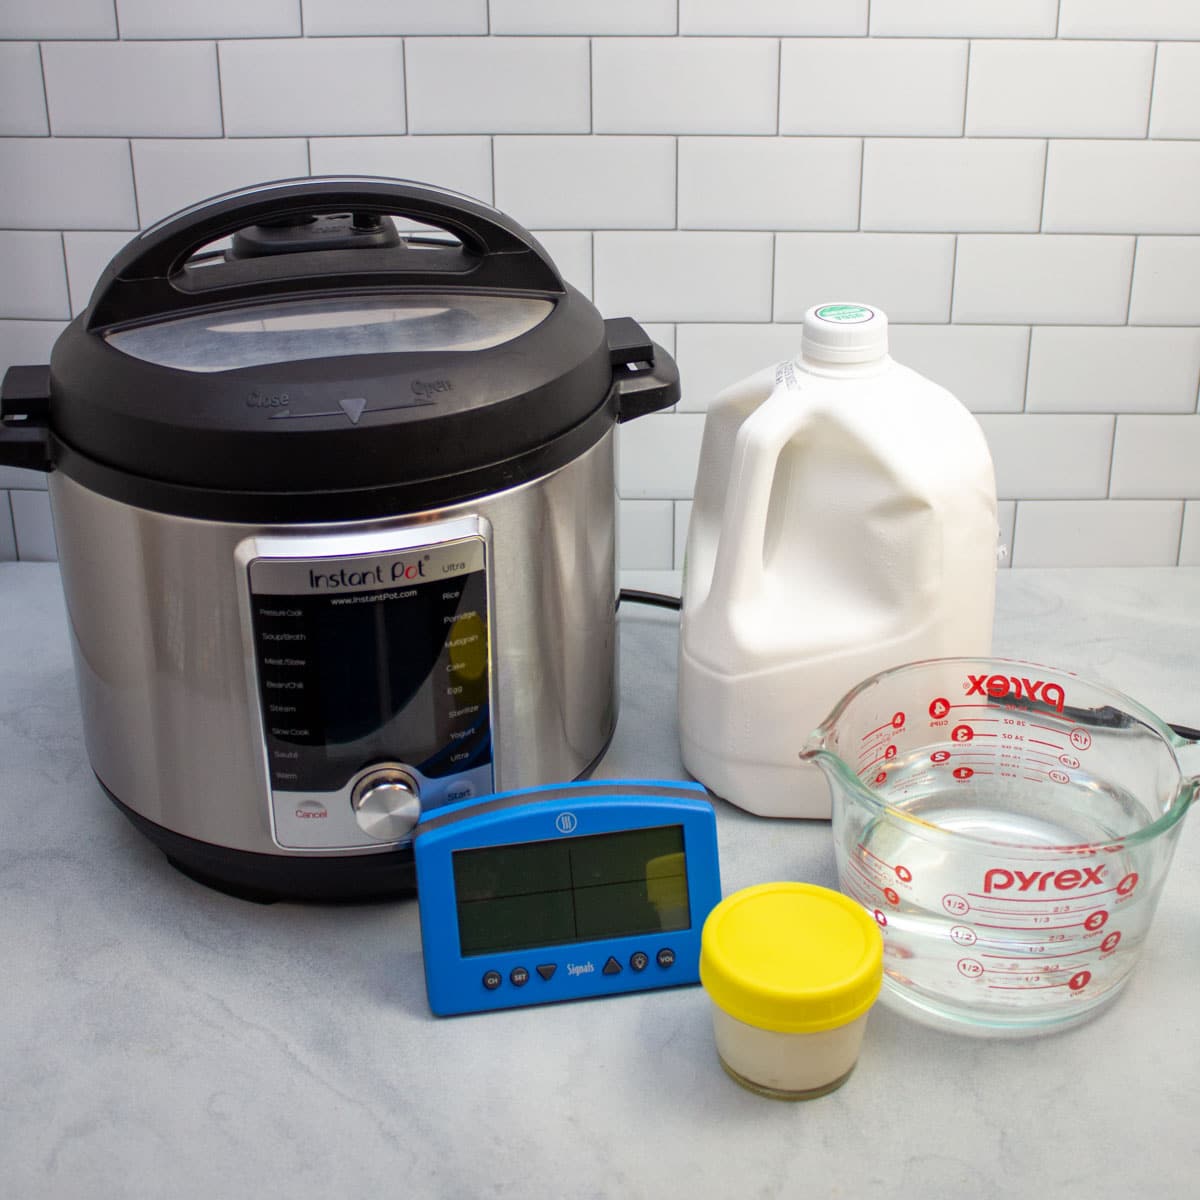
You only need two ingredients to make homemade yogurt - milk and a little bit of yogurt from your last batch to act as a "starter".
If this is your first time making yogurt, you can use some of your favorite store-bought yogurt to get things going. Then get into the habit of reserving a little of the homemade yogurt from each batch to start off the next one. Your only cost for each batch after that point is milk!
Make sure the yogurt you use as a starter has live and active cultures listed in the ingredients - some examples that you may see on labels are lactobacillus bulgaricus and streptococcus thermophilus. Most of the yogurt in stores does contain these, but double-check the label before you get going.

In addition to an Instant Pot that has the "yogurt" mode as an option, you'll also need:
- Water - for sterilizing the pot.
- A thermometer - for monitoring the temperature of your milk. An instant-read thermometer like the Thermapen is perfect here, as you'll get a super quick reading. You can also use a less expensive instant-read thermometer. I like using my Thermoworks Signals multi-probe thermometer because I can monitor the temperature through an app while it cools without having to go back and forth to the kitchen.
- Whisk
- A lid, plastic wrap, or beeswax wrap to cover your yogurt while it chills in the refrigerator. I like using this silicone lid.
- A ladle or big spoon is helpful if you plan to transfer your yogurt into smaller jars after it's ready.


✅ How to make this recipe
- Sterilize your Instant Pot insert.
- Warm the milk to between 180-185°F.
- Cool the milk to between 110-95°F.
- Whisk in yogurt starter.
- Incubate for 8-10 hours.
- Refrigerate at least 6 hours (preferably overnight).
See recipe card below for full instructions.


📌 Tips for yogurt-making success
I've been making yogurt with this method for several years now. Here are some of my biggest tips:
- This process works with any Instant Pot that includes the Yogurt function, such as the Instant Pot Ultra, which is what I've used for several years now.
- Make sure the yogurt you use as a starter has live and active cultures listed in the ingredients - some examples that you may see on labels are lactobacillus bulgaricus and streptococcus thermophilus.
- I like to use mini silicone oven mitts to get a good grip on the Instant Pot insert when removing it from the base while it's hot.


- My preference is to use a multi-probe thermometer, attached with a pot clip, when making yogurt. You can let it monitor the temperature for you so you don't need to go back and forth to keep checking on it. A Thermapen would also be a great choice. I used a less expensive instant-read thermometer for many years and it worked well, but having the app monitor temps while I go about my day is a lot less work.
- Oftentimes, a skin will form on top of the milk as it cools. You can remove this whenever you go to check on the temperature or whisk the milk. Leaving it in there won't hurt things, but it could cause some lumps in your final yogurt.
- You can add a little of the warm milk to your reserved starter yogurt and whisk it together to help fully incorporate it more easily before whisking it into the full pot of milk.
- The time for reaching specific temperatures can vary depending on several things. Most of the time is hands-off, but the process does take some time to complete. You can speed up the cooling process by using an ice bath, but the milk will still take a while to come down to the range that it needs to be in before you start incubating it.


- After the overnight refrigeration, reserve about ¼ cup of your batch of yogurt in a glass jar to use the next time you go to make yogurt. If you save a little of each batch, the only cost for each new batch is the milk (and some time).
- For a smaller batch of yogurt, use a half gallon of milk and 2 tablespoons of yogurt starter. Follow the same process. The only difference is that the milk will reach the various temperatures more easily since there's less liquid to heat/cool.
- I bought a silicone lid for my Instant Pot insert years ago and love it! It's perfect for sealing the contents before popping it into the refrigerator.

💡 Ways to use the strained yogurt liquid (whey)
Don't throw out the liquid that drains out of your yogurt if you strain it to make Greek-style yogurt. It can be used in lots of ways! Just pour the collected liquid into a jar and stash it in the fridge.
Whey can be used:
- As an egg white replacement in cocktail recipes. Swap each egg white for 1 ounce of the reserved whey. Here's a list of egg white cocktail options that you can try over on The Spruce.
- In pancakes - I've read that this can be used in place of buttermilk but haven't personally tried it yet. I'll report back when I do. This recipe from Homa Dashtaki over on NPR looks like a great one to try out!

🍴 Variations and flavored yogurt
This method is strictly for making plain, unflavored yogurt. You can't safely introduce flavorings or additives during the process if you want it to turn out properly. You can, however, add flavors afterward!
- Sweetened yogurt can be made with your favorite sweetener. Just stir them up or whisk them well to combine. This works best with liquid options like agave, honey, and maple syrup.
- For vanilla yogurt, mix in vanilla bean paste or vanilla extract and your preferred sweetener (if desired) to taste.
- For flavored yogurts, you can stir in your favorite fruit preserves. You can also blend fresh fruit into the plain yogurt. If you prefer the "fruit on the bottom" style of yogurt, spoon that onto the bottom of your bowl or jar before topping with yogurt.
I find that homemade yogurt tastes best when using whole milk. You can absolutely make this with lower-fat milk. The texture may be a bit looser, and the flavor won't be as rich.
This yogurt-making method does not work with plant-based or dairy-free milk.

🍽️ Favorite ways to use homemade yogurt
My family eats a lot of yogurt. I usually strain about half of the batch so we have both regular and Greek-style on hand in the refrigerator at all times.
Ways we use our homemade yogurt:
- In place of sour cream on tacos, taquitos, nachos, baked potatoes, or pierogi.
- Mixed with lime zest and juice to make crema for lots of Mexican-inspired dishes.
Some favorite parfait combos:
- Fresh fruit and granola or nuts with honey - whatever we have on hand!
- A chunky monkey yogurt parfait spin on a favorite ice cream flavor with dark chocolate and banana chips.
- This fun Persian parfait with dried fruit and roses.
- A tropical fruit and chocolate combo.
- This Girl Scout cookie-inspired samoa parfait.
- Pie-spiced granola parfaits
Looking for some recipes to use up some of your homemade yogurt stash? Here are some of our favorites:


You can also check out this collection for more of our favorite yogurt recipes.
Doing some online shopping? Check out my Amazon shop page for recommendations!
📖 Recipe
Homemade Instant Pot Yogurt
Instructions
- Sterilize the Instant Pot: Place 3 cups of cold water into the insert of your Instant Pot. Close and lock the lid and steam vent. Select the sterilize function. Set the temperature to low. Adjust the time to 5 minutes and press start. For a gallon of milk, this usually takes around 30 minutes.
- Once the cycle has finished, quick release the pressure and carefully remove the insert from the base. Pour the hot water out and let the insert cool. You can speed this process up by transferring it to the refrigerator, once it's cool to the touch, for at least 10 minutes.
- Pour milk into the sanitized and chilled Instant Pot insert. Close and lock the lid and steam vent. Select the yogurt function. Set the temperature to high and press start. The display should say boil. For a gallon of milk, this usually takes around 45 minutes.
- Once the cycle finishes, the display will say yogt. Remove the lid and whisk the milk. Check the temperature with an instant-read thermometer. It should be between 180-185°F. If it's not quite there yet (it often isn't), select the sauté function and adjust the temperature to high. Whisk the milk and keep checking the temperature until it hits 180°F.
- Turn the Instant Pot off and transfer the insert to the counter (with a wire rack, if you have one). Let the milk cool until the temperature is between 110-95°F. The display should say boil. For a gallon of milk, this usually takes around 90 minutes.
- Whisk in your reserved starter yogurt into the milk and place the insert back into the Instant Pot base. Select the yogurt function and adjust the heat to normal. Adjust to your desired time (8 hours for regular, 10 for a more tart flavor) and hit start.
- After the incubation cycle is finished, carefully remove the insert from the base and cover it with a lid, plastic wrap, or beeswax wrap. DO NOT STIR! Transfer to the refrigerator for at least 6 hours (I usually let it stay overnight).
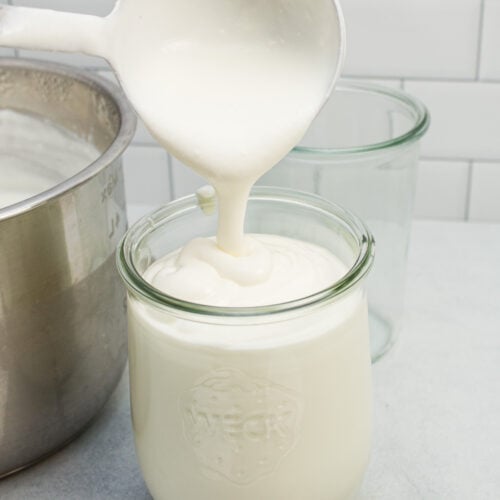
- After the yogurt has chilled, it's ready to eat! Reserve ¼ cup of your yogurt for your next batch of yogurt. Transfer your yogurt into jars or other containers, if desired.
- If you want to make some thicker, Greek-style yogurt, you can strain some or all of your homemade yogurt using a strainer lined with cheesecloth over a bowl or a reusable mesh bag for 2 hours, or until it reaches your desired consistency.
Notes
- This process works with any Instant Pot that includes the Yogurt function, such as the Instant Pot Ultra, which is what I've used for several years now.
- Make sure the yogurt you use as a starter has live and active cultures listed in the ingredients - some examples that you may see on labels are lactobacillus bulgaricus and streptococcus thermophilus.
- I like to use mini silicone oven mitts to get a good grip on the Instant Pot insert when removing it from the base while it's hot.
- My preference is to use a multi-probe thermometer, attached with a pot clip, when making yogurt. You can let it monitor the temperature for you so you don't need to go back and forth to keep checking on it. I used an instant-read thermometer for many years and it worked well, but this is a lot less work. You can read more about my favorite digital thermometers in the post above.
- Oftentimes, a skin will form on top of the milk as it cools. You can remove this whenever you go to check on the temperature or whisk the milk. Leaving it in there won't hurt things, but it could cause some lumps in your final yogurt.
- You can add a little of the warm milk to your reserved starter yogurt and whisk it together to help fully incorporate it more easily before whisking it into the full pot of milk.
- The time for reaching specific temperatures can vary depending on several things. Most of the time is hands-off, but the process does take some time to complete. You can speed up the cooling process by using an ice bath, but the milk will still take a while to come down to the range that it needs to be in before you start incubating it.
- After the overnight refrigeration, reserve about ¼ cup of your batch of yogurt in a glass jar to use the next time you go to make yogurt. If you save a little of each batch, the only cost for each new batch is the milk (and some time).
- For a smaller batch of yogurt, use a half gallon of milk and 2 tablespoons of yogurt starter. Follow the same process. The only difference is that the milk will reach the various temperatures more easily since there's less liquid to heat/cool.
- I bought a silicone lid for my Instant Pot insert years ago and love it! It's perfect for sealing the contents before popping it into the refrigerator.
- Don't throw out the liquid that drains out of your yogurt if you strain it to make Greek-style yogurt. It can be used in lots of ways! See my post above for more!
- Note that nutrition calculation for this recipe uses reduced fat milk.


Comments
No Comments